Spring Angular文件上传
在本节中,我们将创建一个File Upload Web应用程序。该申请包括注册表。在这种集成中,我们使用Spring处理后端部分,使用Angular处理前端部分。
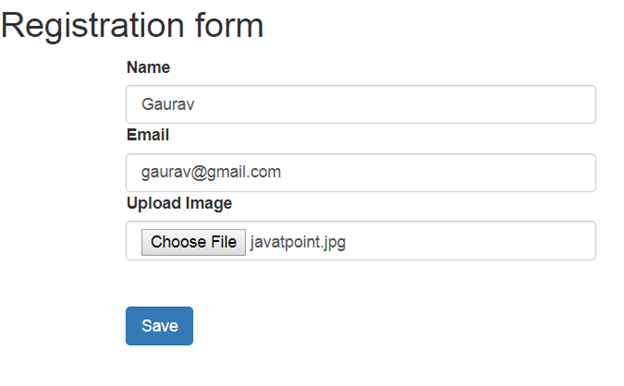
工作应用程序
一旦我们将应用程序部署到服务器上,就会生成一个注册页面。
用户可以填写所需的信息并上传图片。
请记住,图像大小不得超过1 MB。
要使用的工具
使用任何IDE来开发Spring和Hibernate项目。可能是MyEclipse/Eclipse/Netbeans。在这里,我们正在使用Eclipse。
用于数据库的MySQL。
使用任何IDE来开发Angular项目。它可能是Visual Studio代码/Sublime。在这里,我们正在使用Visual Studio Code。
服务器: Apache Tomcat/JBoss/Glassfish/Weblogic/Websphere。
我们使用的技术
在这里,我们使用以下技术:
Spring5
Hibernate5
Angular6
MYSQL
创建数据库
让我们创建数据库
fileuploadexample 。无需创建表,因为Hibernate会自动创建它。
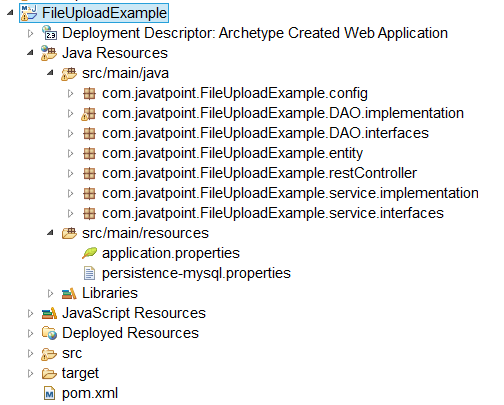
Spring模块
让我们看看我们需要遵循的Spring目录结构:
要开发文件上传应用程序,请执行以下步骤: -
将依赖项添加到pom.xml文件。
pom.xml
<project xmlns="http://maven.apache.org/POM/4.0.0" xmlns:xsi="http://www.w3.org/2001/XMLSchema-instance"
  xsi:schemaLocation="http://maven.apache.org/POM/4.0.0 http://maven.apache.org/maven-v4_0_0.xsd">
  <modelVersion>4.0.0</modelVersion>
  <groupId>com.lidihuo</groupId>
  <artifactId>FileUploadExample</artifactId>
  <packaging>war</packaging>
  <version>0.0.1-SNAPSHOT</version>
  <name>FileUploadExample Maven Webapp</name>
  <url>http://maven.apache.org</url>

  <properties>
		<springframework.version>5.0.6.RELEASE</springframework.version>
		<hibernate.version>5.2.16.Final</hibernate.version>
		<mysql.connector.version>5.1.45</mysql.connector.version>
		<c3po.version>0.9.5.2</c3po.version>
		<maven.compiler.source>1.8</maven.compiler.source>
		<maven.compiler.target>1.8</maven.compiler.target>
	</properties>


  <dependencies>

   <!-- Spring -->
	<dependency>
		<groupId>org.springframework</groupId>
		<artifactId>spring-webmvc</artifactId>
		<version>${springframework.version}</version>
	</dependency>
	<dependency>
		<groupId>org.springframework</groupId>
		<artifactId>spring-tx</artifactId>
		<version>${springframework.version}</version>
	</dependency>

	<dependency>
		<groupId>org.springframework</groupId>
		<artifactId>spring-orm</artifactId>
		<version>${springframework.version}</version>
	</dependency>
	<!-- Add Jackson for JSON converters -->
	<dependency>
		<groupId>com.fasterxml.jackson.core</groupId>
		<artifactId>jackson-databind</artifactId>
		<version>2.9.5</version>
	</dependency>
	<!-- Hibernate -->
	<dependency>
		<groupId>org.hibernate</groupId>
		<artifactId>hibernate-core</artifactId>
		<version>${hibernate.version}</version>
	</dependency>
	<!-- MySQL -->
	<dependency>
		<groupId>mysql</groupId>
		<artifactId>mysql-connector-java</artifactId>
		<version>${mysql.connector.version}</version>
	</dependency>
	<!-- C3PO -->
	<dependency>
		<groupId>com.mchange</groupId>
		<artifactId>c3p0</artifactId>
		<version>${c3po.version}</version>
	</dependency>
	<!-- Servlet+JSP+JSTL -->
	<dependency>
		<groupId>javax.servlet</groupId>
		<artifactId>javax.servlet-api</artifactId>
		<version>3.1.0</version>
	</dependency>
	<dependency>
		<groupId>javax.servlet.jsp</groupId>
		<artifactId>javax.servlet.jsp-api</artifactId>
		<version>2.3.1</version>
	</dependency>
	<dependency>
		<groupId>javax.servlet</groupId>
		<artifactId>jstl</artifactId>
		<version>1.2</version>
	</dependency>
	<!-- to compensate for java 9 not including jaxb -->
	<dependency>
		<groupId>javax.xml.bind</groupId>
		<artifactId>jaxb-api</artifactId>
		<version>2.3.0</version>
	</dependency>

 	<!--  JUnit dependency -->
    <dependency>
        <groupId>junit</groupId>
        <artifactId>junit</artifactId>
        <version>3.8.1</version>
        <scope>test</scope>
    </dependency>

         <!-- https://mvnrepository.com/artifact/commons-fileupload/commons-fileupload -->
	<dependency>
	    <groupId>commons-fileupload</groupId>
	    <artifactId>commons-fileupload</artifactId>
	    <version>1.3</version>
	</dependency>

	<!-- https://mvnrepository.com/artifact/org.apache.commons/commons-dbcp2 -->
	<dependency>
	    <groupId>org.apache.commons</groupId>
	    <artifactId>commons-dbcp2</artifactId>
	    <version>2.0</version>
	</dependency>


  </dependencies>
  <build>
    <finalName>FileUploadExample</finalName>
  </build>
</project>
创建配置类
我们执行基于注释的配置,而不是XML。因此,我们创建两个类并在其中指定所需的配置。
DemoAppConfig.java
package com.lidihuo.FileUploadExample.config;
import java.beans.PropertyVetoException;
import java.io.IOException;
import java.util.Properties;
import javax.sql.DataSource;
import org.hibernate.SessionFactory;
import org.springframework.beans.factory.annotation.Autowired;
import org.springframework.context.annotation.Bean;
import org.springframework.context.annotation.ComponentScan;
import org.springframework.context.annotation.Configuration;
import org.springframework.context.annotation.PropertySource;
import org.springframework.core.env.Environment;
import org.springframework.orm.hibernate5.HibernateTransactionManager;
import org.springframework.orm.hibernate5.LocalSessionFactoryBean;
import org.springframework.transaction.annotation.EnableTransactionManagement;
import org.springframework.web.multipart.commons.CommonsMultipartResolver;
import org.springframework.web.servlet.config.annotation.EnableWebMvc;
import org.springframework.web.servlet.config.annotation.WebMvcConfigurer;
import com.mchange.v2.c3p0.ComboPooledDataSource;
@Configuration
@EnableWebMvc
@EnableTransactionManagement
@ComponentScan("com.lidihuo.FileUploadExample")
@PropertySource(value = { "classpath:persistence-mysql.properties" })
@PropertySource(value = { "classpath:persistence-mysql.properties" })
@PropertySource(value = { "classpath:application.properties" })
public class DemoAppConfig implements WebMvcConfigurer {

	@Autowired
	private Environment env;

	@Bean
	public DataSource myDataSource() {

		// create connection pool
		ComboPooledDataSource myDataSource = new ComboPooledDataSource();
		// set the jdbc driver
		try {
			myDataSource.setDriverClass("com.mysql.jdbc.Driver");
		}
		catch (PropertyVetoException exc) {
			throw new RuntimeException(exc);
		}

		// set database connection props
		myDataSource.setJdbcUrl(env.getProperty("jdbc.url"));
		myDataSource.setUser(env.getProperty("jdbc.user"));
		myDataSource.setPassword(env.getProperty("jdbc.password"));

		// set connection pool props
		myDataSource.setInitialPoolSize(getIntProperty("connection.pool.initialPoolSize"));
		myDataSource.setMinPoolSize(getIntProperty("connection.pool.minPoolSize"));
		myDataSource.setMaxPoolSize(getIntProperty("connection.pool.maxPoolSize"));
		myDataSource.setMaxIdleTime(getIntProperty("connection.pool.maxIdleTime"));
		return myDataSource;
	}

	private Properties getHibernateProperties() {
		// set hibernate properties
		Properties props = new Properties();
		props.setProperty("hibernate.dialect", env.getProperty("hibernate.dialect"));
		props.setProperty("hibernate.show_sql", env.getProperty("hibernate.show_sql"));
		props.setProperty("hibernate.format_sql", env.getProperty("hibernate.format_sql"));
		props.setProperty("hibernate.hbm2ddl.auto", env.getProperty("hibernate.hbm2ddl"));
		return props;
	}

	// need a helper method
	// read environment property and convert to int

	private int getIntProperty(String propName) {

		String propVal = env.getProperty(propName);

		// now convert to int
		int intPropVal = Integer.parseInt(propVal);
		return intPropVal;
	}

	@Bean
	public LocalSessionFactoryBean sessionFactory(){

		// create session factorys
		LocalSessionFactoryBean sessionFactory = new LocalSessionFactoryBean();

		// set the properties
		sessionFactory.setDataSource(myDataSource());
		sessionFactory.setPackagesToScan(env.getProperty("hibernate.packagesToScan"));
		sessionFactory.setHibernateProperties(getHibernateProperties());

		return sessionFactory;
	}

	@Bean
	@Autowired
	public HibernateTransactionManager transactionManager(SessionFactory sessionFactory) {

		// setup transaction manager based on session factory
		HibernateTransactionManager txManager = new HibernateTransactionManager();
		txManager.setSessionFactory(sessionFactory);
		return txManager;
	}

	@Bean(name="multipartResolver")
    public CommonsMultipartResolver getResolver() throws IOException{
        CommonsMultipartResolver resolver = new CommonsMultipartResolver();

        //Set the maximum allowed size (in bytes) for each individual file.
       // resolver.setMaxUploadSize(5242880);//5MB

        resolver.setMaxUploadSize(524288);//0.5MB

        //You may also set other available properties.
        return resolver;
    }

}
MySpringMvcDispatcherServletInitializer.java
package com.lidihuo.FileUploadExample.config;
import org.springframework.web.servlet.support.AbstractAnnotationConfigDispatcherServletInitializer;
public class MySpringMvcDispatcherServletInitializer extends AbstractAnnotationConfigDispatcherServletInitializer {
	@Override
	protected Class<?>[] getRootConfigClasses() {
		// TOdo Auto-generated method stub
		return null;
	}
	@Override
	protected Class<?>[] getServletConfigClasses() {
		return new Class[] { DemoAppConfig.class };
	}
	@Override
	protected String[] getServletMappings() {
		return new String[] { "/" };
	}
}
创建实体类
在这里,我们将创建一个Entity/POJO(普通的旧Java对象)类。
UserDetail.java
package com.lidihuo.FileUploadExample.entity;
import javax.persistence.Column;
import javax.persistence.Entity;
import javax.persistence.GeneratedValue;
import javax.persistence.GenerationType;
import javax.persistence.Id;
import javax.persistence.Table;
@Entity
@Table(name="user_detail")
public class UserDetail {

	@Id
	@GeneratedValue(strategy=GenerationType.AUTO)
	@Column(name="user_id")
	private int userId;

	@Column(name="email_id")
	public String emailId;

	@Column(name="name")
	public String name;

	@Column(name="profile_image")
	public String profileImage;

	public UserDetail() { }
	public UserDetail(int userId, String emailId, String name, String profileImage) {
		super();
		this.userId = userId;
		this.emailId = emailId;
		this.name = name;
		this.profileImage = profileImage;
	}
	public int getUserId() {
		return userId;
	}
	public void setUserId(int userId) {
		this.userId = userId;
	}
	public String getEmailId() {
		return emailId;
	}
	public void setEmailId(String emailId) {
		this.emailId = emailId;
	}
	public String getName() {
		return name;
	}
	public void setName(String name) {
		this.name = name;
	}
	public String getProfileImage() {
		return profileImage;
	}
	public void setProfileImage(String profileImage) {
		this.profileImage = profileImage;
	}
	@Override
	public String toString() {
		return "UserDetail [userId=" + userId + ", emailId=" + emailId + ", name=" + name + ", profileImage="
				+ profileImage + "]";
	}

}
创建DAO接口
在这里,我们正在创建DAO接口以执行与数据库相关的操作。
UserDAO.java
package com.lidihuo.FileUploadExample.DAO.interfaces;
import com.lidihuo.FileUploadExample.entity.UserDetail;
public interface UserDAO {

	public int saveUser(UserDetail userDetail);

	public UserDetail getUserDetail(int userId);

	public int updateProfileImage(String profileImage , int userID);

}
创建DAO接口实现类
UserDAOImpl.java
package com.lidihuo.FileUploadExample.DAO.implementation;
import org.hibernate.Session;
import org.hibernate.SessionFactory;
import org.hibernate.query.Query;
import org.springframework.beans.factory.annotation.Autowired;
import org.springframework.stereotype.Repository;
import com.lidihuo.FileUploadExample.DAO.interfaces.UserDAO;
import com.lidihuo.FileUploadExample.entity.UserDetail;
@Repository("userDAO")
public class UserDAOImpl implements UserDAO {
	@Autowired
	SessionFactory sessionFactory;

	public int saveUser(UserDetail userDetail) {

		Session session = null;
		try
		{
			session = sessionFactory.getCurrentSession();
			int status = (Integer) session.save(userDetail);
			return status;
		}
		catch(Exception exception)
		{
			System.out.println("Exception in saving data into the database" + exception);
			return 0;
		}
		finally
		{
			session.flush();
		}
	}
	public UserDetail getUserDetail(int userId) {
		Session session = null;
		try
		{
			session = sessionFactory.getCurrentSession();
			UserDetail userDetail = session.get(UserDetail.class, userId);
			return userDetail;
		}
		catch(Exception exception)
		{
			System.out.println("Exception in saving data into the database " + exception);
			return null;
		}
		finally
		{
			session.flush();
		}
	}
	public int updateProfileImage(String profileImage, int userID) {
		Session session= sessionFactory.getCurrentSession();
		int result;

		try
		{
			Query<UserDetail> query = session.createQuery("update UserDetail set profileImage = :profileImage where userId=:userID ");
			query.setParameter("profileImage", profileImage);
			query.setParameter("userID", userID);
			result = query.executeUpdate();
			if(result > 0)
			{
				return result;
			}
			else return -5;
		}
		catch(Exception exception)
		{
			System.out.println("Error while updating profileImage from DAO :: " + exception.getMessage());
			return -5;
		}
		finally
		{
			session.flush();
		}


	}
}
创建服务层接口
在这里,我们正在创建一个服务层接口,充当DAO和实体类之间的桥梁。
UserService.java
package com.lidihuo.FileUploadExample.service.interfaces;
import javax.servlet.http.HttpSession;
import org.springframework.web.multipart.MultipartFile;
import com.lidihuo.FileUploadExample.entity.UserDetail;
public interface UserService {

	public int saveUser(UserDetail userDetail);

	public UserDetail getUserDetail(int userId);

	public int store(MultipartFile file, int userID ,  HttpSession session);


}
创建服务层实现类
UserServiceImpl.java
package com.lidihuo.FileUploadExample.service.implementation;
import java.nio.file.Files;
import java.nio.file.Path;
import java.nio.file.Paths;
import javax.servlet.http.HttpSession;
import javax.transaction.Transactional;
import org.springframework.beans.factory.annotation.Autowired;
import org.springframework.stereotype.Service;
import org.springframework.web.multipart.MultipartFile;
import com.lidihuo.FileUploadExample.DAO.interfaces.UserDAO;
import com.lidihuo.FileUploadExample.entity.UserDetail;
import com.lidihuo.FileUploadExample.service.interfaces.UserService;
@Service("userService")
public class UserServiceImpl implements UserService {
	@Autowired
	private UserDAO userDAO;

	@Transactional
	public int saveUser(UserDetail userDetail) {
		return userDAO.saveUser(userDetail);
	}

	@Transactional
	public UserDetail getUserDetail(int userId) {
		return userDAO.getUserDetail(userId);
	}
	@Transactional
	public int store(MultipartFile file, int userID, HttpSession session) {

		Path rootLocation = Paths.get(session.getServletContext().getRealPath("/resources/images"));

		System.out.println("rootLocation  ==  " + rootLocation);

		UserDetail userDetail = this.getUserDetail(userID);

		 String nameExtension[] = file.getContentType().split("/");
		 String profileImage = userID + "." + nameExtension[1];

		 System.out.println("ProfileImage  :: " + profileImage);

		 if(userDetail.getUserId() > 0 )
		 {

			if(userDetail.getProfileImage() == null || userDetail.getProfileImage() == " " || userDetail.getProfileImage() == "" )
			{
				try
				{
					Files.copy(file.getInputStream(),rootLocation.resolve(profileImage));
					int result = userDAO.updateProfileImage(profileImage, userID);
					if(result > 0)
						return result;
					else
						return -5;
				}
				catch(Exception exception)
				{
					System.out.println("error while uploading image catch:: " + exception.getMessage());
					return -5;
				}
			}
			else
			{
				try
				{
					//Files.delete(rootLocation.resolve(profileImage));

					Files.delete(rootLocation.resolve(userDetail.getProfileImage()));

					Files.copy(file.getInputStream(),rootLocation.resolve(profileImage));
					int result = userDAO.updateProfileImage(profileImage, userID);
					if(result > 0)
						return result;
					else
						return -5;
				}
				catch(Exception exception)
				{
					System.out.println("Error while uploading image when image is already Exists :: " + exception.getMessage());
					return -5;
				}
			}
		}
		else {
			return 0;
		}
	}

}
创建控制器类
UserController.java
package com.lidihuo.FileUploadExample.restController;
import javax.servlet.http.HttpSession;
import org.springframework.beans.factory.annotation.Autowired;
import org.springframework.web.bind.annotation.CrossOrigin;
import org.springframework.web.bind.annotation.PathVariable;
import org.springframework.web.bind.annotation.PostMapping;
import org.springframework.web.bind.annotation.RequestBody;
import org.springframework.web.bind.annotation.RequestMapping;
import org.springframework.web.bind.annotation.RequestParam;
import org.springframework.web.bind.annotation.RestController;
import org.springframework.web.multipart.MultipartFile;
import com.lidihuo.FileUploadExample.entity.UserDetail;
import com.lidihuo.FileUploadExample.service.interfaces.UserService;
@RestController
@RequestMapping("/api")
@CrossOrigin(origins = "http://localhost:4200", allowedHeaders = "*")
public class UserController {

	@Autowired
	private UserService userService;

	@PostMapping("/saveUser")
	public int saveUser(@RequestBody UserDetail userDetail)
	{
		return userService.saveUser(userDetail);
	}

	@PostMapping("/uploadImage/{userId}")
	public int handleFileUpload(@PathVariable int userId , @RequestParam("file") MultipartFile file, HttpSession session) {
		return userService.store(file, userId, session);
	}

}
创建属性文件
在这里,我们正在项目的 src/main/resources 内部创建属性文件。
application.properties
spring.http.multipart.max-file-size=1024KB
spring.http.multipart.max-request-size=1024KB
persistence-mysql.properties
#
# JDBC connection properties
#
jdbc.driver=com.mysql.jdbc.Driver
jdbc.url=jdbc:mysql://localhost:3306/fileuploadexample?useSSL=false
jdbc.user=root
jdbc.password=
#
# Connection pool properties
#
connection.pool.initialPoolSize=5
connection.pool.minPoolSize=5
connection.pool.maxPoolSize=20
connection.pool.maxIdleTime=3000
#
# Hibernate properties
#
<!-- hibernate.dialect=org.hibernate.dialect.MySQLDialect -->
hibernate.dialect=org.hibernate.dialect.MySQL5Dialect
hibernate.show_sql=true
hibernate.format_sql=true
hibernate.hbm2ddl=update
hibernate.packagesToScan=com.lidihuo.FileUploadExample.entity
Angular模块
让我们看一下我们需要遵循的Angular目录结构:
 创建一个Angular项目
让我们使用以下命令创建Angular项目:
ng新的FileUploadExample
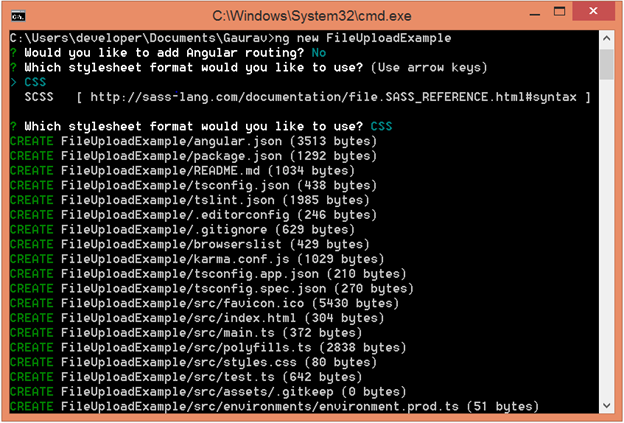
这里,
FileUploadExample 是项目的名称。
安装Bootstrap CSS框架
使用以下命令在项目中安装引导程序。
npm install bootstrap@3.3.7 --save
现在,在style.css文件中包含以下代码。
@import "~bootstrap/dist/css/bootstrap.css";
生成组件
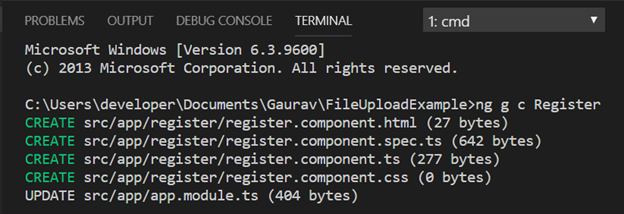
在Visual Studio中打开项目,然后使用以下命令生成Angular组件:
ng g c Register
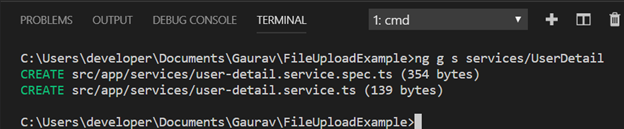
我们还通过使用以下命令: -
ng gs services/UserDetail
 编辑 app.module.ts 文件 导入ReactiveFormsModule -在这里,我们将导入 ReactiveFormsModule 用于反应形式,并在imports数组中指定它。 导入HttpModule -在这里,我们将为服务器请求导入 HttpModule ,并在imports数组中指定它。 注册服务类-在这里,我们在提供者的数组中提到了服务类。
import { BrowserModule } from '@angular/platform-browser';
import { NgModule } from '@angular/core';
// import ReactiveFormsModule for reactive form
import { ReactiveFormsModule } from '@angular/forms';
import { AppComponent } from './app.component';
import { RegisterComponent } from './register/register.component';
import { HttpModule } from '@angular/http';
@NgModule({
  declarations: [
    AppComponent,
    RegisterComponent
  ],
  imports: [
    BrowserModule,
    ReactiveFormsModule,
    HttpModule
  ],
  providers: [],
  bootstrap: [AppComponent]
})
export class AppModule { }
编辑 app.component.html 文件
<app-register></app-register>
创建 UserDetail.ts 类
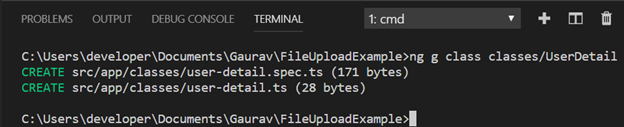
让我们使用以下命令创建一个类: -
ng g类class/UserDetail
现在,在
UserDetail 类中指定必填字段。
export class UserDetail {
    emailId : string;
    name : string;
    profileImage : string;
}
此类的目的是将指定的字段与Spring实体类的字段进行映射。
编辑 user-detail.service.ts 文件
import { Injectable } from '@angular/core';
import { UserDetail } from '../classes/user-detail';
import { Observable } from 'rxjs';
import { Http, RequestOptions , Headers } from '@angular/http';
@Injectable({
  providedIn: 'root'
})
export class UserDetailService {
  // Base URL
  private  baseUrl = "http://localhost:8080/FileUploadExample/api/";
  constructor(private http: Http) { }
  saveData(userDetail : UserDetail) : Observable<any>
  {
      let url = this.baseUrl + "saveUser";
      return this.http.post(url,userDetail);
  }
  uploadFile( file: File , id : number ) : Observable<any>
  {
    let url = this.baseUrl + "uploadImage/" + id ;
    const formdata: FormData = new FormData();

    formdata.append('file', file);

    return this.http.post(url , formdata);
  }
}
编辑 register.component.ts 文件
import { Component, OnInit } from '@angular/core';
import { FormGroup, FormControl, Validators } from '@angular/forms';
import { UserDetail } from '../classes/user-detail';
import { UserDetailService } from '../services/user-detail.service';
import { jsonpFactory } from '@angular/http/src/http_module';
@Component({
  selector: 'app-register',
  templateUrl: './register.component.html',
  styleUrls: ['./register.component.css']
})
export class RegisterComponent implements OnInit {
  selectedFiles: FileList;
  currentFileUpload: File;
  private userDetail = new UserDetail();

  constructor(private userDetailService : UserDetailService) { }
  ngOnInit() {
  }
  selectFile(event) {
    const file = event.target.files.item(0);

    if (file.type.match('image.*')) {
      var size = event.target.files[0].size;
      if(size > 1000000)
      {
          alert("size must not exceeds 1 MB");
          this.form.get('profileImage').setValue("");
      }
      else
      {
        this.selectedFiles = event.target.files;
      }
    } else {
      alert('invalid format!');
    }
  }
  // create the form object.
  form = new FormGroup({
    fullName : new FormControl('' , Validators.required),
    email : new FormControl('' , Validators.required),
    profileImage : new FormControl()
  });
  AdminForm(AdminInformation)
  {
    this.userDetail.name = this.FullName.value;
    this.userDetail.emailId = this.Email.value;
    console.log(this.userDetail);
    this.userDetailService.saveData(this.userDetail).subscribe(
      response => {
          let result = response.json();
          console.log(result);
          if(result > 0 )
          {
            if(this.selectedFiles != null)
            {
              this.currentFileUpload = this.selectedFiles.item(0);
              console.log(this.currentFileUpload);
              this.userDetailService.uploadFile(this.currentFileUpload , result).subscribe(
                  res => {
                    let re = res.json();
                     if(re > 0)
                     {
                        alert("file upload successfully ");
                        this.form.get('fullName').setValue("");
                        this.form.get('email').setValue("");
                        this.form.get('profileImage').setValue("");
                     }
                     else{
                        alert("error while uploading fie details");
                     }
                  },
                  err => {
                      alert("error while uploading fie details");
                  }
              );
            }
          }
      },
      error => {
        console.log("error while saving data in the DB");
      }
    );
  }
    get FullName(){
      return this.form.get('fullName');
    }
    get Email(){
        return this.form.get('email');
    }

}
编辑 register.component.html 文件
<h2>Registration form</h2>
<form [formGroup]="form" #AdminInformation (ngSubmit)="AdminForm(AdminInformation)">
  <div class="row">
    <div class=" col-md-offset-1 col-md-4">
        <label for="fullName"> Name </label>
        <input formControlName="fullName" class="form-control" type="text">
    </div>
  </div>
  <div class="row">
    <div class=" col-md-offset-1 col-md-4">
        <label for="email"> Email </label>
        <input formControlName="email" class="form-control" type="text">
    </div>
  </div>

  <div class="row">
    <div class=" col-md-offset-1 col-md-4">

      <label for="profileImage">Upload Image</label>
        <input formControlName="profileImage" class="form-control" type="file" (change)="selectFile($event)">
    </div>
  </div>
  <div class="row" style="margin-top: 40px;">
    <div class="col-md-offset-1 col-md-4">
        <button class="btn btn-md btn-primary btn-style"  >Save</button>
    </div>
  </div>
</form>
完成后,在网站上提供URL http: //localhost: 4200/浏览器。出现以下网页:
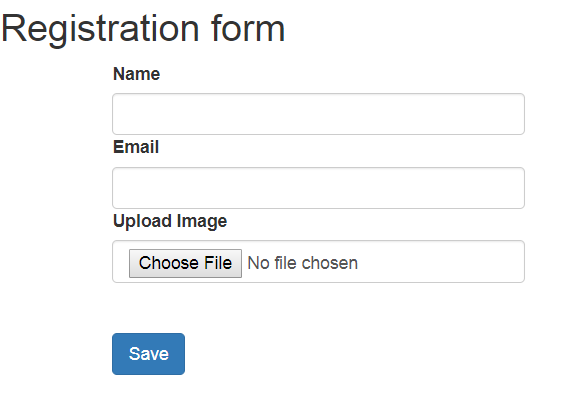
现在,我们可以填写所需的信息并选择需要上传的文件。