CXF 与 JAX-WS
在这个 JAX-WS 应用程序中,我们将像早期的 POJO 应用程序一样使用 Apache CXF 优先的方法。因此,首先我们将为我们的网络服务创建一个接口。
声明服务接口
和前面的例子一样,我们将创建一个简单的服务,它只有一个名为 greetings 的接口方法。服务接口的代码如下所示-
//HelloWorld.java
package com.lidihuo.cxf.jaxws.helloworld;
import javax.jws.WebService;
@WebService
public interface HelloWorld {
   String greetings(String text);
}
我们使用
@WebService 标记注释接口。接下来,我们将实现这个接口。
实现网络界面
Web 界面的实现如下所示-
//HelloWorldImpl.java
package com.lidihuo.cxf.jaxws.helloworld;
public class HelloWorldImpl implements HelloWorld {
   @Override
   public String greetings(String name) {
      return ("hi " + name);
   }
}
问候方法使用
@Override 标记进行注释。该方法向调用者返回"hi"消息。
接下来,我们将编写开发服务器的代码。
开发服务器
与 POJO 应用程序不同,我们现在将通过使用 CXF 提供的 Endpoint 类来发布我们的服务来解耦接口。这是在以下两行代码中完成的-
HelloWorld implementor = new HelloWorldImpl();
Endpoint.publish(
   "http://localhost:9090/HelloServerPort",
   implementor,
   new LoggingFeature()
);
publish 方法的第一个参数指定我们的服务可供客户端使用的 URL。第二个参数指定我们服务的实现类。服务器的整个代码如下所示-
//Server.java
package com.lidihuo.cxf.jaxws.helloworld;
import javax.xml.ws.Endpoint;
import org.apache.cxf.ext.logging.LoggingFeature;
public class Server {
   public static void main(String[] args) throws Exception {
      HelloWorld implementor = new HelloWorldImpl();
      Endpoint.publish("http://localhost:9090/HelloServerPort",
      implementor,
      new LoggingFeature());
      System.out.println("Server ready...");
      Thread.sleep(5 * 60 * 1000);
      System.out.println("Server exiting ...");
      System.exit(0);
   }
}
要部署我们的服务器,您需要对您的项目进行更多修改,如下所列。
部署服务器
最后,要部署服务器应用程序,您需要在 pom.xml 中再做一项修改,以将您的应用程序设置为 Web 应用程序。您需要添加到
pom.xml 中的代码如下-
<profiles>
   <profile>
      <id>server</id>
      <build>
         <defaultGoal>test</defaultGoal>
         <plugins>
            <plugin>
               <groupId>org.codehaus.mojo</groupId>
               <artifactId>exec-maven-plugin</artifactId>
               <version>1.6.0</version>
               <executions>
                  <execution>
                     <phase>test</phase>
                     <goals>
                        <goal>java</goal>
                     </goals>
                     <configuration>
                        <mainClass>
                           com.lidihuo.cxf.jaxws.helloworld.Server
                        </mainClass>
                     </configuration>
                  </execution>
               </executions>
            </plugin>
         </plugins>
      </build>
   </profile>
</profiles>
在部署应用程序之前,您需要向项目中添加另外两个文件。这些显示在下面的屏幕截图中-
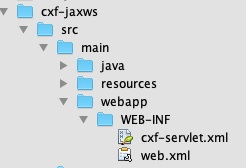
这些文件是定义
CXFServlet 映射的 CXF 标准文件。
web.xml 文件中的代码显示在此处以供您快速参考-
//Web.xml
<?xml version = "1.0" encoding = "UTF-8"??>
<web-app xmlns = "http://java.sun.com/xml/ns/javaee"
xmlns:xsi="http://www.w3.org/2001/XMLSchema-instance" version="2.5"
xsi:schemaLocation = "http://java.sun.com/xml/ns/javaee
http://java.sun.com/xml/ns/javaee/web-app_2_5.xsd">
   <display-name>cxf</display-name>
   <servlet>
      <description>Apache CXF Endpoint</description>
      <display-name>cxf</display-name>
      <servlet-name>cxf</servlet-name>
      <servlet-class>
         org.apache.cxf.transport.servlet.CXFServlet
      </servlet-class>
      <load-on-startup>
         1
      </load-on-startup>
   </servlet>
   <servlet-mapping>
      <servlet-name>
         cxf
      </servlet-name>
      <url-pattern>
         /services/*
      </url-pattern>
   </servlet-mapping>
   <session-config>
      <session-timeout>60</session-timeout>
   </session-config>
</web-app>
在
cxf-servlet.xml, 中,您声明服务端点的属性。这显示在下面的代码片段中-
<beans ...>
   <jaxws:endpoint xmlns:helloworld = "http://lidihuo.com/"
      id = "helloHTTP"
      address = "http://localhost:9090/HelloServerPort"
      serviceName = "helloworld:HelloServiceService"
      endpointName = "helloworld:HelloServicePort">
   </jaxws:endpoint>
</beans>
在这里,我们定义了服务端点的 id、服务可用的地址、服务名称和端点名称。现在,您了解了 CXF servlet 如何路由和处理您的服务。
最终的 pom.xml
pom.xml 包含s 一些更多的依赖。我们没有描述所有的依赖关系,而是在下面包含了 pom.xml 的最终版本-
<?xml version = "1.0" encoding = "UTF-8"??>
<project xmlns = "http://maven.apache.org/POM/4.0.0"
   xmlns:xsi="http://www.w3.org/2001/XMLSchema-instance"
   xsi:schemaLocation = "http://maven.apache.org/POM/4.0.0
   http://maven.apache.org/xsd/maven-4.0.0.xsd">
   <modelVersion>4.0.0</modelVersion>
   <groupId>com.lidihuo</groupId>
   <artifactId>cxf-jaxws</artifactId>
   <version>1.0</version>
   <packaging>jar</packaging>
   <properties>
      <project.build.sourceEncoding>UTF-8</project.build.sourceEncoding>
      <maven.compiler.source>1.8</maven.compiler.source>
      <maven.compiler.target>1.8</maven.compiler.target>
   </properties>
   <profiles>
      <profile>
         <id>server</id>
         <build>
            <defaultGoal>test</defaultGoal>
            <plugins>
               <plugin>
                  <groupId>org.codehaus.mojo</groupId>
                  <artifactId>exec-maven-plugin</artifactId>
                  <version>1.6.0</version>
                  <executions>
                     <execution>
                        <phase>test</phase>
                        <goals>
                           <goal>java</goal>
                        </goals>
                        <configuration>
                           <mainClass>
                              com.lidihuo.cxf.jaxws.helloworld.Server
                           </mainClass>
                        </configuration>
                     </execution>
                  </executions>
               </plugin>
            </plugins>
         </build>
      </profile>
      <profile>
         <id>client</id>
         <build>
            <defaultGoal>test</defaultGoal>
            <plugins>
               <plugin>
                  <groupId>org.codehaus.mojo</groupId>
                  <artifactId>exec-maven-plugin</artifactId>
                  <executions>
                     <execution>
                        <phase>test</phase>
                        <goals>
                           <goal>java</goal>
                        <goals>
                        <configuration>
                           <mainClass>
                              com.lidihuo.cxf.jaxws.helloworld.Client
                           </mainClass>
                        </configuration>
                     </execution>
                  </executions>
               </plugin>
            </plugins>
         </build>
      </profile>
   </profiles>
   <dependencies>
      <dependency>
         <groupId>org.apache.cxf</groupId>
         <artifactId>cxf-rt-frontend-jaxws</artifactId>
         <version>3.3.0</version>
      </dependency>
      <dependency>
         <groupId>org.apache.cxf</groupId>
         <artifactId>cxf-rt-transports-http</artifactId>
         <version>3.3.0</version>
      </dependency>
      <dependency>
         <groupId>org.apache.cxf</groupId>
         <artifactId>cxf-rt-features-logging</artifactId>
         <version>3.3.0</version>
      </dependency>
      <dependency>
         <groupId>org.apache.cxf</groupId>
         <artifactId>cxf-rt-transports-http-jetty</artifactId>
         <version>3.3.0</version>
      </dependency>
   </dependencies>
</project>
请注意,它还包含一个用于构建客户端的配置文件,我们将在本教程的后面部分中学习。
运行 HelloWorld 服务
现在,您已准备好运行网络应用程序。在命令窗口中,使用以下命令运行构建脚本。
您将在控制台上看到以下消息-
INFO: Setting the server's publish address to be http://localhost:9090/HelloServerPort
Server ready…
和之前一样,您可以通过在浏览器中打开服务器 URL 来测试服务器。
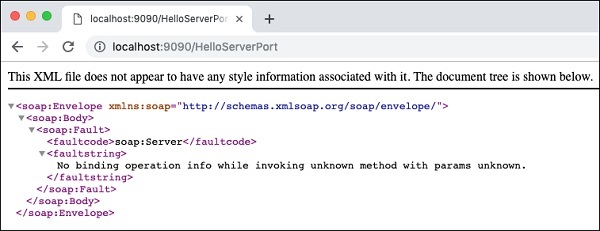
由于我们没有指定任何操作,所以我们的应用程序只会向浏览器返回一条错误消息。
现在,尝试将
?wsdl 添加到您的 URL,您将看到以下输出-

所以我们的服务器应用程序按预期运行。您可以使用前面描述的
Postman 之类的 SOAP 客户端来进一步测试您的服务。
在下一节中,我们将学习如何编写使用我们服务的客户端。
开发客户端
在 CXF 应用程序中编写客户端与编写服务器一样简单。这是客户端的完整代码-
//Client.java
package com.lidihuo.cxf.jaxws.helloworld;
import javax.xml.namespace.QName;
import javax.xml.ws.Service;
import javax.xml.ws.soap.SOAPBinding;
public final class Client {
   private static final QName SERVICE_NAME
   = new QName("http://helloworld.jaxws.cxf.lidihuo.com/",
   "HelloWorld");
   private static final QName PORT_NAME
   = new QName("http://helloworld.jaxws.cxf.lidihuo.com/",
   "HelloWorldPort");
   private Client() {
   }
   public static void main(String[] args) throws Exception {
      Service service = Service.create(SERVICE_NAME);
      System.out.println("service created");
      String endpointAddress = "http://localhost:9090/HelloServerPort";
      service.addPort(PORT_NAME, SOAPBinding.SOAP11HTTP_BINDING,
      endpointAddress);
      HelloWorld hw = service.getPort(HelloWorld.class);
      System.out.println(hw.greetings("World"));
   }
}
在这里,我们使用 CXF 提供的
Service 类绑定到已知服务。我们在
Service 类上调用
create 方法来获取服务的实例。我们通过调用
service 实例上的
addPort 方法来设置已知端口。
现在,我们准备使用服务,我们首先通过调用
service 实例上的
getPort 方法获取服务接口。最后,我们调用
greetings 方法在控制台上打印问候消息。
现在,您已经通过使用 Apache CXF-First 方法了解了 CXF 的基础知识,现在您将在下一章中学习如何使用 CXF 和 WSDL-First 方法。

