SpringBoot AOP @After
SpringBoot AOP的After Advice用于实现交叉。这是一种建议类型,可确保建议在方法执行后运行。我们使用
@After 注解来实现事后建议。
让我们通过一个示例来理解事后建议。
SpringBoot @Around示例
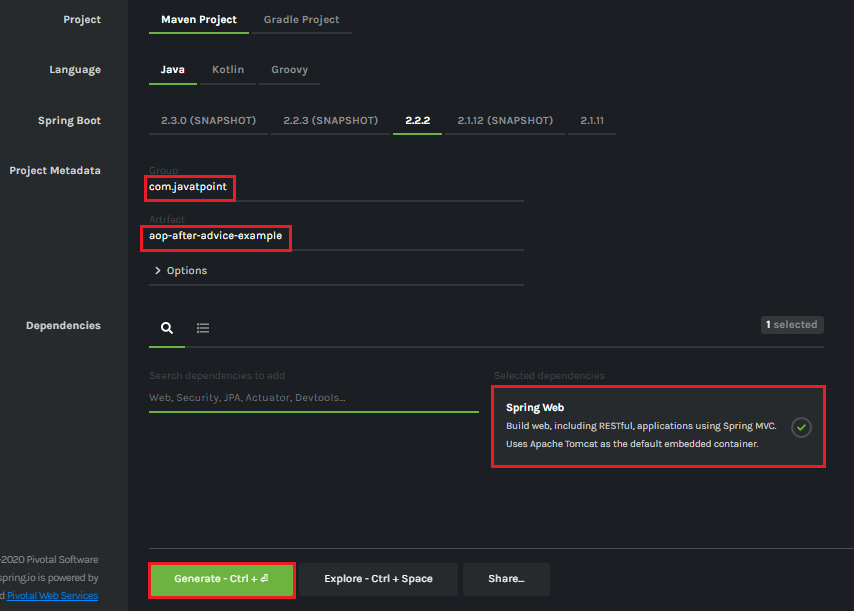
步骤1: 打开Spring Initializr http://start.spring.io 。
步骤2: 提供
Group 名称。我们提供了组名
com.lidihuo。
步骤3: 提供了
Artifact Id。提供Artifact Id
aop-after-advice-example。
步骤4: 添加
Spring Web 依赖项。
步骤5: 点击
生成按钮。当我们单击"生成"按钮时,它将所有规范包装在
jar 文件中,并将其下载到本地系统。
步骤6: 提取下载的jar文件。
步骤7: 通过以下步骤导入文件夹:
文件->导入->现有Maven项目->下一步->浏览文件夹
aop-after-advice-example ->完成。
步骤8: 打开
pom.xml 文件并添加以下
AOP 依赖项。它是使用
Spring AOP 和
AspectJ 进行面向方面编程的入门。
<dependency>
<groupId>org.springframework.boot</groupId>
<artifactId>spring-boot-starter-aop</artifactId>
</dependency>
</dependencies>
pom.xml
<project xmlns="http://maven.apache.org/POM/4.0.0" xmlns:xsi="http://www.w3.org/2001/XMLSchema-instance" xsi:schemaLocation="http://maven.apache.org/POM/4.0.0 http://maven.apache.org/xsd/maven-4.0.0.xsd">
<modelVersion>4.0.0</modelVersion>
<groupId>com.lidihuo</groupId>
<artifactId> aop-after-advice-example</artifactId>
<version>0.0.1-SNAPSHOT</version>
<packaging>jar</packaging>
<name>aop-after-advice-example</name>
    <description>Demo project for Spring Boot</description>
    <parent>
        <groupId>org.springframework.boot</groupId>
        <artifactId>spring-boot-starter-parent</artifactId>
        <version>2.2.2.RELEASE</version>
        <relativePath /> <!-- lookup parent from repository -->
    </parent>
    <properties>
        <project.build.sourceEncoding>UTF-8</project.build.sourceEncoding>
        <project.reporting.outputEncoding>UTF-8</project.reporting.outputEncoding>
        <java.version>1.8</java.version>
    </properties>
    <dependencies>
        <dependency>
            <groupId>org.springframework.boot</groupId>
            <artifactId>spring-boot-starter-web</artifactId>
        </dependency>
    <dependency>
            <groupId>org.springframework.boot</groupId>
            <artifactId>spring-boot-starter-aop</artifactId>
        </dependency>
    </dependencies>
    <build>
        <plugins>
            <plugin>
                <groupId>org.springframework.boot</groupId>
                <artifactId>spring-boot-maven-plugin</artifactId>
            </plugin>
        </plugins>
    </build>
</project>
步骤9: 打开
AopAfterAdviceExampleApplication.java 文件,并添加注解
@EnableAspectJAutoProxy。
@EnableAspectJAutoProxy(proxyTargetClass=true)
它支持处理带有AspectJ的
@Aspect 批注的组件。它与@Configuration批注一起使用。我们可以使用
proxyTargetClass 属性来控制代理的类型。其默认值为
false 。
AopAfterAdviceExampleApplication.java
package com.lidihuo;
import org.springframework.boot.SpringApplication;
import org.springframework.boot.autoconfigure.SpringBootApplication;
import org.springframework.context.annotation.EnableAspectJAutoProxy;
@SpringBootApplication
@EnableAspectJAutoProxy(proxyTargetClass=true)
public class AopAfterAdviceExampleApplication
{
public static void main(String[] args) {
SpringApplication.run(AopAfterAdviceExampleApplication.class, args);
}
}
步骤10: 创建名称为
com.lidihuo.model的包。
步骤11: 在包
com.lidihuo.model下创建一个类。 我们创建了一个名为
Employee的类。 在类中,定义以下内容:
定义三个String类型的变量 empId,firstName,和 secondName 。
生成Getters and Setters。
创建default
Employee.java
package com.lidihuo.model;
public class Employee
{
private String empId;
private String firstName;
private String secondName;
//default constructor
public Employee()
{
}
public String getEmpId()
{
return empId;
}
public void setEmpId(String empId)
{
this.empId = empId;
}
public String getFirstName()
{
return firstName;
}
public void setFirstName(String firstName)
{
this.firstName = firstName;
}
public String getSecondName()
{
return secondName;
}
public void setSecondName(String secondName)
{
this.secondName = secondName;
}
}
步骤12: 创建一个名称为
com.lidihuo.controller的包。
步骤13: 在包
com.lidihuo.controller下创建一个控制器类。 我们创建了一个名为
EmployeeController的类。
在控制器类中,我们定义了两个映射,一个用于添加雇员,另一个用于删除雇员。
EmployeeController.java
package com.lidihuo.controller;
import org.springframework.beans.factory.annotation.Autowired;
import org.springframework.web.bind.annotation.RequestMapping;
import org.springframework.web.bind.annotation.RequestMethod;
import org.springframework.web.bind.annotation.RequestParam;
import org.springframework.web.bind.annotation.RestController;
import com.lidihuo.model.Employee;
import com.lidihuo.service.EmployeeService;
@RestController
public class EmployeeController
{
@Autowired
private EmployeeService employeeService;
@RequestMapping(value = "/add/employee", method = RequestMethod.GET)
public com.lidihuo.model.Employee addEmployee(@RequestParam("empId") String empId, @RequestParam("firstName") String firstName, @RequestParam("secondName") String secondName)
{
return employeeService.createEmployee(empId, firstName, secondName);
}
@RequestMapping(value = "/remove/employee", method = RequestMethod.GET)
public String removeEmployee( @RequestParam("empId") String empId)
{
employeeService.deleteEmployee(empId);
return "Employee removed";
}
}
步骤14: 创建名称为
com.lidihuo.service的包。
步骤15: 在包
com.lidihuo.service下创建一个Service类。 我们创建了一个名为
EmployeeService的类。
在Service类中,我们定义了两个方法
createEmployee 和
deleteEmployee。
EmployeeService .java
package com.lidihuo.service;
import org.springframework.stereotype.Service;
import com.lidihuo.model.Employee;
@Service
public class EmployeeService
{
public Employee createEmployee( String empId, String fname, String sname)
{
Employee emp = new Employee();
emp.setEmpId(empId);
emp.setFirstName(fname);
emp.setSecondName(sname);
return emp;
}
public void deleteEmployee(String empId)
{
}
}
步骤16: 创建名称为
com.lidihuo.aspect的包。
步骤17: 在包
com.lidihuo.aspect下创建一个方面类。 我们创建了一个名为
EmployeeServiceAspect的类。
在方面类中,我们定义了建议后逻辑。
EmployeeServiceAspect.java
package com.lidihuo.aspect;
import org.aspectj.lang.JoinPoint;
import org.aspectj.lang.annotation.Aspect;
import org.aspectj.lang.annotation.After;
import org.springframework.stereotype.Component;
@Aspect
@Component
public class EmployeeServiceAspect
{
@After(value = "execution(* com.lidihuo.service.EmployeeService.*(..)) and args(empId, fname, sname)")
public void afterAdvice(JoinPoint joinPoint, String empId, String fname, String sname) {
System.out.println("After method:" + joinPoint.getSignature());
System.out.println("Creating Employee with first name - " + fname + ", second name - " + sname + " and id - " + empId);
}
}
在上面的类中:
execution(expression): 表达式是一种可以应用建议的方法。
@After: 用 @After 注解的方法在与切入点表达式匹配的所有方法之后执行。
创建所有模块后,项目目录如下所示:
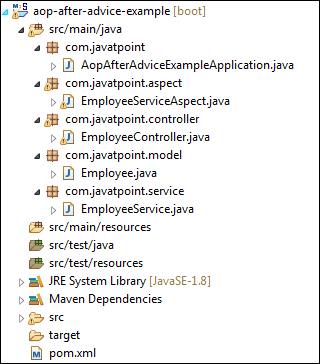
我们已经设置了所有模块。现在我们将运行该应用程序。
第18步: 打开
AopAfterAdviceExampleApplication.java 文件并将其作为Java应用程序运行。
步骤19: 打开浏览器并调用以下URL:
http://localhost:8080/add/employee?empId = {id}&firstName = {fname}&secondName = {sname}
在上面的URL中,
/add/employee 是我们在Controller类中创建的映射。我们使用了两个分隔符
(?)和
(&)来分隔两个值。

在上面的输出中,我们分配了
emId 102,firstName = Sachin,和
secondName = Bansal。
我们来看看控制台。我们看到,在调用
EmployeeService 类的
createEmployee ()方法之后,
EmployeeServiceAspect 类的方法
afterAdvice()如下所示。

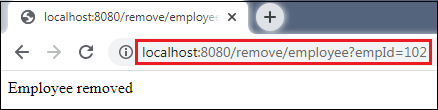
同样,我们也可以通过调用URL http: //localhost: 8080/remove/employee?empId = 102来删除员工。它将返回一条消息
已罢免员工,如下图所示。
在本节中,我们学习了After Advice的工作原理。在下一节中,我们将学习围绕建议的工作。

