SpringBoot 项目创建
以下是创建简单Spring Boot项目的步骤。
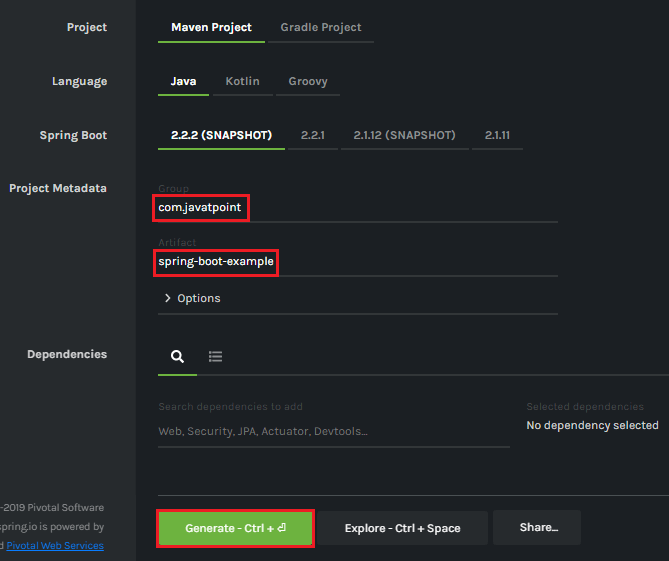
步骤1: 打开Spring initializr https://start.spring.io 。
步骤2: 提供
组和
工件名称。我们提供了组名
com.lidihuo 和工件
spring-boot-example 。
步骤3: 现在,点击
Generate (生成)。
何时我们单击"生成"按钮,它将开始将项目打包为
.rar 文件并下载该项目。
步骤4: 提取
RAR 文件。
步骤5:
导入文件夹。
文件->导入->现有Maven项目->下一步->浏览->选择项目->完成
导入需要一些时间该项目。成功导入项目后,我们可以在
Package Explorer 中查看项目目录。下图显示了项目目录:
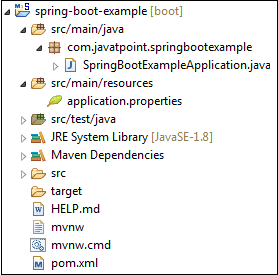
SpringBootExampleApplication .java
package com.lidihuo.springbootexample;
import org.springframework.boot.SpringApplication;
import org.springframework.boot.autoconfigure.SpringBootApplication;
@SpringBootApplication
public class SpringBootExampleApplication
{
public static void main(String[] args)
{
SpringApplication.run(SpringBootExampleApplication.class, args);
}
}
pom.xml
<?xml version="1.0" encoding="UTF-8"?>
<project xmlns="http://maven.apache.org/POM/4.0.0" xmlns:xsi=http://www.w3.org/2001/XMLSchema-instance xsi:schemaLocation="http://maven.apache.org/POM/4.0.0 https://maven.apache.org/xsd/maven-4.0.0.xsd">
<modelVersion>4.0.0</modelVersion>
<parent>
<groupId>org.springframework.boot</groupId>
<artifactId>spring-boot-starter-parent</artifactId>
<version>2.2.2.BUILD-SNAPSHOT</version>
<relativePath/> <!-- lookup parent from repository -->
</parent>
<groupId>com.lidihuo</groupId>
<artifactId>spring-boot-example</artifactId>
<version>0.0.1-SNAPSHOT</version>
<name>spring-boot-example</name>
<description>Demo project for Spring Boot</description>
<properties>
<java.version>1.8</java.version>
</properties>
<dependencies>
<dependency>
<groupId>org.springframework.boot</groupId>
<artifactId>spring-boot-starter</artifactId>
</dependency>
<dependency>
<groupId>org.springframework.boot</groupId>
<artifactId>spring-boot-starter-test</artifactId>
<scope>test</scope>
<exclusions>
<exclusion>
<groupId>org.junit.vintage</groupId>
<artifactId>junit-vintage-engine</artifactId>
</exclusion>
</exclusions>
</dependency>
</dependencies>
<build>
<plugins>
<plugin>
<groupId>org.springframework.boot</groupId>
<artifactId>spring-boot-maven-plugin</artifactId>
</plugin>
</plugins>
</build>
<repositories>
<repository>
<id>spring-milestones</id>
<name>Spring Milestones</name>
<url>https://repo.spring.io/milestone</url>
</repository>
<repository>
<id>spring-snapshots</id>
<name>Spring Snapshots</name>
<url>https://repo.spring.io/snapshot</url>
<snapshots>
<enabled>true</enabled>
</snapshots>
</repository>
</repositories>
<pluginRepositories>
<pluginRepository>
<id>spring-milestones</id>
<name>Spring Milestones</name>
<url>https://repo.spring.io/milestone</url>
</pluginRepository>
<pluginRepository>
<id>spring-snapshots</id>
<name>Spring Snapshots</name>
<url>https://repo.spring.io/snapshot</url>
<snapshots>
<enabled>true</enabled>
</snapshots>
</pluginRepository>
</pluginRepositories>
</project>
步骤6: : 运行
SpringBootExampleApplication.java 文件。
右键单击该文件->运行方式-> Java应用程序

下图显示了应用程序已成功运行。


