SpringBoot EhCaching
EhCache
EhCache是一种基于Java的开源缓存,用于提高性能。 Ehcache的当前版本为
3 。它提供了
JSR-107 缓存管理器的实现。我们可以直接使用它。
EhCache的功能
它快速,轻巧,可扩展和灵活。
它允许我们执行可序列化和对象
它提供诸如 LRU,LFU,FIFO等的缓存逐出策略。
它将缓存存储在内存和磁盘(SSD)中。
它依赖于 SLF4J 进行记录。
它已完全实现 JSR-107 和 Jcache
它支持通过 JGroups 或 JMS 和 RMI 进行分布式缓存。
它使用流利的查询语言进行分布式搜索。
EhCache使用模式
缓存使用多种访问模式。 EhCache使用以下模式:
Cache-aside
Cache-as-SoR (system-of-record)
Read-through
Write-through
Write-behind
Cache-aside
在
备用缓存模式中,首先,应用程序查询缓存。如果找到数据,它将直接返回数据。在相反的情况下,它从SoR中获取数据,将其存储到缓存中,然后返回。
Cache-as-SoR
cache-as-SoR 模式代表SoR对缓存的读写操作。它减少了应用程序的责任。它使用读写模式的组合,包括
直读,直写,和
后写。 它减少了应用程序的难度。它允许缓存解决雷电问题
Read-through
Read-through模式还复制了缓存-从高速缓存中读取数据时预留模式。读取和缓存保留之间的区别在于,读取模式实现了
CacheEntryFactory 接口。它指导缓存如何从缓存中读取对象。最好在使用通读模式时将EhCache实例包装为
SelfPopulatingCache 实例。
Write-through
Write-through模式还可以在将数据写入缓存时复制备用缓存模式。直写模式和备用缓存模式之间的区别在于,直写模式实现
CacheWriter 接口。它为直写和后写模式配置高速缓存。它在同一执行线程中将数据写入SoR。
Write-behind
Write-behind模式的形式不同其他三种模式。在
可配置的延迟之后,它会修改缓存条目。延迟可能会在
秒,分钟,一天,一周,或
很长时间。同时,它还将数据排队,以便稍后在同一执行线程中写入。
使用后写模式进行数据写入发生在事务范围之外。这意味着它创建了一个新事务以在SoR中提交与主事务不同的数据。
EhCaching存储层
EhCache允许我们使用各种数据存储区域,例如堆,磁盘和群集。我们可以配置一个多存储缓存(使用多个存储区域)。可以将其安排为
层。
这些层是按顺序组织的。最底层是
授权层,另一层是
缓存层。也称为
nearer 或
near cache。 缓存层可以具有多个存储区域。最热的数据保留在缓存层中,因为它比授权层更快。与高速缓存层相比,其他数据保留在权限层中,速度较慢但较丰富。
EhCache支持的数据存储类型有
四种:
On-Heap Store
Off-Heap Store
Disk Store
Clustered Store
On-Heap Store
它将缓存条目存储在Java堆内存中。它与 Java 应用程序共享存储。这是快速的,因为它使用堆,但存储空间有限。垃圾收集器还会扫描堆上存储。
Off-Heap Store
它使用主内存(RAM)来存储缓存条目。垃圾收集器不会对其进行扫描。它比堆上存储慢,因为缓存条目在使用前移到了堆上存储。它的大小受到限制。
Disk Store
它使用磁盘来存储高速缓存条目。它比基于 RAM 的存储(存储上和存储下)要慢得多。如果使用磁盘存储模式,最好使用专用磁盘。
Clustered Store
它将缓存条目存储在远程服务器上。它比堆外存储慢。它可能具有提供高可用性的故障转移服务器。
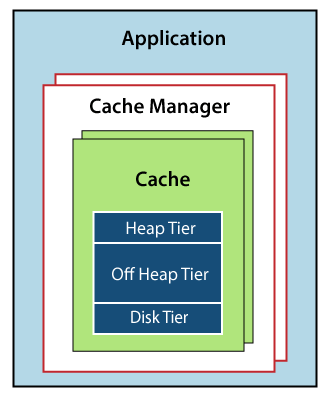
上图显示了
一个应用程序可能具有多个缓存管理器。
许多缓存可以由缓存管理器处理。
缓存可以使用多个层来存储缓存条目。
EhCache将最近使用或经常使用的数据放在更快的层(缓存层)中。
配置EhCache
将
EhCache jar放在类路径中。配置
xml 并将其放在类路径中。创建一个引用缓存。
EhCache示例
在以下示例中,我们将在应用程序中配置EhCache。
步骤1: 打开 Spring Initializr https://start.spring.io/。
步骤2: 选择Spring Boot版本
2.3.0 M2 。
步骤3: 提供
Group名称。我们提供了组名
com.lidihuo。
步骤4: 提供
Artifact。我们提供了Artifact
spring-boot-ehcache-example。
步骤5: 添加
Spring Web 依赖项。
步骤6: 单击
Generate (生成)按钮。当我们单击"生成"按钮时,它将与应用程序相关的所有规范包装到一个
Jar 文件中,并将其下载到本地系统。
步骤7:
提取 jar文件。
步骤8: 复制文件夹并将其粘贴到STS工作区中。
第9步:
导入项目。
文件->导入->现有 Maven 项目->下一步->浏览->选择文件夹spring-boot-ehcache-example->选择文件夹->完成
导入项目需要时间。
步骤10: 从 Maven 存储库 https://mvnrepository.com/并将其粘贴到
pom.xml中文件。
spring-boot-starter-cache
ehcache 3
cache API。
注意: 请勿使用包net.sf.ehcache的ehcache。
pom.xml
<?xml version="1.0" encoding="UTF-8"?>
<project xmlns="http://maven.apache.org/POM/4.0.0" xmlns:xsi=http://www.w3.org/2001/XMLSchema-instance xsi:schemaLocation="http://maven.apache.org/POM/4.0.0 https://maven.apache.org/xsd/maven-4.0.0.xsd">
<modelVersion>4.0.0</modelVersion>
<parent>
<groupId>org.springframework.boot</groupId>
<artifactId>spring-boot-starter-parent</artifactId>
<version>2.3.0.M2</version>
<relativePath/> <!-- lookup parent from repository -->
</parent>
<groupId>com.lidihuo</groupId>
<artifactId>spring-boot-ehcache-example</artifactId>
<version>0.0.1-SNAPSHOT</version>
<name>spring-boot-ehcache-example</name>
<description>Demo project for Spring Boot</description>
<properties>
<java.version>1.8</java.version>
</properties>
<dependencies>
<dependency>
<groupId>org.springframework.boot</groupId>
<artifactId>spring-boot-starter-web</artifactId>
</dependency>
<dependency>
<groupId>org.springframework.boot</groupId>
<artifactId>spring-boot-starter-cache</artifactId>
</dependency>
<dependency>
<groupId>org.ehcache</groupId>
<artifactId>ehcache</artifactId>
</dependency>
<dependency>
<groupId>javax.cache</groupId>
<artifactId>cache-api</artifactId>
</dependency>
<dependency>
<groupId>org.springframework.boot</groupId>
<artifactId>spring-boot-starter-test</artifactId>
<scope>test</scope>
<exclusions>
<exclusion>
<groupId>org.junit.vintage</groupId>
<artifactId>junit-vintage-engine</artifactId>
</exclusion>
</exclusions>
</dependency>
</dependencies>
<build>
<plugins>
<plugin>
<groupId>org.springframework.boot</groupId>
<artifactId>spring-boot-maven-plugin</artifactId>
</plugin>
</plugins>
</build>
<repositories>
<repository>
<id>spring-milestones</id>
<name>Spring Milestones</name>
<url>https://repo.spring.io/milestone</url>
</repository>
</repositories>
<pluginRepositories>
<pluginRepository>
<id>spring-milestones</id>
<name>Spring Milestones</name>
<url>https://repo.spring.io/milestone</url>
</pluginRepository>
</pluginRepositories>
</project>
现在,我们需要配置
ehcache.xml 文件。
步骤11: 打开
application.properties 文件,并使用以下属性配置EhCache。
application.properties
#configuring ehcache.xml
spring.cache.jcache.config=classpath:ehcache.xml
步骤12: 打开
SpringBootEhcacheExampleApplication.java 文件,并使用注解
@EnableCaching 启用缓存。
SpringBootEhcacheExampleApplication.java
package com.lidihuo;
import org.springframework.boot.SpringApplication;
import org.springframework.boot.autoconfigure.SpringBootApplication;
import org.springframework.cache.annotation.EnableCaching;
@SpringBootApplication
//enables the cache management capability
@EnableCaching
public class SpringBootEhcacheExampleApplication
{
public static void main(String[] args)
{
SpringApplication.run(SpringBootEhcacheExampleApplication.class, args);
}
}
注意: 如果我们不想在主应用程序文件中使用注解@EnableCaching,则可以创建一个单独的CacheConfig类,并使用注解对调用进行注解。
package com.lidihuo;
import org.springframework.cache.annotation.EnableCaching;
import org.springframework.context.annotation.Configuration;
@Configuration
//enable caching
@EnableCaching
public class CacheConfig
{
}
步骤13: 创建类。我们已经在包
com.lidihuo 中创建了名称为
Student的类。 在类中,执行以下操作:
创建五个变量id, name, gender,和
生成使用Constructor
右键单击文件->源->使用字段生成构建器->全选->生成
生成Getters and Setters。
右键单击文件->源->生成Getter和设置器->全选->生成
生成 toString()
右键单击文件->源->生成toString()->生成
完成上述所有步骤后,类如下所示。
Student.java
package com.lidihuo;
public class Student
{
private int id;
private String name;
private String gender;
private String city;
public Student(int id, String name, String gender, String city)
{
super();
this.id = id;
this.name = name;
this.gender = gender;
this.city = city;
}
public int getId()
{
return id;
}
public void setId(int id)
{
this.id = id;
}
public String getName()
{
return name;
}
public void setName(String name)
{
this.name = name;
}
public String getGender()
{
return gender;
}
public void setGender(String gender)
{
this.gender = gender;
}
public String getCity()
{
return city;
}
public void setCity(String city)
{
this.city = city;
}
@Override
public String toString()
{
return "Student [id=" + id + ", name=" + name + ", gender=" + gender + ", city=" + city + "]";
}
}
步骤14: 创建用于管理学生的
服务类。我们已经创建了名称为
StudentManager的服务类。 在本课程中,我们完成了以下操作:
使用注解 @Service注解类。
创建 HashMap 的实例。
在静态块中,我们已在地图中添加了学生数据。
通过使用注解 @Cacheable ,我们定义了缓存的名称所有数据都将保存在此缓存中。我们已经在注解的键属性中定义了 id 。缓存根据 id 来搜索学生。
我们创建了一种方法 getStudentById(),该方法将id解析为参数。它返回学生的 id 。
StudentManager.java
StudentManager.java
package com.lidihuo;
import java.util.HashMap;
import org.springframework.cache.annotation.Cacheable;
import org.springframework.stereotype.Service;
@Service
public class StudentManager
{
static HashMap<Integer, Student> student = new HashMap<>();
static
{
student.put(1, new Student(100, "Alex", "Male", "Berlin"));
student.put(2, new Student(101, "Tony", "Male", "Maxico"));
student.put(3, new Student(102, "Andrew", "Male", "Chicago"));
student.put(4, new Student(103, "Alexa", "Female", "Brussels"));
student.put(5, new Student(104, "Maria", "Female", "Houston"));
}
@Cacheable(cacheNames="demoCache", key="#id")
public Student getStudentById(Integer id)
{
System.out.println("Fetching student data from cache");
return student.get(id);
}
}
现在,我们需要创建
ehcache.xml 文件。它包含与高速缓存相关的信息,例如高速缓存的名称,内存中的元素数量,高速缓存中的实时数据生存时间等。
第15步: 在
src/main/resources 文件夹中缓存名为
ehcache.xml 的配置文件。
ehcahe.xml
<config
xmlns:xsi='http://www.w3.org/2001/XMLSchema-instance'
xmlns='http://www.ehcache.org/v3'
xmlns:jsr107='http://www.ehcache.org/v3/jsr107'>
<ehcache>
<diskStore path="java.io.tmpdir" />
<defaultCache maxElementsInMemory="2000"
            eternal="true"
            overflowToDisk="false"
            timeToLiveSeconds="1200" />
    <cache name="demoCache"
            maxElementsInMemory="2000"
            eternal="false"
            overflowToDisk="false"
            timeToLiveSeconds="10000" />
</ehcache>
</config>
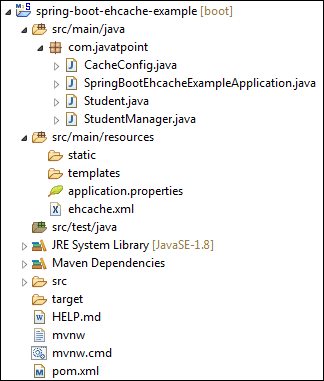
现在,我们已经创建了所有必需的文件。创建所有文件后,项目目录如下所示:
让我们运行该应用程序。
步骤16: 打开
SpringBootEhcacheExampleApplication.java 文件,并以 Java 应用程序。
它显示以下输出:
Getting Students from Cache
[id=100, name=Alex, gender=Male, city=Berlin]
[id=101, name=Tony, gender=Male, city=Mexico]
[id=102, name=Andrew, gender=Male, city=Chicago]
[id=103, name=Alexa, gender=Female, city=Brussels]
[id=104, name=Maria, gender=Female, city=Houston]

