SpringBoot H2数据库
什么是内存数据库
内存数据库依赖于系统内存而不是磁盘数据存储空间。因为内存访问比磁盘访问快。当我们不需要持久化数据时,我们使用内存数据库。内存数据库是嵌入式数据库。默认情况下,内存数据库是易失性的,当我们重新启动应用程序时,所有存储的数据都会丢失。
广泛使用的内存数据库是
H2,HSQLDB (HyperSQL数据库)
,和
Apache Derby。 它会自动创建配置。
持久性与内存数据库
持久性数据库将数据持久存储在物理内存中。即使数据库服务器退回,数据也将可用。一些流行的持久性数据库是
Oracle , MySQL , Postgres ,等。
在对于
内存数据库,数据存储在
系统内存中。程序关闭时丢失了数据。它对
POC (概念证明)很有帮助,而不对生产应用程序有用。广泛使用的内存数据库是
H2。
什么是H2数据库
H2 是
嵌入式,开源和
内存数据库。它是用 Java 编写的关系数据库管理系统。这是一个
客户端/服务器应用程序。它通常用于
单元测试。它将数据存储在内存中,而不是将数据持久存储在磁盘上。
优点
零配置
易于使用。
轻巧,快速。
它提供了简单的配置,可以在真实数据库和内存数据库之间切换。
它支持标准的SQL和JDBC API。
它提供了一个可在数据库中维护的Web控制台。
配置H2数据库
如果要在应用程序中使用H2数据库,则需要在pom.xml文件中添加以下依赖项:
<dependency>
<groupId>com.h2database</groupId>
<artifactId>h2</artifactId>
<scope>runtime</scope>
</dependency>
添加依赖项后,我们需要配置H2数据库的
数据源URL,驱动程序类名称,用户名和
密码。 Spring Boot提供了一种简单的方法来配置
application.properties 文件中的这些属性。
spring.datasource.url=jdbc:h2:mem:testdb
spring.datasource.driverClassName=org.h2.Driver
spring.datasource.username=sa
spring.datasource.password=
spring.jpa.database-platform=org.hibernate.dialect.H2Dialect
在
spring.datasource.url 属性中,
mem 是内存数据库的名称,而
testdb 是内存数据库的名称。默认情况下,H2提供的架构。我们还可以定义自己的架构和数据库。默认用户名是
sa ,空白密码表示
空密码。如果要更改用户名和密码,可以覆盖这些值。
将数据保留在H2数据库中
如果要将数据保留在在H2数据库中,我们应该将数据存储在一个文件中。为此,我们需要更改数据源的 URL 属性。
#persist the data
spring.datasource.url=jdbc:h2:file:/data/sampledata
spring.datasource.url=jdbc:h2:C:/data/sampledata
在上面的属性中,
sampledata 是一个文件名。
创建Schema构并填充数据
我们可以定义通过在
resource 文件夹(src)中创建
SQL 文件创建架构/main/resource)。
schema.sql
DROP TABLE if EXISTS CITY;
CREATE TABLE CITY (
City_code int AUTO_INCREMENT  PRIMARY KEY,
city_name VARCHAR(50) NOT null,
city_pincode INT(8) NOT null,
);
我们可以通过在
resource 文件夹(src/main/resource)中创建一个
SQL 文件来填充表中的数据。
data.sql
INSERT INTO CITY VALUES ('Delhi', 110001);
INSERT INTO CITY VALUES ('Kanpur', 208001);
INSERT INTO CITY VALUES ('Lucknow', 226001);
Spring Boot在应用程序启动期间自动拾取
data.sql 文件并针对H2数据库运行它。
H2控制台
默认情况下,禁用H2数据库的控制台视图。在访问H2数据库之前,我们必须使用以下属性启用它。
#enabling the H2 console
spring.h2.console.enabled=true
一旦启用了H2控制台,现在我们可以通过调用URL http://localhost:8080/h2-console在浏览器中访问H2控制台。下图显示了H2数据库的控制台视图。
在上面的屏幕快照中,我们定义了一个名为
lidihuo 的数据库。
Spring Boot H2示例
让我们设置一个Spring Boot。
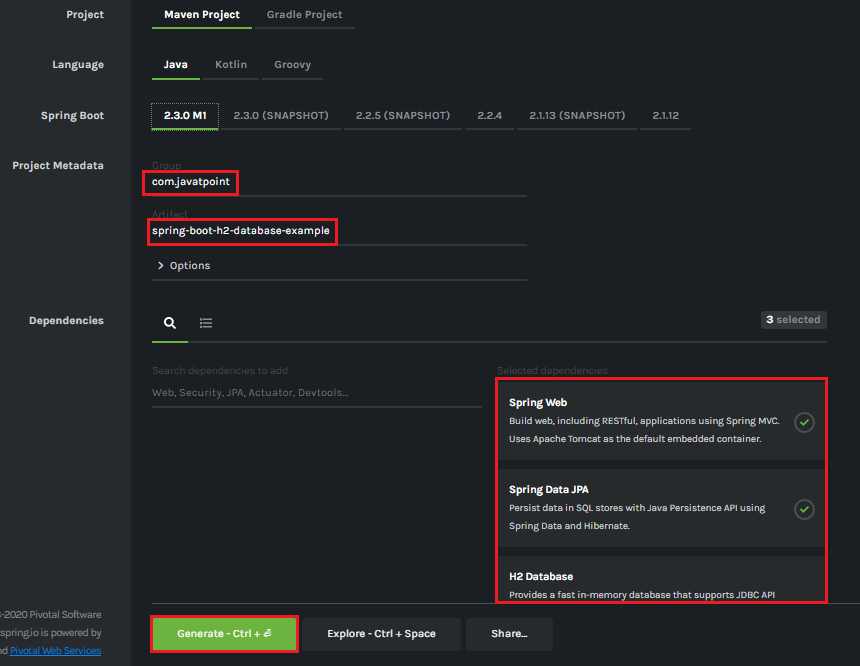
步骤1: 打开Spring Initializr http://start.spring.io 。
步骤2: 选择Spring Boot版本
2.3.0.M1。
步骤2: 提供
Group名称。我们提供了
com.lidihuo。
步骤3: 提供
Artifact ID。我们提供了
spring-boot-h2-database-example。
步骤5: 添加依赖项
Spring Web,Spring Data JPA ,和
H2数据库。
步骤6: 单击
Generate (生成)按钮。当我们单击"生成"按钮时,它会将项目包装在
Jar 文件中,并将其下载到本地系统。
步骤7:
提取 Jar文件并将其粘贴到STS工作区中。
第8步:
导入项目文件夹到STS。
文件->导入->现有Maven项目->浏览->选择文件夹spring-boot-h2-database-example->完成
导入需要一些时间。
步骤9:
src/main/java文件夹中的名称 com.lidihuo.model 。
步骤10: 包
com.lidihuo.model中的类。 我们创建了名为
Student的类。 在"图书"类中,我们执行了以下操作:
定义四个变量 id, age, name和
生成Getter和Setters。
右键单击文件-> Source-> Generate Getters和Setters。
使用注解 @Entity,将类标记为 Entity 。
使用注解 @Table将该类标记为 Table 名称。
通过使用注解 @Column 将每个变量定义为 Column 。
Student.java
package com.lidihuo.model;
import javax.persistence.Column;
import javax.persistence.Entity;
import javax.persistence.Id;
import javax.persistence.Table;
//mark class as an Entity
@Entity
//defining class name as Table name
@Table
public class Student
{
//mark id as primary key
@Id
//defining id as column name
@Column
private int id;
//defining name as column name
@Column
private String name;
//defining age as column name
@Column
private int age;
//defining email as column name
@Column
private String email;
public int getId()
{
return id;
}
public void setId(int id)
{
this.id = id;
}
public String getName()
{
return name;
}
public void setName(String name)
{
this.name = name;
}
public int getAge()
{
return age;
}
public void setAge(int age)
{
this.age = age;
}
public String getEmail()
{
return email;
}
public void setEmail(String email)
{
this.email = email;
}
}
步骤11: 在文件夹
src/main/java中创建一个名称为 com.lidihuo.controller 的包。
步骤12: 在包
com.lidihuo.controller 中创建一个Controller类。我们已经创建了名称为
StudentController 的控制器类。在StudentController类中,我们完成了以下操作:
使用注解 @RestController将类标记为 RestController 。
使用注解 @Autowired 自动注解 StudentService 类。
定义以下方法: getAllStudent(): 它返回所有学生的列表。 getStudent(): 它返回我们在path变量中指定的学生详细信息。通过使用注解@PathVariable,我们已将id作为参数传递。注解指示方法参数应绑定到URI模板变量。 deleteStudent(): 它将删除我们在path变量中指定的特定学生。 saveStudent(): 它保存学生的详细信息。注解@RequestBody表示应将方法参数绑定到Web请求的正文。
StudentController.java
package com.lidihuo.controller;
import java.util.List;
import org.springframework.beans.factory.annotation.Autowired;
import org.springframework.web.bind.annotation.DeleteMapping;
import org.springframework.web.bind.annotation.GetMapping;
import org.springframework.web.bind.annotation.PathVariable;
import org.springframework.web.bind.annotation.PostMapping;
import org.springframework.web.bind.annotation.RequestBody;
import org.springframework.web.bind.annotation.RestController;
import com.lidihuo.model.Student;
import com.lidihuo.service.StudentService;
//creating RestController
@RestController
public class StudentController
{
//autowired the StudentService class
@Autowired
StudentService studentService;
//creating a get mapping that retrieves all the students detail from the database
@GetMapping("/student")
private List<Student> getAllStudent()
{
return studentService.getAllStudent();
}
//creating a get mapping that retrieves the detail of a specific student
@GetMapping("/student/{id}")
private Student getStudent(@PathVariable("id") int id)
{
return studentService.getStudentById(id);
}
//creating a delete mapping that deletes a specific student
@DeleteMapping("/student/{id}")
private void deleteStudent(@PathVariable("id") int id)
{
studentService.delete(id);
}
//creating post mapping that post the student detail in the database
@PostMapping("/student")
private int saveStudent(@RequestBody Student student)
{
studentService.saveOrUpdate(student);
return student.getId();
}
}
步骤13: 在文件夹
src/main/java中创建名称为 com.lidihuo.service 的包。
步骤14: 创建一个
Service 类。我们在包
com.lidihuo.service。
StudentService.java 中创建了名为
StudentService 的服务类。
package com.lidihuo.service;
import java.util.ArrayList;
import java.util.List;
import org.springframework.beans.factory.annotation.Autowired;
import org.springframework.stereotype.Service;
import com.lidihuo.model.Student;
import com.lidihuo.repository.StudentRepository;
@Service
public class StudentService
{
@Autowired
StudentRepository studentRepository;
//getting all student records
public List<Student> getAllStudent()
{
List<Student> students = new ArrayList<Student>();
studentRepository.findAll().forEach(student -> students.add(student));
return students;
}
//getting a specific record
public Student getStudentById(int id)
{
return studentRepository.findById(id).get();
}
public void saveOrUpdate(Student student)
{
studentRepository.save(student);
}
//deleting a specific record
public void delete(int id)
{
studentRepository.deleteById(id);
}
}
步骤15: 在文件夹
src/main/java中创建一个名称为 com.lidihuo.repository 的包。
步骤16: 创建一个
存储库界面。我们在包
com.lidihuo.repository中创建了名称为 StudentRepository 的存储库接口。 它扩展了
Crud Repository 界面。
StudentRepository.java
package com.lidihuo.repository;
import org.springframework.data.repository.CrudRepository;
import com.lidihuo.model.Student;
public interface StudentRepository extends CrudRepository<Student, Integer>
{
}
现在,我们将在
application.properties 文件中配置数据源
URL,驱动程序类名称,用户名和
密码。
步骤17: 打开
application.properties 文件并配置以下属性。
application.properties
spring.datasource.url=jdbc:h2:mem:lidihuo
spring.datasource.driverClassName=org.h2.Driver
spring.datasource.username=sa
spring.datasource.password=
spring.jpa.database-platform=org.hibernate.dialect.H2Dialect
#enabling the H2 console
spring.h2.console.enabled=true
注意: 不要忘记启用H2控制台。
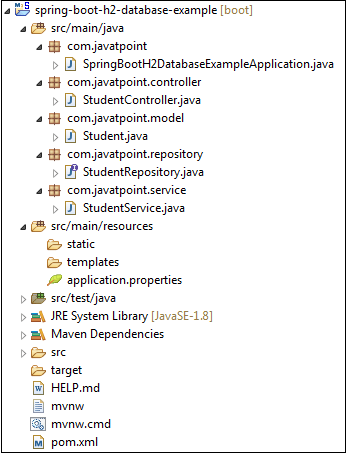
之后创建所有类和包后,项目目录如下所示。
现在,我们将运行该应用程序。
步骤18: 打开
SpringBootH2DatabaseExampleApplication.java 文件并将其作为Java应用程序运行。
SpringBootH2DatabaseExampleApplication.java
package com.lidihuo;
import org.springframework.boot.SpringApplication;
import org.springframework.boot.autoconfigure.SpringBootApplication;
@SpringBootApplication
public class SpringBootH2DatabaseExampleApplication
{
public static void main(String[] args)
{
SpringApplication.run(SpringBootH2DatabaseExampleApplication.class, args);
}
}
在下一步中,我们将使用其余客户端
Postman发送
POST 和
GET 请求
。 如果您的系统中未安装Postman,请执行以下步骤:
从 https://www.getpostman.com/downloads/或在浏览器 https://bit.ly/1HCOCwF 中添加Google Chrome扩展程序。
启动Postman并注册。创建一个用户名。我们已经创建了一个名称为 lidihuo 的用户,并点击了 Submit
步骤19: 打开
Postman并执行以下操作:
选择 POST
调用URL http: //localhost: 8080/student。
选择Body
选择内容类型 JSON(application/json)。
插入数据。我们在正文中插入了以下数据:
{
    "id": "001",
    "age": "23",
    "name": "Amit",
    "email": "amit@yahoo.co.in"
}
点击发送
请求成功执行后,它会显示
状态: 200 OK 。这意味着记录已成功插入数据库中。
类似地,我们插入了以下数据。
{
    "id": "002",
    "age": "24",
    "name": "Vadik",
    "email": "vadik@yahoo.co.in"
}
{
    "id": "003",
    "age": "21",
    "name": "Prateek",
    "email": "prateek@yahoo.co.in"
}
{
    "id": "004",
    "age": "25",
    "name": "Harsh",
    "email": "harsh@yahoo.co.in"
}
{
    "id": "005",
    "age": "24",
    "name": "Swarit",
    "email": "Swarit@yahoo.co.in"
}
让我们访问H2控制台以查看数据。
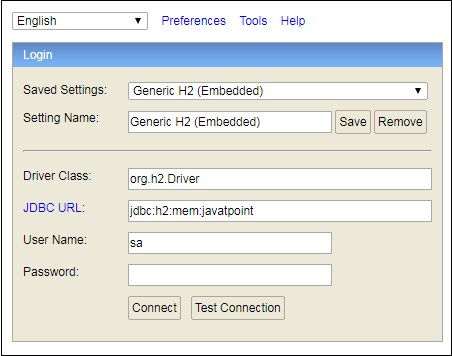
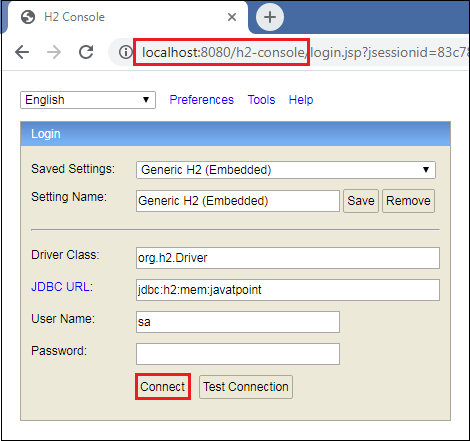
步骤20: 打开浏览器并调用URL http://localhost:8080/h2-console。单击
Connect 按钮,如下所示。
单击
连接按钮后,我们将在数据库中看到
Student表,如下所示。
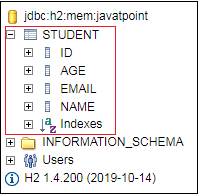
步骤21: 单击
Student表,然后单击
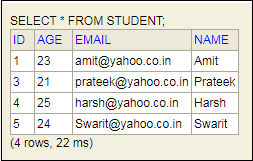
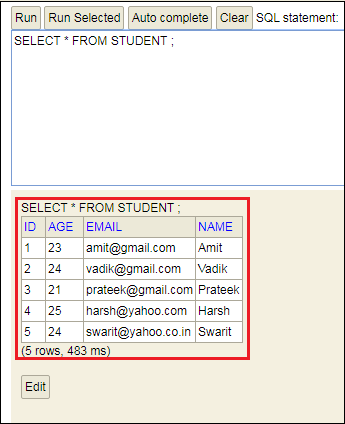
运行按钮。该表显示了我们插入到正文中的数据。
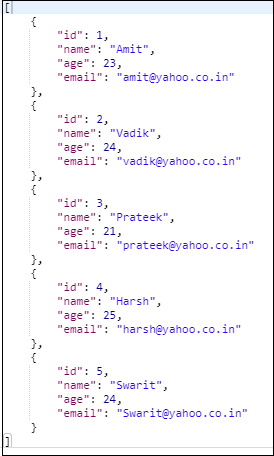
步骤22: 打开Postman并发送
GET 请求。它返回我们已经插入数据库中的数据。
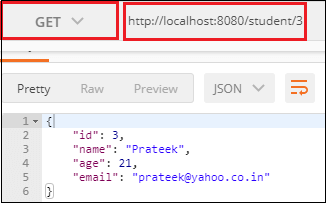
让我们使用URL http: //localhost: 8080/student/{id}发送
GET 请求。我们已经调用了URL http://localhost:8080/student/3。它返回ID为3的学生的详细信息。
同样,我们也可以发送
Delete 请求。假设我们要删除ID为2的学生记录。
要删除学生记录,请发送带有URL http://localhost:8080/student/的
DELETE 请求。我们看到ID为
2 的学生已从数据库中删除。