Spring Cloud Config服务器连接到本地Git存储库
在本节中,我们将学习如何将spring-cloud-config-server连接到本地git存储库。首先,我们将找到文件夹路径。
右键单击
git-localconfig-repo ->
属性->复制
位置标签地址并将其粘贴到
application.properties 文件中。
在SpringCloudConfigServerApplication.java文件中添加注释
@EnableConfigServer 。
在浏览器中键入以下URL:
localhost:8888/limits-service/default
输出
{
name: "limits-service",
-profiles: [
"default"
],
label: null,
version:"0898c54ae1deb62733728e37e4c7962f529ee9ad",
state: null,
-propertySources: [
- {
name: C:\Users\Anubhav\git-localconfig-repo\limits-service.properties",
-source: {
limits-service-minimum: "8",
limits-service-maximum: "88"
}
}
]
}
在此我们建立了
SprinCloudConfigServer 和
Git存储库之间的连接。
我们可以看到它显示了一组属性,并且价值观。它还从检索这些值(最小值和最大值)的位置检索属性文件的文件名。
SpringCloudConfigServer的重要之处在于,
它存储多个服务的配置。 它还可以存储针对不同环境的每个服务的配置。
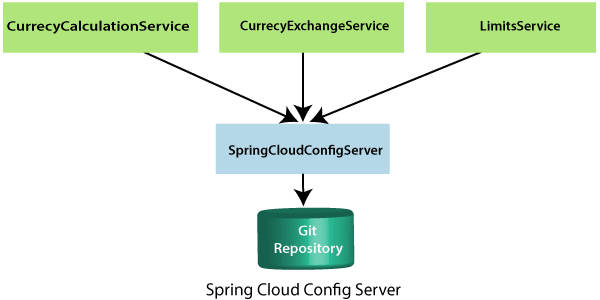
在上图中,有三个服务
CurrencyCalculationService ,
CurrencyExchangeService 和
LimitsService 。 LimitsService具有四个环境服务
开发,质量检查,阶段和
生产。我们可以在SpringCloudConfigServer中配置这三个服务。
在Git存储库中配置多个环境
服务
Dev,QA,Stage,和
Production。我们可以在SpringCloudConfigServer中配置这三个服务。
在Git存储库中配置多个环境
在spring-cloud-config-server项目中,向git-localconfig-repo添加了一个链接,其中包含limits-service.properties文件。它成为限制服务的默认配置。
但是,我们可以为特定环境覆盖它们。要覆盖这些值,请复制
limits-service.properties 并粘贴到文件夹
git-localconfig-repo 中,并使用
limits-service-dev.properties 。现在更新最小值和最大值。
limits-service.minimum=1
limits-service.maximum=111
再次复制相同的文件并将其粘贴到相同的文件夹中。用
limits-service-qa.properties 重命名。现在更新最小值和最大值。
limits-service.minimum=2
limits-service.maximum=222
如果我们要选择最大值的默认值而不是修改后的值,请在该行的开头放置一个
introduction-to-currency-conversion-and-currency-exchange-service 符号声明。现在,第二条语句成为注释。
limits-service.minimum=1
introduction-to-currency-conversion-and-currency-exchange-servicelimits-service.maximum=111
执行时,它将从默认属性文件中获取最大值888,而不是最大值111。无论何时在文件中进行更改,都应在本地存储库中提交更改。
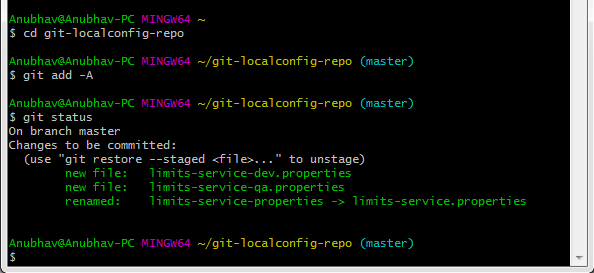
现在打开Git Bash并执行以下命令:
创建我们要在其中添加文件的目录。
将文件添加到Git存储库中。
现在检查必须提交的文件的状态。
现在提交更改
git commit -m "Dev and QA"
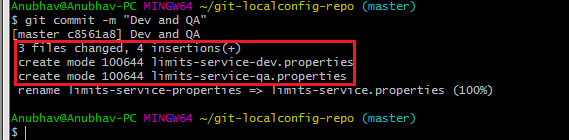
现在我们可以访问属性Dev和QA。
在浏览器的地址栏中键入以下内容。
localhost:8888/limits-service/qa
输出
{
name: "limits-service",
-profiles: [
"qa"
],
label: null,
version:"0898c54ae1deb62733728e37e4c7962f529ee9ad",
state: null,
-propertySources: [
- {
name: C:\Users\Anubhav\git-localconfig-repo\limits-service-qa.properties",
-source: {
limits-service-minimum: "2",
limits-service-maximum: "222"
}
},
-{
name: C:\Users\Anubhav\git-localconfig-repo\limits-service.properties?,
-source: {
limits-service-minimum: "8",
limits-service-maximum: "888"
}
}
]
}
我们可以观察到它正在检索属性源。这些属性列表在优先级列表中。高度优先级是质量检查文件中配置的任何值。
如果质量检查文件中没有该值,则将从默认文件中获取该值。因此,质量检查文件中的所有内容都具有最高的属性。
将限制服务连接到Spring Cloud Config服务器
在本节中,我们将连接限制服务以从spring-cloud-config中获取配置-服务器。我们不需要在application.properties文件中配置值。移至
limits-service 项目,并将
application.properties 文件重命名为
bootstrap.properties 。我们不需要在bootstrap.properties中配置值。所有配置值均来自spring-cloud-config-server。在bootstrap.properties中指定URI。
spring.application.name=limits-service
spring.cloud.config.uri=http://localhost:8888
限制服务是bootstrap.properties的关键路径。根据应用程序名称,我们将从本地Git存储库中获取值。现在,重新启动
LimitsServiceApplication.java。
Fetching config from the server at http://localhost:8888
Located environment: name=limits-service, profiles=[default], label= null,  version="0898c54ae1deb62733728e37e4c7962f529ee9ad", state=null,
为限制服务配置配置文件
此处要了解的是,限制服务的所有配置都来自Git存储库。我们没有在limits-service中配置任何内容。在Git存储库中配置内容的优点是,限制服务的整个配置与限制服务的部署是分开的。
现在打开
bootstrap.properties 并将
dev 配置文件添加到其中。
spring .profile.active=dev
运行限制时,将显示以下输出:
{
maximum: 111,
minimum:1
}
如果我们查看limits-service-dev.properties文件,则从那里获取值。
假设我们要从
limits-service.properties中选择一个最大值。 和
limits-service-dev.properties 中的最小值,然后从
limits-service-dev.properties 中删除最大值。 limits-service-dev.properties文件如下所示:
limits-service-minimum: 1
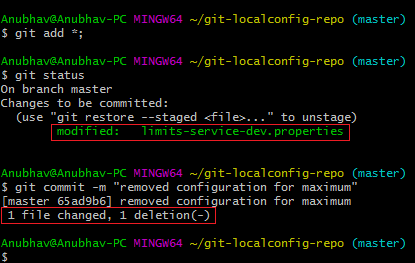
现在使用以下命令提交更改:
git add *;
git status
git commit -m "removed configuration for maximum "
现在启动
LimitsServiceApplication.java 。当我们启动LimitsServiceApplication时,它将从SpringCloudConfigServer中选择值。我们可以观察到,它从limits-service.properties(默认服务)中选择最大值,即
888 ,并从
limit-service-dev.properties 中选择最小值。即
1。 但是,我们已经覆盖了默认服务的最小值。
让我们看看将配置文件
dev 更改为
qa时会发生什么。 打开
bootstrap.properties 并写
qa 代替
dev 。该应用程序将启动并获取更改。现在执行
限制。
输出
{
maximum: 222,
minimum: 2
}
这些是来自qa环境配置的值。

