Aurelia 路由
路由是每个应用程序的重要组成部分。在本章中,您将学习如何在 Aurelia 框架中使用路由器。
第 1 步-创建页面
我们已经在前一章中创建了一个 components 文件夹。如果你还没有创建它,你应该把它放在
src 文件夹中。
C:\Users\username\Desktop\aureliaApp\src>mkdir components
在此文件夹中,我们将创建
home 和
about 目录。
C:\Users\username\Desktop\aureliaApp\src\components>mkdir home
C:\Users\username\Desktop\aureliaApp\src\components>mkdir about
在
home文件夹内,我们需要创建
view和
view-model文件。
C:\Users\username\Desktop\aureliaApp\src\components\home>touch home.js
C:\Users\username\Desktop\aureliaApp\src\components\home>touch home.html
对于
about页面,我们还需要
view和
view-model。
C:\Users\username\Desktop\aureliaApp\src\components\about>touch about.js
C:\Users\username\Desktop\aureliaApp\src\components\about>touch about.html
注意-您也可以手动创建上述所有文件夹。
第 2 步-页面
接下来,我们需要为我们创建的文件添加一些默认代码。
home.html
<template>
   <h1>HOME</h1>
</template>
home.js
about.html
<template>
   <h1>ABOUT</h1>
</template>
about.js
第 3 步-路由器
我们将在
app.js 文件中为
router 创建
view-model。
app.js
export class App {
   configureRouter(config, router) {
      config.title = 'Aurelia';

      config.map([
         { route: ['','home'],  name: 'home',
            moduleId: './components/home/home',  nav: true, title:'Home' },
         { route: 'about',  name: 'about',
            moduleId: './components/about/about',    nav: true, title:'About' }
      ]);
      this.router = router;
   }
}
我们的路由器
view 将放置在
app.html 中。
app.html
<template>
   <nav>
      <ul>
         <li repeat.for = "row of router.navigation">
            <a href.bind = "row.href">${row.title}</a>
         </li>
      </ul>
   </nav>
   <router-view></router-view>
</template>
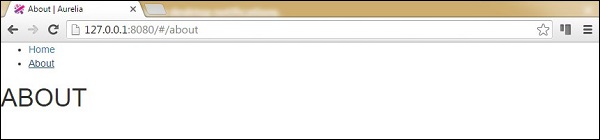
当我们运行应用程序时,我们可以通过点击
主页或关于链接来更改路线。