Kibana 加载示例数据
我们已经看到了如何从logstash上传数据到elasticsearch。我们将在这里使用 logstash 和 elasticsearch 上传数据。但是关于我们需要使用的具有日期、经度和纬度字段的数据,我们将在接下来的章节中学习。如果我们没有 CSV 文件,我们还将了解如何直接在 Kibana 中上传数据。
在本章中,我们将涵盖以下主题-
在 Elasticsearch 中使用 Logstash 上传具有日期、经度和纬度字段的数据
使用开发工具上传批量数据
使用 Logstash 上传 Elasticsearch 中有字段的数据
我们将使用 CSV 格式的数据,同样取自 Kaggle.com,它处理可用于分析的数据。
家庭医疗访问的数据这里使用的是从网站 Kaggle.com 中提取的。
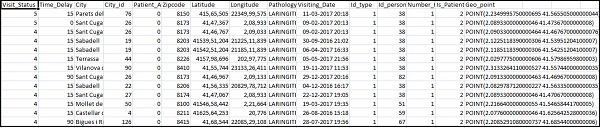
以下是 CSV 文件可用的字段-
["Visit_Status","Time_Delay","City","City_id","Patient_Age","Zipcode","Latitude","Longitude",
"Pathology","Visiting_Date","Id_type","Id_personal","Number_Home_Visits","Is_Patient_Minor","Geo_point"]
Home_visits.csv 如下-
以下是与 logstash 一起使用的 conf 文件-
input {
   file {
      path => "C:/kibanaproject/home_visits.csv"
      start_position => "beginning"
      sincedb_path => "NUL"
   }
}
filter {
   csv {
      separator => ","
      columns =>
      ["Visit_Status","Time_Delay","City","City_id","Patient_Age",
      "Zipcode","Latitude","Longitude","Pathology","Visiting_Date",
      "Id_type","Id_personal","Number_Home_Visits","Is_Patient_Minor","Geo_point"]
   }
   date {
      match => ["Visiting_Date","dd-MM-YYYY HH:mm"]
      target => "Visiting_Date"
   }
   mutate {convert => ["Number_Home_Visits", "integer"]}
   mutate {convert => ["City_id", "integer"]}
   mutate {convert => ["Id_personal", "integer"]}
   mutate {convert => ["Id_type", "integer"]}
   mutate {convert => ["Zipcode", "integer"]}
   mutate {convert => ["Patient_Age", "integer"]}
   mutate {
      convert => { "Longitude" => "float" }
      convert => { "Latitude" => "float" }
   }
   mutate {
      rename => {
         "Longitude" => "[location][lon]"
         "Latitude" => "[location][lat]"
      }
   }
}
output {
   elasticsearch {
      hosts => ["localhost:9200"]
      index => "medicalvisits-%{+dd.MM.YYYY}"
   }
   stdout {codec => json_lines }
}
默认情况下,logstash 将所有在 elasticsearch 中上传的内容视为字符串。装箱您的 CSV文件具有日期字段,您需要执行以下操作以获取日期格式。
对于日期字段-
date {
   match => ["Visiting_Date","dd-MM-YYYY HH:mm"]
   target => "Visiting_Date"
}
在地理位置的情况下,elasticsearch 的理解与-
"location": {
   "lat":41.565505000000044,
   "lon": 2.2349995750000695
}
所以我们需要确保我们有elasticsearch需要的格式的经度和纬度。所以首先我们需要将经度和纬度转换为浮动,然后重命名它,以便它可以作为
location json 对象的一部分使用
lat 和
lon。此处显示了相同的代码-
mutate {
      convert => { "Longitude" => "float" }
      convert => { "Latitude" => "float" }
   }
mutate {
   rename => {
      "Longitude" => "[location][lon]"
      "Latitude" => "[location][lat]"
   }
}
要将字段转换为整数,请使用以下代码-
mutate {convert => ["Number_Home_Visits", "integer"]}
mutate {convert => ["City_id", "integer"]}
mutate {convert => ["Id_personal", "integer"]}
mutate {convert => ["Id_type", "integer"]}
mutate {convert => ["Zipcode", "integer"]}
mutate {convert => ["Patient_Age", "integer"]}
处理好字段后,运行以下命令将数据上传到elasticsearch-
进入 Logstash bin 目录并运行以下命令。
logstash-f logstash_homevisists.conf
完成后,您应该会在elasticsearch中看到logstash conf文件中提到的索引,如下所示-
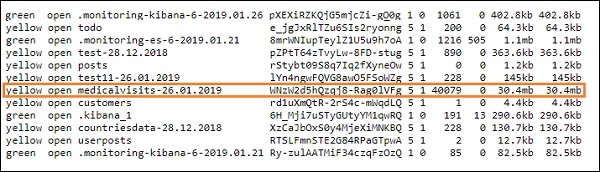
我们现在可以在上面上传的索引上创建索引模式,并进一步使用它来创建可视化。
使用开发工具上传批量数据
我们将使用 Kibana UI 中的开发工具。 Dev Tools 有助于在 Elasticsearch 中上传数据,而无需使用 Logstash。我们可以使用 Dev Tools 在 Kibana 中发布、放置、删除、搜索我们想要的数据。
在本节中,我们将尝试在 Kibana 本身中加载示例数据。我们可以用它来练习示例数据并尝试使用 Kibana 的功能来更好地理解 Kibana。
让我们从以下 url 中获取 json 数据并将其上传到 Kibana。同样,您可以尝试在 Kibana 中加载任何示例 json 数据。
在我们开始上传示例数据之前,我们需要有要在elasticsearch中使用的索引的json数据。当我们使用 logstash 上传它时,logstash 会注意添加索引,用户不必担心 elasticsearch 需要的索引。
普通 Json 数据
[
   {"type":"act","line_id":1,"play_name":"Henry IV",

   "speech_number":"","line_number":"","speaker":"","text_entry":"ACT I"},
   {"type":"scene","line_id":2,"play_name":"Henry IV",
   "speech_number":"","line_number":"","speaker":"","text_entry":"SCENE I.London. The palace."},
   {"type":"line","line_id":3,"play_name":"Henry IV",
   "speech_number":"","line_number":"","speaker":"","text_entry":
   "Enter KING HENRY, LORD JOHN OF LANCASTER, the
   EARL of WESTMORELAND, SIR WALTER BLUNT, and others"}
]
与 Kibana 一起使用的 json 代码必须索引如下-
{"index":{"_index":"shakespeare","_id":0}}
{"type":"act","line_id":1,"play_name":"Henry IV",
"speech_number":"","line_number":"","speaker":"","text_entry":"ACT I"}
{"index":{"_index":"shakespeare","_id":1}}
{"type":"scene","line_id":2,"play_name":"Henry IV",
"speech_number":"","line_number":"","speaker":"",
"text_entry":"SCENE I. London. The palace."}
{"index":{"_index":"shakespeare","_id":2}}
{"type":"line","line_id":3,"play_name":"Henry IV",
"speech_number":"","line_number":"","speaker":"","text_entry":
"Enter KING HENRY, LORD JOHN OF LANCASTER, the EARL
of WESTMORELAND, SIR WALTER BLUNT, and others"}
请注意,jsonfile 中有一个额外的数据-
{"index":{"_index":"nameofindex","_id":key}}。
要转换任何与elasticsearch兼容的示例json文件,这里我们在php中有一个小代码,它将输出给elasticsearch想要的格式的json文件-
PHP 代码
<?php
   $myfile = fopen("todo.json", "r") or die("Unable to open file!"); // your json
   file here
   $alldata = fread($myfile,filesize("todo.json"));
   fclose($myfile);
   $farray = json_decode($alldata);
   $afinalarray = [];
   $index_name = "todo";
   $i=0;
   $myfile1 = fopen("todonewfile.json", "w") or die("Unable to open file!"); //
   writes a new file to be used in kibana dev tool
   foreach ($farray as $a => $value) {
      $_index = json_decode('{"index": {"_index": "'.$index_name.'", "_id": "'.$i.'"}}');
      fwrite($myfile1, json_encode($_index));
      fwrite($myfile1, "\n");
      fwrite($myfile1, json_encode($value));
      fwrite($myfile1, "\n");
      $i++;
   }
?>
我们从 https://jsonplaceholder.typicode.com/todos 获取了 todo json 文件并使用php代码转换成我们需要在Kibana上传的格式。
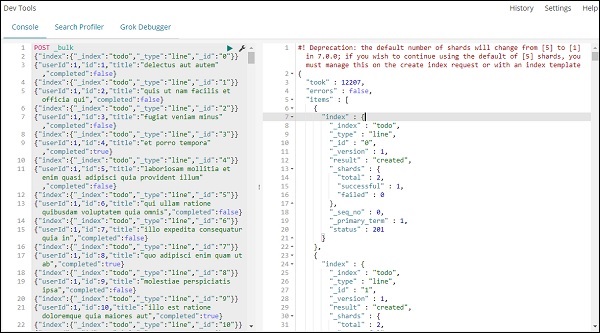
要加载示例数据,请打开开发工具选项卡,如下所示-
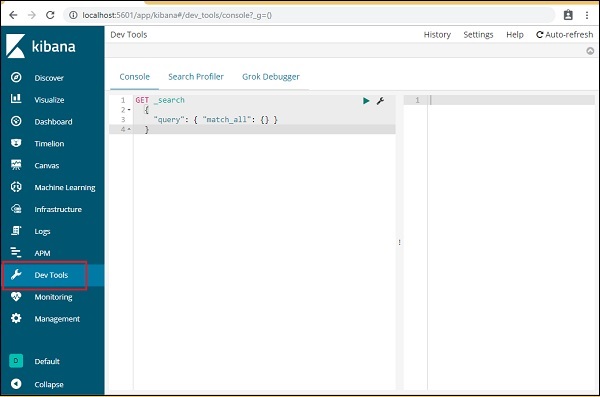
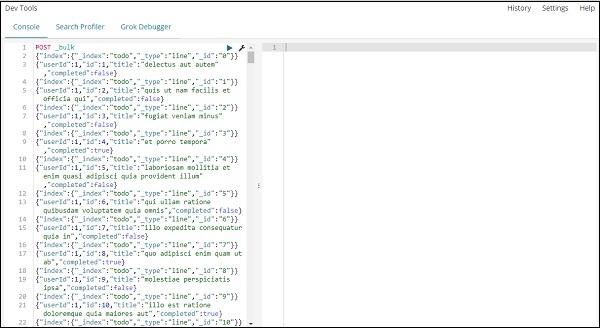
我们现在将使用如上所示的控制台。我们将通过php代码运行后得到的json数据。
在开发工具中用于上传 json 数据的命令是-
请注意,我们正在创建的索引名称是
todo。
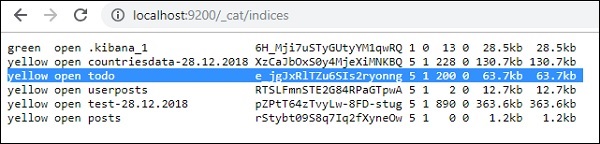
点击绿色按钮后,数据已上传,您可以在elasticsearch中检查索引是否已创建,如下所示-
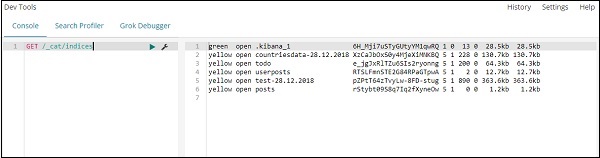
您可以在开发工具本身中检查相同的内容,如下所示-
命令-
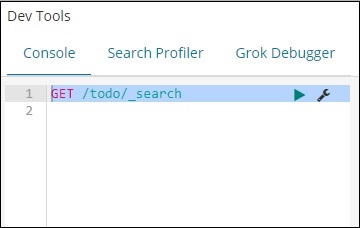
如果您想在 index:todo 中搜索某些内容,您可以按如下所示进行操作-
开发工具中的命令
上述搜索的输出如下所示-
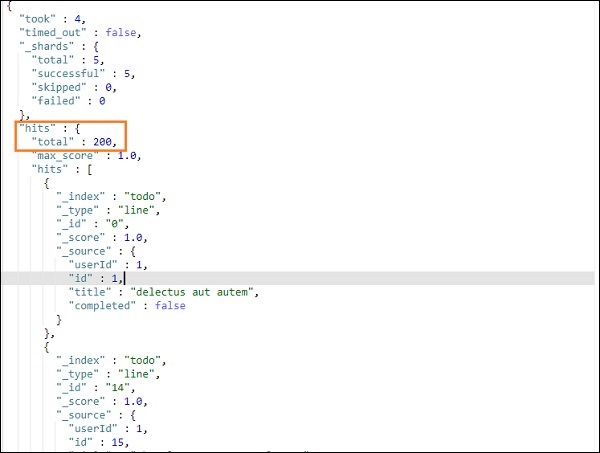
它给出了存在于 todoindex 中的所有记录。我们得到的记录总数是 200。
在待办事项索引中搜索记录
我们可以使用以下命令来做到这一点-
GET /todo/_search
{
   "query":{
      "match":{
         "title":"delectusautautem"
      }
   }
}
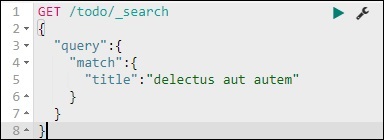
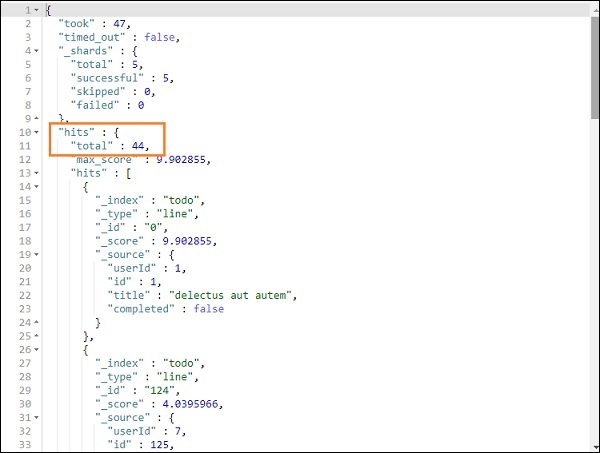
我们能够获取与我们给出的标题匹配的记录。

