Angular8 指令
Angular 8 指令是与您的应用程序交互的 DOM 元素。通常,指令是一个
TypeScript 函数。当这个函数执行
Angular 编译器检查它内部 DOM 元素。 Angular 指令以
ng- 开头,其中
ng 代表 Angular 并使用
@directive 装饰器扩展 HTML 标签。
指令使逻辑能够包含在 Angular 模板中。 Angular 指令可以分为三类,它们如下-
属性指令
用于为现有 HTML 元素添加新属性以更改其外观和行为。
<HTMLTag [attrDirective]='value' />
例如
<p [showToolTip]='Tips' />
此处,
showToolTip 指的是一个示例指令,当在 HTML 元素中使用时,将在用户悬停 HTML 元素时显示提示。
结构指令
用于添加或删除当前 HTML 文档中的 DOM 元素。
<HTMLTag [structuralDirective]='value' />
例如
<div *ngIf="isNeeded">
   Only render if the *isNeeded* value has true value.
</div>
这里,
ngIf 是一个内置指令,用于在当前 HTML 文档中添加或删除 HTML 元素。 Angular 提供了许多内置指令,我们将在后面的章节中学习。
基于组件的指令
组件可以用作指令。每个组件都有
Input 和
Output 选项以在组件与其父 HTML 元素之间传递。
<component-selector-name [input-reference]="input-value"> ... </component-selector-name>
例如
<list-item [items]="fruits"> ... </list-item>
这里,
list-item 是一个组件,
items 是输入选项。我们将在后面的章节中学习如何创建组件和高级用法。
在进入这个主题之前,让我们在 Angular 8 中创建一个示例应用程序
(directive-app) 来学习。
打开命令提示符并使用以下命令创建新的 Angular 应用程序-
cd /go/to/workspace
ng new directive-app
cd directive-app
使用 Angular CLI 创建一个
test 组件,如下所述-
ng generate component test
上面创建了一个新的组件,输出如下-
CREATE src/app/test/test.component.scss (0 bytes) CREATE src/app/test/test.component.html (19 bytes) CREATE src/app/test/test.component.spec.ts (614 bytes)
CREATE src/app/test/test.component.ts (262 bytes) UPDATE src/app/app.module.ts (545 bytes)
使用以下命令运行应用程序-
DOM 概览
让我们简要地看一下 DOM 模型。 DOM 用于定义访问文档的标准。通常,HTML DOM 模型被构造为对象树。它是访问 html 元素的标准对象模型。
出于以下原因,我们可以在 Angular 8 中使用 DOM 模型-
我们可以使用 DOM 元素轻松导航文档结构。
我们可以轻松添加 html 元素。
我们可以轻松更新元素及其内容。
结构指令
结构指令通过添加或删除元素来改变
DOM 的结构。它由带有三个预定义指令
NgIf、NgFor 和
NgSwitch 的 * 符号表示。让我们一一了解。
NgIf 指令
NgIf 指令用于根据条件变为真或假来显示或隐藏应用程序中的数据。我们可以将其添加到您模板中的任何标签中。
让我们在
directive-app 应用程序中尝试
ngIf 指令。
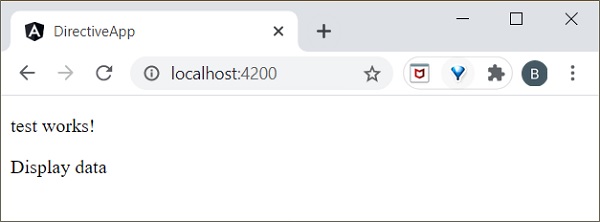
在
test.component.html 中添加以下标签。
<p>test works!</p>
<div *ngIf="true">Display data</div>
在您的
app.component.html 文件中添加测试组件,如下所示-
使用以下命令启动您的服务器(如果尚未启动)-
现在,运行您的应用程序,您可以看到以下响应-
如果您设置条件
ngIf="false" 那么,内容将被隐藏。
ngIfElse 指令
ngIfElse 与
ngIf 类似,不同之处在于它也提供了在失败情况下呈现内容的选项。
让我们通过一个示例来了解
ngIfElse 的工作原理。
在
test.component.ts 文件中添加以下代码。
export class TestComponent implements OnInit {
   isLogIn : boolean = false;
   isLogOut : boolean = true;
}
在
test.component.html 文件中添加以下代码如下-
<p>ngIfelse example!</p>
<div *ngIf="isLogIn; else isLogOut">
   Hello you are logged in
</div>
<ng-template #isLogOut>
   You're logged out..
</ng-template>
最后,使用以下命令启动您的应用程序(如果尚未完成)-
现在,运行您的应用程序,您可以看到以下响应-
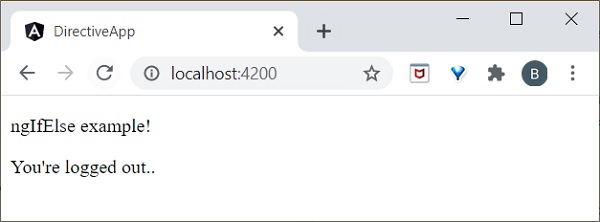
这里,
isLogOut
值被赋值为
true,所以它去
else 阻塞并渲染
ng-模板。我们将学习
ng-template 在本章后面。
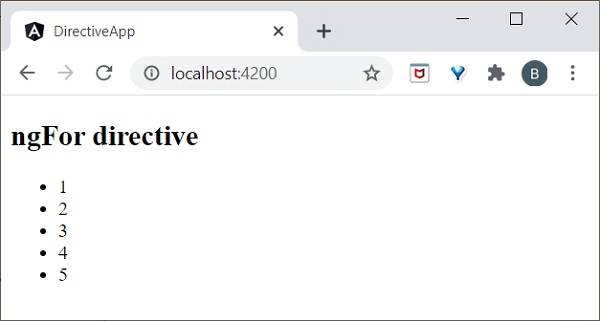
ngFor 指令
ngFor 用于重复项目列表中的部分元素。
让我们通过一个示例来了解 ngFor 的工作原理。
在 test.component.ts 文件中添加列表,如下所示-
在
test.component.html 中添加
ngFor 指令,如下所示-
<h2>ngfor directive</h2>
<ul>
   <li *ngFor="let l of list">
      {{l}}
   </li>
</ul>
这里, let 关键字创建了一个局部变量,它可以在模板中的任何地方被引用。 let l 创建模板局部变量以获取列表元素。
最后,使用以下命令启动您的应用程序(如果尚未完成)-
现在,运行您的应用程序,您可以看到以下响应-
trackBy
有时,对于大型列表,
ngFor 性能较低。例如,在列表中添加新项目或删除任何项目时可能会触发多个 DOM 操作。为了迭代大型对象集合,我们使用
trackBy。
用于跟踪元素何时添加或删除。它由 trackBy 方法执行。它有两个参数 index 和 element。索引用于唯一标识每个元素。下面定义了一个简单的例子。
让我们通过一个示例来了解 trackBy 如何与
ngFor 一起工作。
在
test.component.ts 文件中添加以下代码。
export class TestComponent {
   studentArr: any[] = [ {
      "id": 1,
      "name": "student1"
   },
   {
      "id": 2,
      "name": "student2"
   },
   {
      "id": 3, "name": "student3"
   },
   {
      "id": 4,
      "name": "student4"
   }
   ];
   trackByData(index:number, studentArr:any): number {
      return studentArr.id;
   }
这里,
我们已经创建了,
trackByData()
方法根据 id 以独特的方式访问每个学生元素。
在
test.component.html 文件中添加以下代码以定义 ngFor 中的 trackBy 方法。
<ul>
   <li *ngFor="let std of studentArr; trackBy: trackByData">
      {{std.name}}
   </li>
</ul>
最后,使用以下命令启动您的应用程序(如果尚未完成)-
现在,运行您的应用程序,您可以看到以下响应-
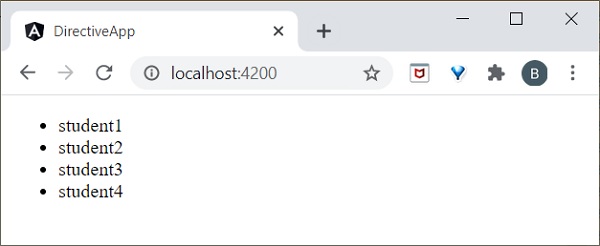
在这里,应用程序将打印学生姓名。现在,应用程序正在使用学生 ID 而不是对象引用来跟踪学生对象。因此,DOM 元素不受影响。
NgSwitch 指令
NgSWitch 用于检查多个条件并保持 DOM 结构简单易懂。
让我们在
directive-app 应用程序中尝试
ngSwitch 指令。
在
test.component.ts 文件中添加以下代码。
export class TestComponent implements OnInit {
   logInName = 'admin';
}
在 test.component.html 文件中添加以下代码如下-
<h2>ngswitch directive</h2>
<ul [ngSwitch]="logInName">
   <li *ngSwitchCase="'user'">
      <p>User is logged in..</p>
   </li>
   <li *ngSwitchCase="'admin'">
      <p>admin is logged in</p>
   </li>
   <li *ngSwitchDefault>
      <p>Please choose login name</p>
   </li>
</ul>
最后,使用以下命令启动您的应用程序(如果尚未完成)-
现在,运行您的应用程序,您可以看到以下响应-
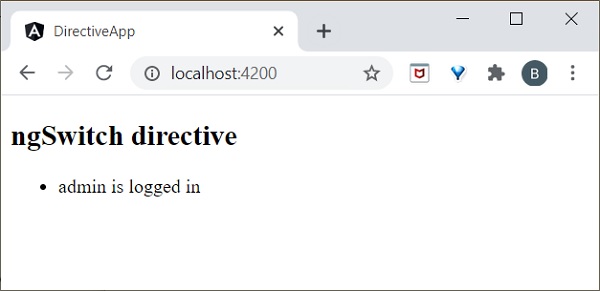
在这里,我们将
logInName 定义为
admin。 因此,它匹配第二个 SwitchCase 并打印上面与管理员相关的消息。
属性指令
属性指令执行 DOM 元素或组件的外观或行为。其中一些示例是 NgStyle、NgClass 和 NgModel。而 NgModel 是前一章解释的双向属性数据绑定。
ngStyle
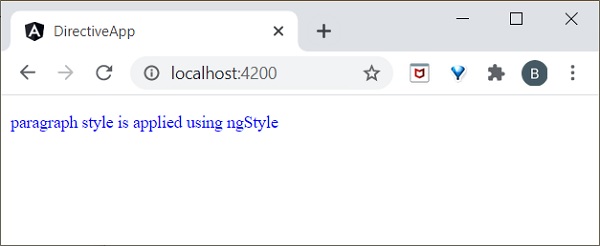
ngStyle 指令用于添加动态样式。下面的示例用于将蓝色应用于段落。
让我们在
directive-app 应用程序中尝试
ngStyle 指令。
在
test.component.html 文件中添加以下内容。
<p [ngStyle]="{'color': 'blue', 'font-size': '14px'}">
   paragraph style is applied using ngStyle
</p>
使用以下命令启动您的应用程序(如果尚未完成)-
现在,运行您的应用程序,您可以看到以下响应-
ngClass
ngClass 用于在 HTML 元素中添加或删除 CSS 类。
让我们在
directive-app 应用程序中尝试
ngClass 指令。
使用以下命令创建一个类
User
您可以看到以下响应-
CREATE src/app/user.spec.ts (146 bytes)
CREATE src/app/user.ts (22 bytes)
移至
src/app/user.ts 文件并添加以下代码-
export class User {
   userId : number; userName : string;
}
这里,我们在
User 类中创建了两个属性
userId 和
userName。
打开
test.component.ts 文件并添加以下更改-
import { User } from '../user';
export class TestComponent implements OnInit {
   users: User[] = [
      {
         "userId": 1,
         "userName": 'User1'
      },
      {
         "userId": 2,
         "userName": 'User2'
      },
   ];
}
这里,我们声明了一个局部变量 users 并用 2 个用户对象初始化。
打开
test.component.css 文件并添加以下代码
.highlight {
   color: red;
}
打开您的
test.component.html 文件并添加以下代码-
<div class="container">
   <br/>
   <div *ngFor="let user of users" [ngClass]="{
      'highlight':user.userName === 'User1'
   }">
      {{ user.userName }}
   </div>
</div>
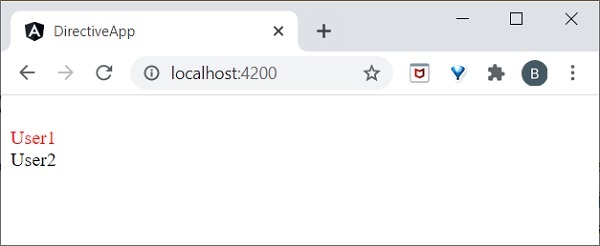
这里,
我们已经为
User1 申请了
ngClass,所以它会突出显示
User1。
最后,使用以下命令启动您的应用程序(如果尚未完成)-
现在,运行您的应用程序,您可以看到以下响应-
自定义指令
Angular 提供了使用用户定义的指令扩展 angular 指令的选项,它被称为
自定义指令。让我们在本章中学习如何创建自定义指令。
让我们尝试在
directive-app 应用程序中创建自定义指令。
Angular CLI 提供了以下命令来创建自定义指令。
ng generate directive customstyle
执行此命令后,您可以看到以下响应-
CREATE src/app/customstyle.directive.spec.ts (244 bytes)
CREATE src/app/customstyle.directive.ts (151 bytes) UPDATE src/app/app.module.ts (1115 bytes)
打开
app.module.ts. 指令将通过
declarations 元数据在
AppModule 中配置。
import { CustomstyleDirective } from './customstyle.directive';
@NgModule({
   declarations: [
      AppComponent,
      TestComponent,
      CustomstyleDirective
   ]
})
打开
customstyle.directive.ts 文件并添加以下代码-
import { Directive, ElementRef } from '@angular/core';
@Directive({
   selector: '[appCustomstyle]'
})
export class CustomstyleDirective {
   constructor(el: ElementRef) {
      el.nativeElement.style.fontSize = '24px';
   }
}
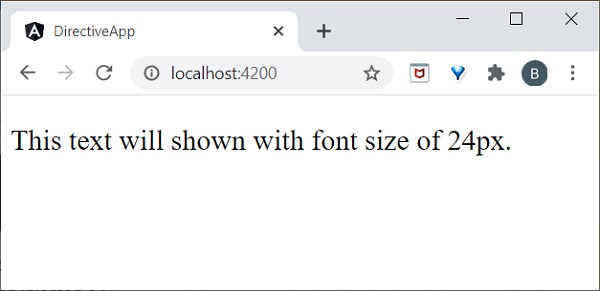
此处,
constructor 方法使用
CustomStyleDirective 作为
el 获取元素。然后,它访问 el 的样式并使用 CSS 属性将其字体大小设置为
24px。
最后,使用以下命令启动您的应用程序(如果尚未完成)-
现在,运行您的应用程序,您可以看到以下响应-
ng-模板
ng-template 用于创建动态和可重用的模板。它是一个虚拟元素。如果你使用
ng-template 编译你的代码,那么它会被转换为 DOM 中的注释。
例如
让我们在
test.component.html 页面中添加以下代码。
<h3>ng-template</h3>
<ng-template>ng-template tag is a virtual element</ng-template>
如果您运行该应用程序,那么它将仅打印
h3 元素。检查您的页面源,模板显示在评论部分,因为它是一个虚拟元素,因此它不会呈现任何内容。我们需要将
ng-template 与 Angular 指令一起使用。
通常,指令会发出与其关联的 HTML 标记。有时,我们不想要标签而只想要内容。例如,在下面的示例中,将发出 li。
<li *ngFor="let item in list">{{ item }}</li>
我们可以使用
ng-template 安全地跳过
li 标签。
带有结构指令的ng-template
ng-template 应始终在
ngIf、ngFor 或
ngSwitch 指令内使用以呈现结果。
让我们假设简单的代码。
<ng-template [ngIf]=true>
   <div><h2>ng-template works!</h2></div>
</ng-template>
这里,如果
ngIf 条件成立,它将打印 div 元素内的数据。同样,您也可以使用
ngFor 和
ngSwitch 指令。
NgForOf 指令
ngForOf 也是一个结构指令,用于呈现集合中的项目。下面的示例用于显示
ng-template 中的
ngForOf 指令。
import { Component, OnInit } from '@angular/core';
@Component({
   selector: 'app-test',
   template: `
   <div>
   <ng-template ngfor let-item [ngForOf]="Fruits" let-i="index">
   <p>{{i}}</p>
   </ng-template>
   </div>`
   ,
   styleUrls: ['./test.component.css']
})
export class TestComponent implements OnInit {
   Fruits = ["mango","apple","orange","grapes"];
   ngOnInit()
   {
   }
}
如果您运行该应用程序,它将显示每个元素的索引,如下所示-
组件指令
组件指令基于组件。实际上,每个组件都可以用作指令。组件提供@Input 和@Output 装饰器,用于在父子组件之间发送和接收信息。
让我们尝试在我们的
directive-app 应用程序中使用组件作为指令。
使用以下命令创建一个新的
ChildComponent-
ng generate component child
CREATE src/app/child/child.component.html (20 bytes) CREATE src/app/child/child.component.spec.ts (621 bytes)
CREATE src/app/child/child.component.ts (265 bytes) CREATE src/app/child/child.component.css (0 bytes) UPDATE src/app/app.module.ts (466 bytes)
打开
child.component.ts 并添加以下代码-
@Input() userName: string;
这里,我们为
ChildComponent 设置输入属性。
打开
child.component.html 并添加以下代码-
<p>child works!</p>
<p>Hi {{ userName }}</p>
在这里,我们使用值 userName 来欢迎用户。
打开
test.component.ts 并添加以下代码-
打开
test.component.html 并添加以下代码-
<h1>Test component</h1>
<app-child [userName]="name"><app-child>
在这里,我们在
TestComponent 中使用
AppComponent 作为具有输入属性的指令。
最后,使用以下命令启动您的应用程序(如果尚未完成)-
现在,运行您的应用程序,您可以看到以下响应-
[](images/directive-app/component_as_directive.PNG"
工作示例
让我们在
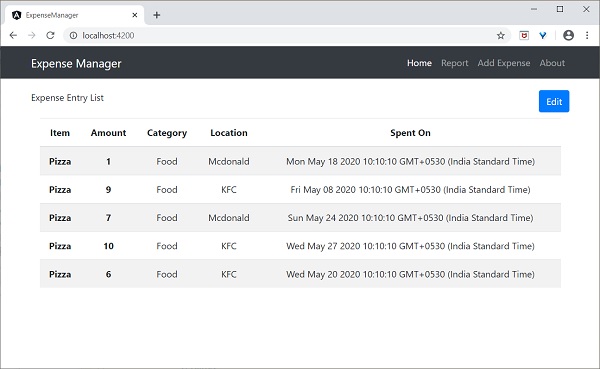
ExpenseManager 应用程序中添加一个新组件来列出费用条目。
打开命令提示符并转到项目根文件夹。
cd /go/to/expense-manager
启动应用程序。
使用以下命令创建一个新组件
ExpenseEntryListComponent-
ng generate component ExpenseEntryList
输出
输出如下-
CREATE src/app/expense-entry-list/expense-entry-list.component.html (33 bytes)
CREATE src/app/expense-entry-list/expense-entry-list.component.spec.ts (700 bytes)
CREATE src/app/expense-entry-list/expense-entry-list.component.ts (315 bytes)
CREATE src/app/expense-entry-list/expense-entry-list.component.css (0 bytes)
UPDATE src/app/app.module.ts (548 bytes)
此处,该命令创建 ExpenseEntryList 组件并更新
AppModule 中的必要代码。
将
ExpenseEntry导入
ExpenseEntryListComponent组件
(src/app/expense-entry-list/expense-entry-list.component)
import { ExpenseEntry } from '../expense-entry';
在
ExpenseEntryListComponent (src/app/expense-entry-list/expense-entry-list.component) 中添加一个方法,getExpenseEntries() 以返回费用条目(模拟项目)列表)
getExpenseEntries() : ExpenseEntry[] {
   let mockExpenseEntries : ExpenseEntry[] = [
      { id: 1,
         item: "Pizza",
         amount: Math.floor((Math.random() * 10) + 1),
         category: "Food",
         location: "Mcdonald",
         spendOn: new Date(2020, 4, Math.floor((Math.random() * 30) + 1), 10, 10, 10),
         createdOn: new Date(2020, 4, Math.floor((Math.random() * 30) + 1), 10, 10, 10) },
      { id: 1,
         item: "Pizza",
         amount: Math.floor((Math.random() * 10) + 1),
         category: "Food",
         location: "KFC",
         spendOn: new Date(2020, 4, Math.floor((Math.random() * 30) + 1), 10, 10, 10),
         createdOn: new Date(2020, 4, Math.floor((Math.random() * 30) + 1), 10, 10, 10) },
      { id: 1,
         item: "Pizza",
         amount: Math.floor((Math.random() * 10) + 1),
         category: "Food",
         location: "KFC",
         spendOn: new Date(2020, 4, Math.floor((Math.random() * 30) + 1), 10, 10, 10),
         createdOn: new Date(2020, 4, Math.floor((Math.random() * 30) + 1), 10, 10, 10)
      },
   ];
   return mockExpenseEntries;
}
声明一个局部变量,费用条目并加载如下所述的费用条目的模拟列表-
title: string;
expenseEntries: ExpenseEntry[];
constructor() { }
ngOnInit() {
   this.title = "Expense Entry List";
   this.expenseEntries = this.getExpenseEntries();
}
打开模板文件
(src/app/expense-entry-list/expense-entry-list.component.html) 并在表格中显示模拟条目。
<!--Page Content-->
<div class="container">
   <div class="row">
      <div class="col-lg-12 text-center" style="padding-top: 20px;">
         <div class="container" style="padding-left: 0px; padding-right: 0px;">
            <div class="row">
               <div class="col-sm" style="text-align: left;">
                  {{ title }}
               </div>
               <div class="col-sm" style="text-align: right;">
                  <button type="button" class="btn btn-primary">Edit</button>
               </div>
            </div>
         </div>
         <div class="container box" style="margin-top: 10px;">
            <table class="table table-striped">
               <thead>
                  <tr>
                     <th>Item</th>
                     <th>Amount</th>
                     <th>Category</th>
                     <th>Location</th>
                     <th>Spent On</th>
                  </tr>
               </thead>
               <tbody>
                  <tr *ngFor="let entry of expenseEntries">
                     <th scope="row">{{ entry.item }}</th>
                     <th>{{ entry.amount }}</th>
                     <td>{{ entry.category }}</td>
                     <td>{{ entry.location }}</td>
                     <td>{{ entry.spendOn | date: 'short' }}</td>
                  </tr>
               </tbody>
            </table>
         </div>
      </div>
   </div>
</div>
这里,
使用过的引导表。 table 和 table-striped 将根据 Boostrap 样式标准设置表格样式。
使用 ngFor 循环遍历 expenseEntries 并生成表格行。
打开
AppComponent 模板,
src/app/app.component.html 并包含
ExpenseEntryListComponent 并删除
ExpenseEntryComponent如下图所示-
...
<app-expense-entry-list></app-expense-entry-list>
最后,应用程序的输出如下所示。