C# 列表框控件
C# 列表框控件
列表框控件为我们提供了一个用户界面,用于显示项目列表。从那里,用户可以从列表中选择一项或多项。我们可以使用 ListBox 来显示多列,这些列可以包含图像和其他控件。
C# 中的 ListBox 控件创建
用于创建 ListBox,我们将遵循 Windows 窗体中的两种方法。创建ListBox控件,既可以在设计时使用Forms Designer,也可以在运行时使用ListBox类来创建控件。
ListBox Creation at设计时
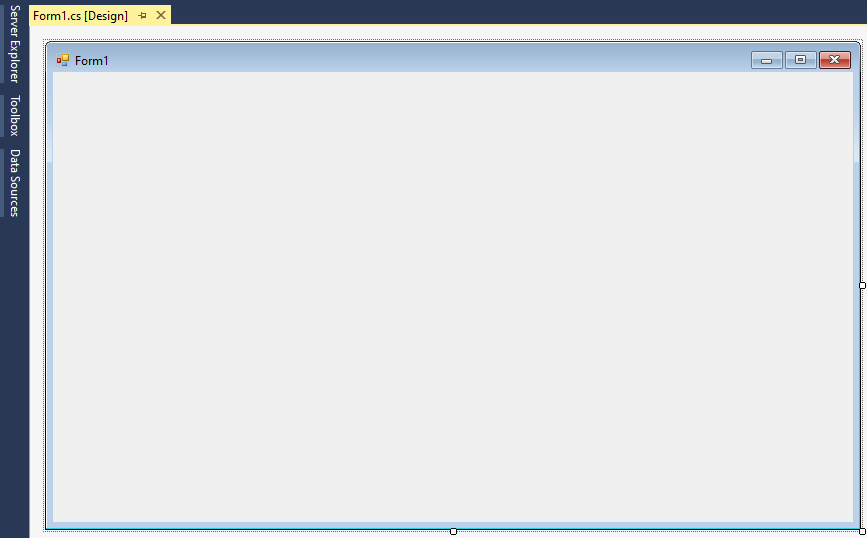
在我们的第一种方法中,我们将在设计时使用 Windows 窗体创建 ListBox 控件。
要创建 ListBox 控件,我们只需拖动工具箱中的 ListBox 控件并将其拖放到窗体中。拖放 Listbox 后,Form 将如下图所示。当 ListBox 显示在 Form 上时,现在我们将使用鼠标调整其大小并设置其属性和事件。

动态创建 ListBox 的方法
ListBox 类以 Windows 形式显示 ListBox 控件。对于创建 ListBox 的运行时执行,首先,我们将创建 ListBox 类的实例并设置其属性,并将 ListtBox 对象添加到 Form Control。
步骤 1. 首先要创建动态列表框,我们将创建列表框类的实例。
要创建列表框的对象,我们将编写以下代码:
ListBox List1 = new ListBox();
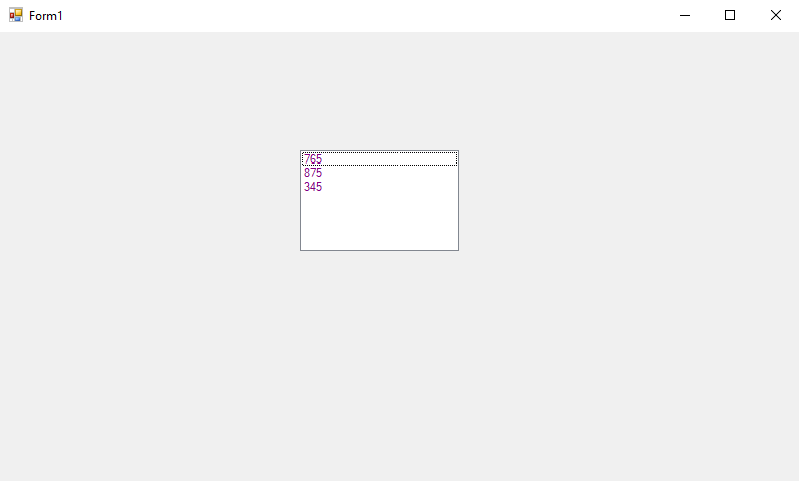
步骤 2、 在下一步中,我们将设置 ListBox 控件的属性。为此,我们将编写以下代码。在属性中我们将设置ListBox的位置、宽度、高度、背景色、前景色、名称和字体属性,如下图:
ListBox box = new ListBox();
box.Location = new Point(300, 110);
box.Size = new Size(160, 103);
box.ForeColor = Color.Purple;
box.Items.Add(765);
box.Items.Add(875);
box.Items.Add(345);
第 3 步。 使用 ListBox 控件设置属性后,下一步我们将把 ListBox 添加到表单中。为此,我们将使用 Form.Controls.Add 方法,该方法会将 ListBox 控件添加到 Form 控件,并根据它们的位置和大小将其显示在 Form 上。
// Now we will add ListBox control
            // to the form
            this.Controls.Add(box);
现在我们将编写一个代码来在 ListBox 控件中添加项并在列表中显示它们。
示例:
using System;
using System.Collections.Generic;
using System.ComponentModel;
using System.Data;
using System.Drawing;
using System.Linq;
using System.Text;
using System.Threading.Tasks;
using System.Windows.Forms;
namespace WindowsFormsApp2
{
    public partial class Form1: Form
    {
        public Form1()
        {
            InitializeComponent();

        }
        private void Form1_Load(object sender, EventArgs e)
        {
            ListBox box = new ListBox();
            box.Location = new Point(300, 110);
            box.Size = new Size(160, 103);
            box.ForeColor = Color.Purple;
            box.Items.Add(765);
            box.Items.Add(875);
            box.Items.Add(345);
            // Now we will add ListBox control
            // to the form
            this.Controls.Add(box);
        }

    }
}
输出:
现在我们将举另一个在运行时创建 ListBox 项的示例。
为此,将按照与上述代码相同的步骤进行操作。
步骤 1、 首先,我们将创建一个 ListBox 对象。为此,我们将编写以下代码:
ListBox ListItem = new ListBox();
步骤 2、 在下一步中,我们将设置 ListBox 控件的属性。我们将编写位置、宽度、高度等的代码。
ListItem.Location = new System.Drawing.Point(15, 15);
ListItem.Name = "ListItem";
ListItem.Size = new System.Drawing.Size(350, 400);
ListItem.BackColor = System.Drawing.Color.Orange;
ListItem.ForeColor = System.Drawing.Color.Black;
第 3 步。现在我们将使用以下代码在运行时将项目添加到 ListBox 中。
ListItem.Items.Add("Vaishali Tyagi");
ListItem.Items.Add("Samlesh Tyagi");
ListItem.Items.Add("Preeti Tyagi");
ListItem.Items.Add("Priyanka Tyagi");
第 4 步。 在下一步中,我们将把 ListBox 添加到表单中。为此,我们将使用 Forms.Controls.Add 方法,该方法帮助我们将 ListBox 控件添加到 Forms 控件,并根据控件的位置和大小将其显示在 Form 上。
this.Controls.Add(ListItem);
现在我们将用 C# 编写代码,以在 Windows 窗体中创建 ListBox 控件。
示例 2、
using System;
using System.Collections.Generic;
using System.ComponentModel;
using System.Data;
using System.Drawing;
using System.Linq;
using System.Text;
using System.Threading.Tasks;
using System.Windows.Forms;
namespace WindowsFormsApp2
{
    public partial class Form1: Form
    {
        public Form1()
        {
            InitializeComponent();

        }
        ListBox ListItem = new ListBox();
        private void Form1_Load(object sender, EventArgs e)
      {
            ListItem.Location = new System.Drawing.Point(15, 15);
            ListItem.Name = "ListItem";
            ListItem.Size = new System.Drawing.Size(350, 400);
            ListItem.BackColor = System.Drawing.Color.Orange;
            ListItem.ForeColor = System.Drawing.Color.Black;
            ListItem.Items.Add("Vaishali Tyagi");
            ListItem.Items.Add("Samlesh Tyagi");
            ListItem.Items.Add("Preeti Tyagi");
            ListItem.Items.Add("Priyanka Tyagi");
            this.Controls.Add(ListItem);
        }
    }
}
输出:
以上代码说明
C#中ListBox的属性
ListBox名称属性
name 属性表示 ListBox 控件的唯一名称。我们在代码中使用了这个名称来访问控件。下面的代码设置并获取ListBox控件的文本名称。
ListItem.Name = "ListItem";
ListBox 的位置、高度、宽度和大小属性
Location: Location 属性包含一个点,该点显示了 ListBox 上的起始位置表格。我们还可以使用 Left 和 Top 属性从 Form 的左上角显示控件的位置。
Size: size 属性显示控件的大小控制。我们还可以使用 width 和 height 属性代替 size 属性。为此,我们将编写以下代码来设置 ListBox 控件的位置、高度和宽度属性。
ListItem.Location = new System.Drawing.Point(15, 15);
ListItem.Size = new System.Drawing.Size(350, 400);
ListBox 的字体
Font 属性显示了 ListBox 控件文本的字体。当我们在那里的属性窗口中单击字体属性时,我们可以看到字体的名称、大小和其他选项的字体。为此,我们将编写以下代码,在运行时设置 Font 属性。
ListItem.Font = new Font("Georgia", 16);
ListBox 的背景色和前景色
为了设置ListBox 的背景色和前景色,我们使用了BackColor 和Forecolor 属性。在属性窗口中点击这些属性后,会出现一个颜色对话框。
为此,我们将编写以下代码:
ListItem.BackColor = System.Drawing.Color.Orange;
ListItem.ForeColor = System.Drawing.Color.Black;
使用 ListBox 在 C# 中创建应用程序
这里我们将在 ListBox 中添加元素,删除元素并将它们显示在 GridView 中。
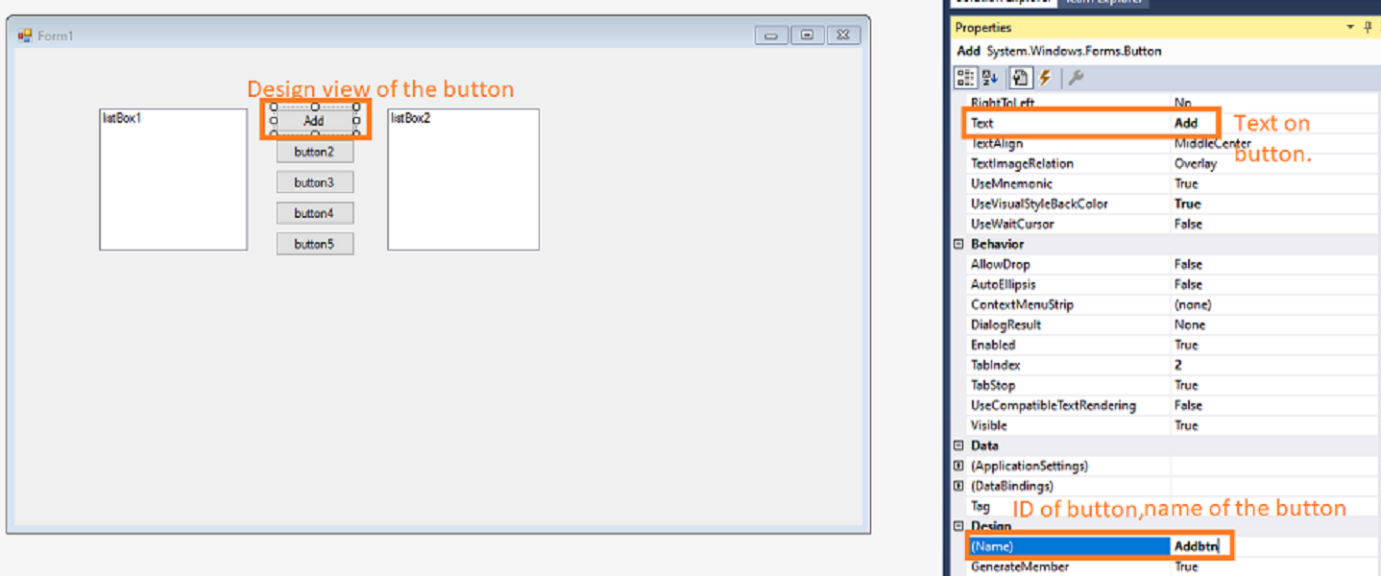
对于应用程序的创建,我们将设计一个用户界面,其中界面包含两个列表框(listbox1 和 listbox2),五个按钮,包括不同的功能,即,将数据从第一个列表框添加到第二个列表框,删除data、Add All、Remove All、Finalize 和一个 GridView,我们将在其中显示 Finalize 数据。
要设计图形用户界面,我们将遵循以下步骤:
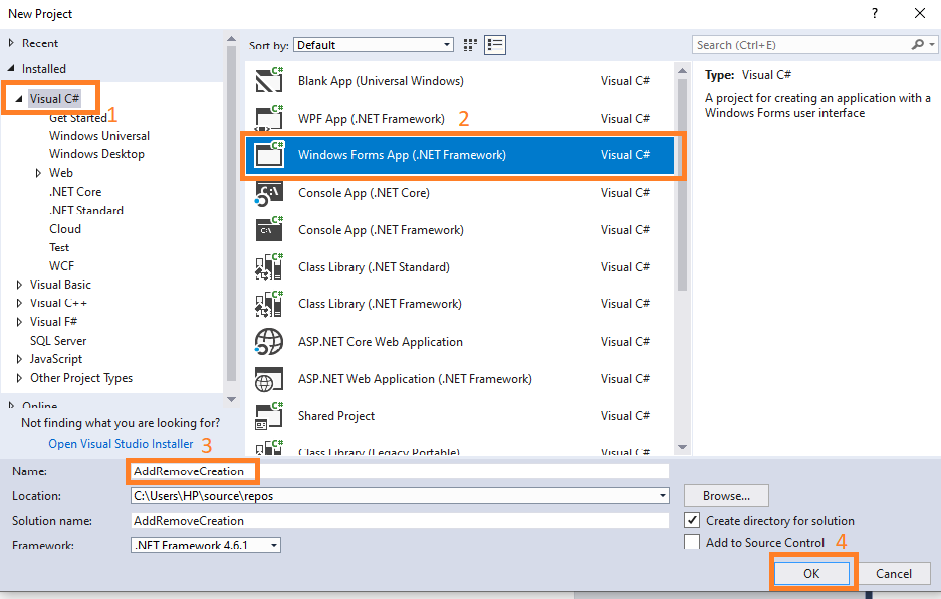
Step1. 首先,我们将创建一个新项目用于创建项目;我们将按照以下步骤进行:
点击New->Project,如下图所示。

步骤 2。之后,将显示一个新窗口,我们在其中选择 Visual C#->Windows 窗体应用程序-> 项目名称(AddRemoveCreation)并单击确定,如下面的屏幕截图所示。
第 3 步。 之后,将创建一个表单,如下面的屏幕截图所示:
步骤 4、 在下一步中,我们将从工具箱中拖放 ListBox。这里我们将使用两个 ListBox(ListBox1 和 ListBox2)和五个按钮(添加、删除、添加全部、全部删除和完成)。

步骤 5. 在下一步中,我们将通过右键更改按钮的文本和名称-点击按钮->选择属性->更改文本名称,如下图所示:

第 6 步。 点击属性后,将打开属性窗口,我们将在其中更改按钮的名称和文本按钮如下图所示:
第 7 步。 在此之后,我们将在单击 GridView 中的完成按钮后显示数据。为此,我们将点击 Data->GridView。
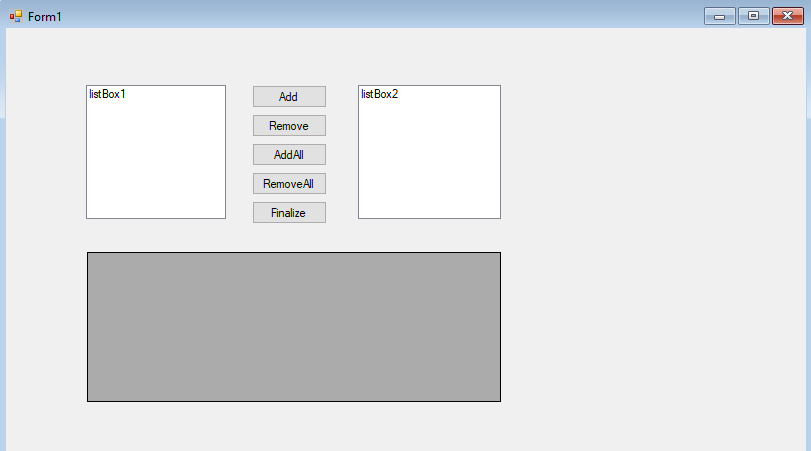
之后,页面将如下所示:
现在我们将展示如何在listbox1中添加数据并在ListBox2中导入数据。
为此,我们将执行以下代码:
using System;
using System.Collections.Generic;
using System.ComponentModel;
using System.Data;
using System.Drawing;
using System.Linq;
using System.Text;
using System.Threading.Tasks;
using System.Windows.Forms;
namespace AddRemoveCreation
{
     public partial class Form1: Form
    {
        //create an object dtCourse of the DataTable.
        private DataTable dtCourse = new DataTable();
        //create an object dtSelectedCourse of the DataTable.
        private DataTable dtSelectedCourse = new DataTable();
        public Form1()
        {
            //InitializeComponent() is used to initialize the form.
            InitializeComponent();
        }
        private void Form1_Load(object sender, EventArgs e)
        {
            //call the function at the form loading
            FillCouseTable();
            SelectedCourseTable();
            //Add the value in the DataSource of the ListBox1
            listBox1.DataSource = dtCourse;
            //listbox1.DisplayMember is used to decide which column we want to show in the final output
            listBox1.DisplayMember = "CourseName";
            //dtSelectedCourse datatable add the value in the listbox2 datasource
            listBox2.DataSource = dtSelectedCourse;
            listBox2.DisplayMember = "CourseName";
        }
        //FillCourseTable() function is declare to add the data in the datatable with the help of the data object
        private void FillCouseTable()
        {
            //adding the column name
            dtCourse.Columns.Add("CourseID", typeof(int));
            dtCourse.Columns.Add("CourseName");
            dtCourse.Columns.Add("CourseDuration");
            //add the data in the dtCourse table
            dtCourse.Rows.Add(1, "Advance OOPS", "4 Months");
            dtCourse.Rows.Add(2, "Data Structure", "5 Months");
            dtCourse.Rows.Add(3, "Java", "6 Months");
            dtCourse.Rows.Add(4, "C++", "3 Months");
            dtCourse.Rows.Add(5, "C", "2 Months");
        }
        //SelectedCourseTable() function is declare which contain the column name of the data table.
        private void SelectedCourseTable()
        {
            dtSelectedCourse.Columns.Add("CourseID", typeof(int));
            dtSelectedCourse.Columns.Add("CourseName");
            dtSelectedCourse.Columns.Add("CourseDuration");
        }
        //After clicking on the add button function Addbtn_Click() is create which contain the functionality of Add button
        private void Addbtn_Click(object sender, EventArgs e)
        {
            //if the condition applies if the listbox1 contain the item greater than zero then this will import the data in the listbox2 and delete the data from the listbox1
            if(listBox1.Items.Count>0)
            {
                //Here we are improting the data to the dtSelectedCourse datatable from the dtcourse datatable
                dtSelectedCourse.ImportRow(dtCourse.Rows[listBox1.SelectedIndex]);
                dtCourse.Rows[listBox1.SelectedIndex].Delete();
            }
        }
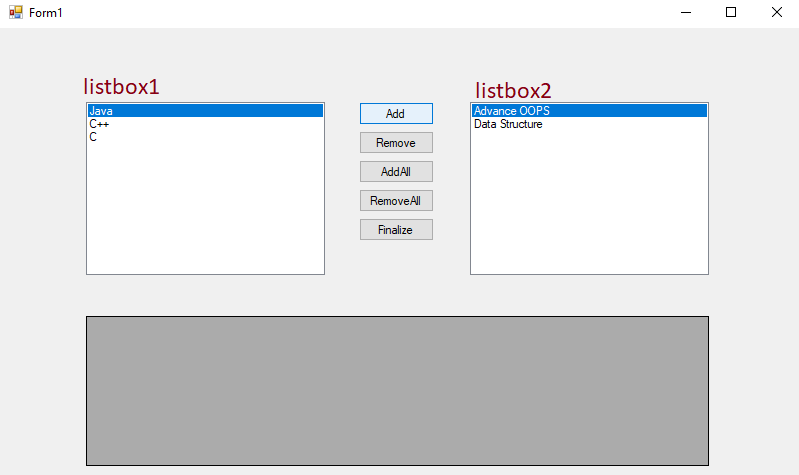
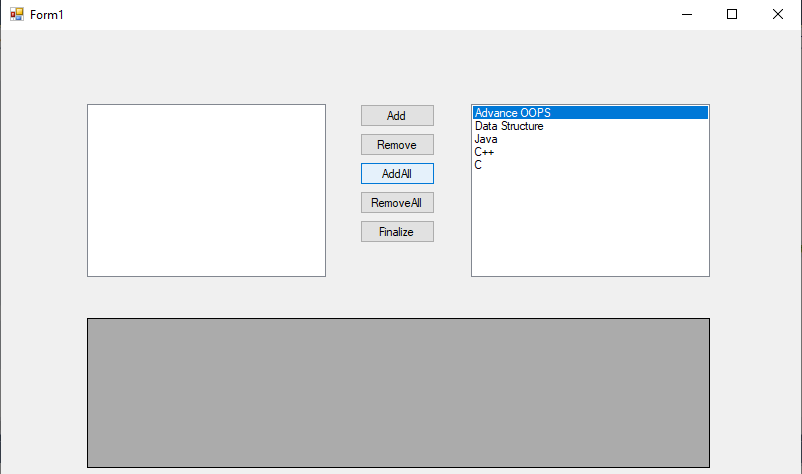
这里我们将展示包含数据的 listbox1、

点击添加按钮后,数据将添加到listbox2并从listbox1中删除。
从 ListBox 中删除数据
这里我们将展示如何从listbox2中删除数据。
为此,我们将编写以下代码:
using System;
using System.Collections.Generic;
using System.ComponentModel;
using System.Data;
using System.Drawing;
using System.Linq;
using System.Text;
using System.Threading.Tasks;
using System.Windows.Forms;
namespace AddRemoveCreation
{
     public partial class Form1: Form
    {
        //create an object dtCourse of the DataTable.
        private DataTable dtCourse = new DataTable();
        //create an object dtSelectedCourse of the DataTable.
        private DataTable dtSelectedCourse = new DataTable();
        public Form1()
        {
            //InitializeComponent() is used to initialize the form.
            InitializeComponent();
        }
        private void Form1_Load(object sender, EventArgs e)
        {
            //call the function at the form loading
            FillCouseTable();
            SelectedCourseTable();
            //Add the value in the DataSource of the ListBox1
            listBox1.DataSource = dtCourse;
            //listbox1.DisplayMember is used to decide which column we want to show in the final output
            listBox1.DisplayMember = "CourseName";
            //dtSelectedCourse datatable add the value in the listbox2 datasource
            listBox2.DataSource = dtSelectedCourse;
            listBox2.DisplayMember = "CourseName";
        }
        //FillCourseTable() function is declare to add the data in the datatable with the help of the data object
        private void FillCouseTable()
        {
            //adding the column name
            dtCourse.Columns.Add("CourseID", typeof(int));
            dtCourse.Columns.Add("CourseName");
            dtCourse.Columns.Add("CourseDuration");
            //add the data in the dtCourse table
            dtCourse.Rows.Add(1, "Advance OOPS", "4 Months");
            dtCourse.Rows.Add(2, "Data Structure", "5 Months");
            dtCourse.Rows.Add(3, "Java", "6 Months");
            dtCourse.Rows.Add(4, "C++", "3 Months");
            dtCourse.Rows.Add(5, "C", "2 Months");
        }
        //SelectedCourseTable() function is declare which contain the column name of the data table.
        private void SelectedCourseTable()
        {
            dtSelectedCourse.Columns.Add("CourseID", typeof(int));
            dtSelectedCourse.Columns.Add("CourseName");
            dtSelectedCourse.Columns.Add("CourseDuration");
        }

//After clicking on the Remove button Removebtn_Click() function is created where we remove the element from the listbox2 and import the data in the data table.
        private void Removebtn_Click(object sender, EventArgs e)
        {
            //for removing the element we apply condition if listbox contain the element greater than zero
            if (listBox2.Items.Count > 0)
            {
                //here the data will be import to the datatable dtcourse from the dtSelected Database.
                dtCourse.ImportRow(dtSelectedCourse.Rows[listBox2.SelectedIndex]);
                //All data will be deleted from the datatable dtSelectedCourse
                dtSelectedCourse.Rows[listBox2.SelectedIndex].Delete();
            }
        }
}
}
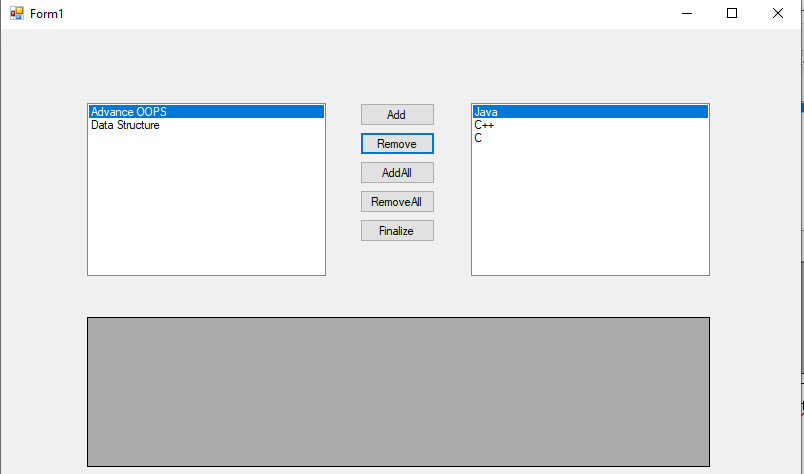
在删除数据之前,整个数据都在listbox2中,listbox1不包含任何值。输出将如下所示:
After单击删除按钮,数据将从列表框 2 中删除并添加到列表框 1,如下图所示:
一次性添加ListBox中的全部数据
将listbox1的完整数据添加到listbox2 ,我们将编写如下代码:
using System;
using System.Collections.Generic;
using System.ComponentModel;
using System.Data;
using System.Drawing;
using System.Linq;
using System.Text;
using System.Threading.Tasks;
using System.Windows.Forms;
namespace AddRemoveCreation
{
     public partial class Form1: Form
    {
        //create an object dtCourse of the DataTable.
        private DataTable dtCourse = new DataTable();
        //create an object dtSelectedCourse of the DataTable.
        private DataTable dtSelectedCourse = new DataTable();
        public Form1()
        {
            //InitializeComponent() is used to initialize the form.
            InitializeComponent();
        }
        private void Form1_Load(object sender, EventArgs e)
        {
            //call the function at the form loading
            FillCouseTable();
            SelectedCourseTable();
            //Add the value in the DataSource of the ListBox1
            listBox1.DataSource = dtCourse;
            //listbox1.DisplayMember is used to decide which column we want to show in the final output
            listBox1.DisplayMember = "CourseName";
            //dtSelectedCourse datatable add the value in the listbox2 datasource
            listBox2.DataSource = dtSelectedCourse;
            listBox2.DisplayMember = "CourseName";
        }
        //FillCourseTable() function is declare to add the data in the datatable with the help of the data object
        private void FillCouseTable()
        {
            //adding the column name
            dtCourse.Columns.Add("CourseID", typeof(int));
            dtCourse.Columns.Add("CourseName");
            dtCourse.Columns.Add("CourseDuration");
            //add the data in the dtCourse table
            dtCourse.Rows.Add(1, "Advance OOPS", "4 Months");
            dtCourse.Rows.Add(2, "Data Structure", "5 Months");
            dtCourse.Rows.Add(3, "Java", "6 Months");
            dtCourse.Rows.Add(4, "C++", "3 Months");
            dtCourse.Rows.Add(5, "C", "2 Months");
        }
        //SelectedCourseTable() function is declare which contain the column name of the data table.
        private void SelectedCourseTable()
        {
            dtSelectedCourse.Columns.Add("CourseID", typeof(int));
            dtSelectedCourse.Columns.Add("CourseName");
            dtSelectedCourse.Columns.Add("CourseDuration");
        }
        //After clicking on the AddAll button AddAllbtn_Click() function is create.
        private void AddAllbtn_Click(object sender, EventArgs e)
        {
            //if condition is apply this will check if the listbox contain the element greater than zero.
            if(listBox1.Items.Count>0)
            {
                //dtCourse.Rows.Count will count the element and assign the value in the count variable.
                int count = dtCourse.Rows.Count;
                //for condition is apply this will going upto the count
                for(int i=count-1;i>=0;i--)
                {
                    //dtCourse.Rows[listbox1.SelectedIndex] with the help of this data will be import to the dtSelected datatable.
                    dtSelectedCourse.ImportRow(dtCourse.Rows[listBox1.SelectedIndex]);
                    //with this code data eill be delete from the dtCourse datatable.
                    dtCourse.Rows[listBox1.SelectedIndex].Delete();
                }
            }
        }
}
}
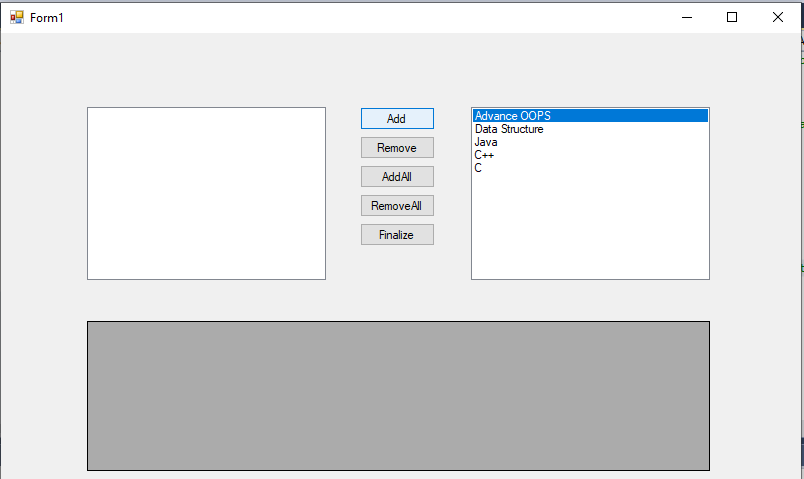
listbox1中的数据如下图:
写完这段代码后,AddAll按钮就起作用了,如下图:
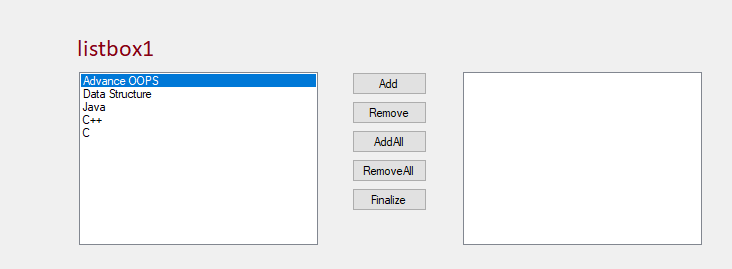
从ListBox中删除所有数据
这里我们将listbox2中的数据全部移除,listbox1中的数据全部添加。
为了将Listbox中的数据全部移除,我们将编写如下代码:
>
using System;
using System.Collections.Generic;
using System.ComponentModel;
using System. Data;
using System. Drawing;
using System. Linq;
using System. Text;
using System.Threading.Tasks;
using System.Windows.Forms;
namespace AddRemoveCreation
{
     public partial class Form1: Form
    {
        //create an object dtCourse of the DataTable.
        private DataTable dtCourse = new DataTable();
        //create an object dtSelectedCourse of the DataTable.
        private DataTable dtSelectedCourse = new DataTable();
        public Form1()
        {
            //InitializeComponent() is used to initialize the form.
            InitializeComponent();
        }
        private void Form1_Load(object sender, EventArgs e)
        {
            //call the function at the form loading
            FillCouseTable();
            SelectedCourseTable();
            //Add the value in the DataSource of the ListBox1
            listBox1.DataSource = dtCourse;
            //listbox1.DisplayMember is used to decide which column we want to show in the final output
            listBox1.DisplayMember = "CourseName";
            //dtSelectedCourse datatable add the value in the listbox2 datasource
            listBox2.DataSource = dtSelectedCourse;
            listBox2.DisplayMember = "CourseName";
        }
        //FillCourseTable() function is declare to add the data in the datatable with the help of the data object
        private void FillCouseTable()
        {
            //adding the column name
            dtCourse.Columns.Add("CourseID", typeof(int));
            dtCourse.Columns.Add("CourseName");
            dtCourse.Columns.Add("CourseDuration");
            //add the data in the dtCourse table
            dtCourse.Rows.Add(1, "Advance OOPS", "4 Months");
            dtCourse.Rows.Add(2, "Data Structure", "5 Months");
            dtCourse.Rows.Add(3, "Java", "6 Months");
            dtCourse.Rows.Add(4, "C++", "3 Months");
            dtCourse.Rows.Add(5, "C", "2 Months");
        }
        //SelectedCourseTable() function is declare which contain the column name of the data table.
        private void SelectedCourseTable()
        {
            dtSelectedCourse.Columns.Add("CourseID", typeof(int));
            dtSelectedCourse.Columns.Add("CourseName");
            dtSelectedCourse.Columns.Add("CourseDuration");
        }
//After clicking on the Remove button RemoveAllbtn_Click() function is create.
        private void RemoveAllbtn_Click(object sender, EventArgs e)
        {
            //if the condition is applied, this will count the listbox2 containing the value.
            if (listBox2.Items.Count > 0)
            {
                int count = dtSelectedCourse.Rows.Count;
                //for loop is apply which will go upto the greater than zero
                for (int i = count-1; i >= 0; i--)
                {
                    //dtCourse datatable import the data from the dtSelectedCourse datatable.
                    dtCourse.ImportRow(dtSelectedCourse.Rows[listBox2.SelectedIndex]);
                    //data will be deleted from the dtSelectedCourse datatable.
                    dtSelectedCourse.Rows[listBox2.SelectedIndex].Delete();
                }

            }
        }
}
}

显示数据GridView 中的 ListBox
这里我们将使用 GridView 在点击完成按钮后显示 ListBox2 的所有数据。
为了在 GridView 中显示数据,我们将编写以下代码:
using System;
using System.Collections.Generic;
using System.ComponentModel;
using System. Data;
using System. Drawing;
using System. Linq;
using System. Text;
using System.Threading.Tasks;
using System.Windows.Forms;
namespace AddRemoveCreation
{
    public partial class Form1: Form
    {
        //create an object dtCourse of the DataTable.
        private DataTable dtCourse = new DataTable();
        //create an object dtSelectedCourse of the DataTable.
        private DataTable dtSelectedCourse = new DataTable();
        public Form1()
        {
            //InitializeComponent() is used to initialize the form.
            InitializeComponent();
        }
        private void Form1_Load(object sender, EventArgs e)
        {
            //call the function at the form loading
            FillCouseTable();
            SelectedCourseTable();
            //Add the value in the DataSource of the ListBox1
            listBox1.DataSource = dtCourse;
            //listbox1.DisplayMember is used to decide which column we want to show in the final output
            listBox1.DisplayMember = "CourseName";
            //dtSelectedCourse datatable add the value in the listbox2 datasource
            listBox2.DataSource = dtSelectedCourse;
            listBox2.DisplayMember = "CourseName";
        }
        //FillCourseTable() function is declare to add the data in the datatable with the help of the data object
        private void FillCouseTable()
        {
            //adding the column name
            dtCourse.Columns.Add("CourseID", typeof(int));
            dtCourse.Columns.Add("CourseName");
            dtCourse.Columns.Add("CourseDuration");
            //add the data in the dtCourse table
            dtCourse.Rows.Add(1, "Advance OOPS", "4 Months");
            dtCourse.Rows.Add(2, "Data Structure", "5 Months");
            dtCourse.Rows.Add(3, "Java", "6 Months");
            dtCourse.Rows.Add(4, "C++", "3 Months");
            dtCourse.Rows.Add(5, "C", "2 Months");
        }
        //SelectedCourseTable() function is declare which contain the column name of the data table.
        private void SelectedCourseTable()
        {
            dtSelectedCourse.Columns.Add("CourseID", typeof(int));
            dtSelectedCourse.Columns.Add("CourseName");
            dtSelectedCourse.Columns.Add("CourseDuration");
        }
//Clicking on the Finalize button Finalizebtn_Click() function is create
        private void Finalizebtn_Click(object sender, EventArgs e)
        {
            // create an object of the DialoResult where we will show the message with the help of the MessageBox.Show() function.
            DialogResult dialog=MessageBox.Show("Are you sure you want to finalize the selected course", "Confirmation Message", MessageBoxButtons.YesNo, MessageBoxIcon.Question);
            //Condition is apply if the result is yes.
            if(dialog==DialogResult.Yes)
            {
                //Shows the result of the dtSelectedCourse datatable to GridView.
                dataGridView1.DataSource = dtSelectedCourse;
                //to stop the editing we enable the datagridview to false.
                dataGridView1.Enabled = false;
                //With this code we apply the visiblity of the column index 0 to false.
                dataGridView1.Columns[0].Visible = false;
                //hide the header value of the row
                dataGridView1.RowHeadersVisible = false;
            }
            else
            {
                //if the result no, then shows the message with the help of the MessageBox.Show().
                MessageBox.Show("Please Select Atleast one course","Information Message", MessageBoxButtons.YesNo, MessageBoxIcon.Information);
            }
        }
}
}
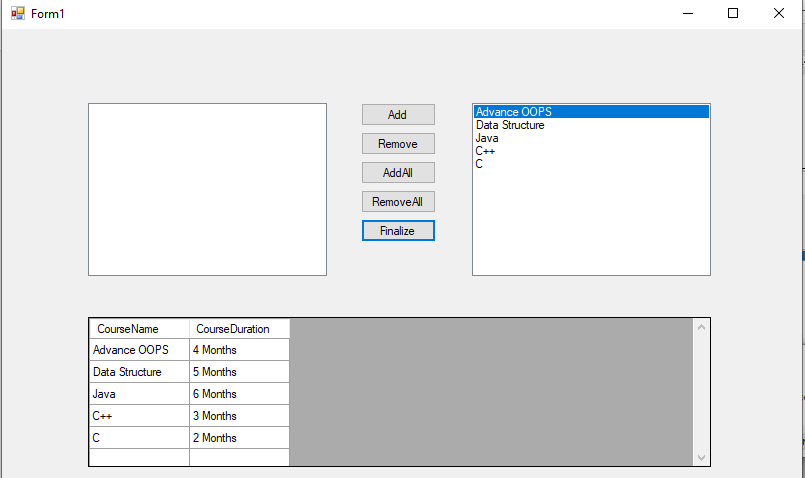
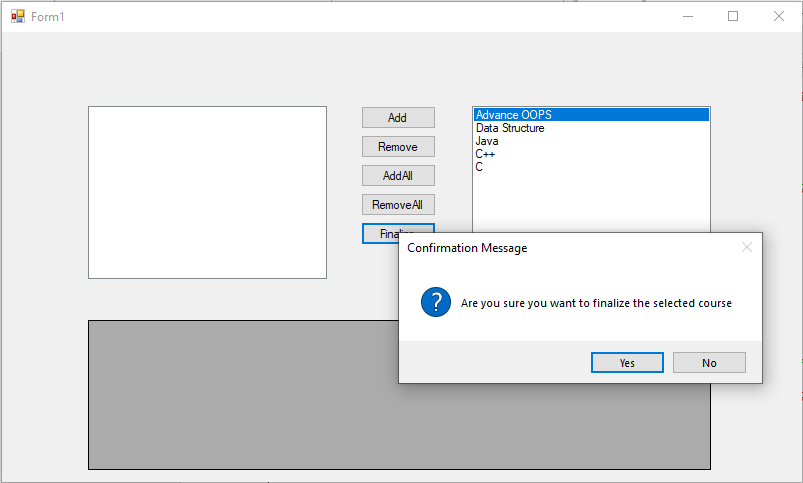
点击Finalize按钮后,会显示确认信息。
点击yes后,聚合数据显示在GridView中,如下图所示: