FuelPHP 表单编程
FuelPHP 提供了三个类,
Form Fieldset 和
Input,用于执行表单编程。
Form 类提供了创建所有 HTML 表单元素的选项。
Fieldset 类提供了通过更高级别的方法创建 html 元素、集成模型和验证的选项。
Input 类提供了一个选项来解析通过 html 表单提交的数据以及 http 参数、服务器变量和用户代理。
在本章中,让我们学习 FuelPHP 中的
表单编程。
Table
如前所述,Form类提供了创建html表单元素的方法,重要的方法如下-
open()
open() 用于创建新表单。它提供以下两个参数-
$attributes-表单标签的属性作为数组或只是操作 URL 作为字符串。
$hidden-隐藏字段名称及其值的数组。
echo Form::open('/employee/add');
echo Form::open(array('action' => '/employee/add', 'method' => 'post'));
close()
close() 只是关闭表单。
input()
input() 创建 html 输入元素。它有以下三个参数,
$field-输入元素的名称
$value-输入元素的值
$attributes-输入元素作为数组的属性
echo Form::input('name', 'jon', array('style' => 'border: 20px;'));
标签元素
label 创建 html 标签元素。它有以下三个参数,
$label-要显示的标签
$id-关联的表单元素 id
$attributes-标签元素作为数组的属性
echo Form::label('Employee Name', 'employee_name');
hidden
hidden 与输入法类似,只是它将输入元素的类型设置为隐藏。
password
password 与输入法类似,只是它将输入元素的类型设置为密码。
radio
radio 与输入法类似,只是它将输入元素的类型设置为单选。它有以下四个参数,
$field-输入元素的名称
$value-输入元素的值
$checked-项目是否被选中(真/假)
$attributes-输入元素作为数组的属性
echo Form::label('Male', 'gender');
echo Form::radio('gender', 'Male', true);
echo Form::label('Female', 'gender');
echo Form::radio('gender', 'Female');
checkbox
checkbox 类似于输入法,只不过它设置了输入元素的类型为复选框。它有以下四个参数,
$field-输入元素的名称
$value-输入元素的值
$checked-项目是否被选中(真/假)
$attributes-输入元素作为数组的属性
echo Form::label('Male', 'gender');
echo Form::checkbox('gender', 'Male', true);
echo Form::label('Female', 'gender');
echo Form::checkbox('gender', 'Female');
file
file 与输入法类似,只是它将输入元素的类型设置为文件。
textarea
textarea 创建 html textarea 元素。它有以下三个参数,
$field-textarea 元素的名称
$value-textarea 元素的值
$attributes-作为数组的 textarea 元素的属性
echo Form::textarea ('description', 'original data (value)', array ('rows' => 6,
      'cols' => 8));
select
select 创建一个 HTML 选择元素。它有以下四个参数-
$field-选择元素的名称
$values-初始选择值
$options-选项作为数组。可以使用嵌套数组对选项进行分组
$attributes-输入元素作为数组的属性
echo Form::select (
   'country',
   'none',
   array (
      'none'  => 'None',
      'asia'  => array (
         'in' > 'India',
         'cn' => 'China'
      ),

      'us' => 'United States'
   )
);
submit
submit 类似于输入法,不同之处在于它设置要提交的输入元素的类型。
button
button 创建 html 按钮元素。它有以下三个参数,
$field-按钮元素的名称
$value-按钮元素的值
$attributes-按钮元素作为数组的属性
echo Form::button('emp_submit', 'Submit');
reset
reset 类似于输入法,不同之处在于它设置要重置的输入元素的类型。
fieldset_open
fieldset_open 创建 html 字段集和图例元素。它有以下两个参数-
attributes-fieldset 元素作为数组的属性
legend-要创建的图例名称
// returns <fieldset class = "example-class" id = "example-id">
<legend>
   Custom Legend
</legend>
echo Form::fieldset_open (array (
   'class'  => 'example-class',
   'id'     => 'exampleid',
   'legend' => 'Custom Legend'
));
fieldset_close
fieldset_close 创建 HTML 字段集关闭标记。
// returns </fieldset>
echo Form::fieldset_close();
Input Class
Input 类提供了读取所有请求数据以及表单详细信息的方法。一些重要的方法如下-
uri
uri 返回请求的当前 URI
// request: http://localhost:8080/employee/welcome
echo Input::uri(); // return /employee/welcome
method
method 返回请求中使用的 HTTP 方法
echo Input::method() // "POST"
get
get 允许读取 $_GET 变量。它有以下两个参数,
$index-$_GET 数组的索引
$default-默认值,如果没有找到索引。
echo Input::get('age', '20'); // returns $_GET['age']
post
post 允许读取 $_POST 变量。它有以下两个参数,
$index-$_POST 数组的索引
$default-默认值,如果没有找到索引
echo Input::get('age', '20'); // returns $_POST['age']
param
param 允许从 $_GET、$_POST、$_PUT 或 $_DELETE 变量中获取项目。它有以下两个参数,
$index-数组的索引
$default-默认值,如果没有找到索引
如果不指定参数,将返回所有项目。
echo Input::param('age', '20'); // returns $_POST['age']
file
file 允许读取 $_FILE 变量。它有以下两个参数,
$index-$_POST 数组的索引
$default-默认值,如果没有找到索引
is_ajax
is_ajax 返回 true,如果请求是通过 AJAX 发出的。
echo Input::is_ajax() // return false
protocol
protocol 返回请求中使用的 HTTP 协议。
echo Input::protocol() // returns "HTTP"
ip
ip 返回发出请求的 IP 地址。
echo Input::ip() // returns "84.45.34.24" (public IP Address)
real_ip
real_ip 尝试返回发出请求的真实 IP 地址(如果客户端位于代理之后)。
echo Input::real_ip() // returns "10.76.12.1" (local private IP Address)
server
server 允许读取 $_SERVER 变量。它有以下两个参数,
$index-$_POST 数组的索引
$default-默认值,如果没有找到索引。
echo Input::server('HTTP_HOST'); // returns localhost:8080
referrer
referrer 从 $_SERVER 变量返回引用者。是获取当前请求的http referrer的快捷方式。
user_agent
user_agent 从 $_SERVER 变量返回用户代理。是获取当前请求的http用户代理的快捷方式。
query_string
query_string 从 $_SERVER 变量返回查询字符串。是获取当前请求的查询字符串的快捷方式。
headers
headers 返回特定或所有标题。它有以下两个参数-
$index-HTTP 标头的名称
$default-默认值,如果没有找到索引。
echo Input::headers('Content-Type'); // returns "text/html"
extension
extension 返回当前请求的 URI 扩展名。
// Example URL: http://localhost/test/
echo Input::extension();  // null
// Example URL: http://localhost/test.html
echo Input::extension();  // 'html'
工作示例
让我们使用 Form 和 Input 类创建一个简单的表单来添加新员工。
创建表单
在员工控制器中创建新操作,
get_add,如下所示。
public function get_add() {
   return Response::forge(View::forge('employee/add'));
}
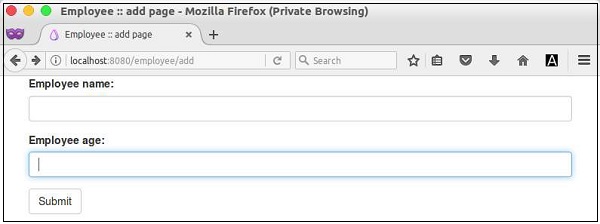
现在,为动作添加视图,fuel/app/views/employee/add.php,如下所示。
<!DOCTYPE html>
<html lang = "en">
   <head>
      <title>Employee :: add page</title>
      <meta charset = "utf-8">
      <meta name = "viewport" content = "width = device-width, initial-scale = 1">
      <?php echo Asset::css('bootstrap.css'); ?>
   </head>

   <body>
      <div class = "container">
         <?php
            echo Form::open(array('action' => 'employee/add', 'method' => 'post'));
         ?>

         <div class = "form-group">
            <?php
               echo Form::label('Employee name:', 'name');
               echo Form::input('name', '', array('class' => 'form-control'));
            ?>
         </div>

         <div class = "form-group">
            <?php
               echo Form::label('Employee age:', 'age');
               echo Form::input('age', '', array('class' => 'form-control'));
            ?>
         </div>

         <?php echo Form::button('frmbutton', 'Submit', array(
            'class' => 'btn btn-default'));
         ?>

         <?php
            echo Form::close();
         ?>
      </div>
   </body>

</html>
在这里,我们使用了
bootstrap 来设计表单。 FuelPHP 完全支持引导组件。现在,请求页面,http://localhost:8080/employee/add 将显示以下表单。
Process Form
创建新动作,
post_add处理表单并将用户输入的员工数据添加到员工控制器中的数据库中,如下所示。
public function post_add() {
   $name = Input::post('name');
   $age = Input::post('age');
   $model = new model_employee();
   $model->name = $name;
   $model->age = $age;
   $model->save();
   Response::redirect('employee/list');
}
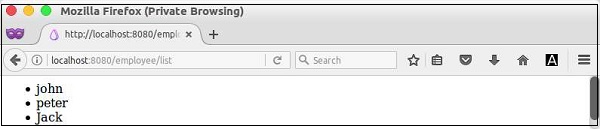
在这里,我们被重定向到员工列表页面,一旦用户输入的数据被保存到数据库中。接下来,我们将创建员工列表页面。
List Employee
创建新的动作 action_list 以列出数据库中的员工,如下所示。
public function action_list() {
   $data = array();
   $data['emps'] = model_employee::find('all');
   return Response::forge(view::forge('employee/list', $data));
}
为上述操作创建新视图,
fuel/app/views/employee/list,如下所示。
<ul>
   <?php
      foreach($emps as $emp) {
   ?>
   <li><?php echo $emp['name']; ?></li>
   <?php
   }
   ?>
</ul>
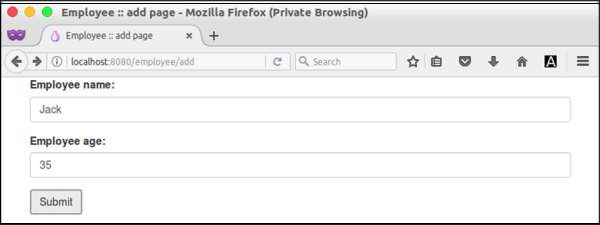
Check the Form
现在,请求 URL,
http://localhost:8080/employee/add,输入一些员工数据,如下面的屏幕截图所示,然后提交表单。
然后,它显示数据库中可用的所有员工(包括新添加的员工)如下-