import {ApolloClient, HttpLink, InMemoryCache} from 'apollo-boost'
const cache = new InMemoryCache();
const client = new ApolloClient({
   link: new HttpLink(),
   cache
});
| Sr.No. | 参数和说明 |
| 1 |
addTypename
一个布尔值,用于确定是否将 __typename 添加到文档中(默认:true)
|
| 2 |
dataIdFromObject
一个函数,它接受一个数据对象并返回一个在规范化存储中的数据时使用的唯一标识符
|
| 3 |
fragmentMatcher
默认情况下,InMemoryCache 使用启发式片段匹配器
|
| 4 |
cacheRedirects
在请求发生之前将查询重定向到缓存中的另一个条目的函数映射。
|
type Query {
   students:[Student]
   getTime:String
}
type Student {
   id:ID!
   firstName:String
   lastName:String
   fullName:String
}
const db = require('./db')
const Query = {
      students:() => db.students.list(),
      getTime:() => {
      const today = new Date();
      var h = today.getHours();
      var m = today.getMinutes();
      var s = today.getSeconds();
      return `${h}:${m}:${s}`;
   }
}
module.exports = {Query}
{
   getTime
   students {
      id
      firstName
   }
}
{
   "data": {
      "getTime": "22:18:42",
      "students": [
         {
            "id": "S1001",
            "firstName": "Mohtashim"
         },
         {
            "id": "S1002",
            "firstName": "Kannan"
         },
         {
            "id": "S1003",
            "firstName": "Kiran"
         }
      ]
   }
}
npx create-react-app hello-world-client
npm install apollo-boost graphql
{
   'apollo-cache': '^1.1.15',
   'apollo-cache-inmemory': '^1.2.8',
   'apollo-client': '^2.4.0',
   'apollo-link': '^1.0.6',
   'apollo-link-error': '^1.0.3',
   'apollo-link-http': '^1.3.1',
   'apollo-link-state': '^0.4.0',
   'graphql-tag': '^2.4.2'
}
hello-world-client /
  -->node_modules
  -->public
      index.html
  -->src
      index.js
      students.js
  -->package.json
import React, {Component} from 'react';
import ReactDOM from 'react-dom';
import {HashRouter, Route, Link} from 'react-router-dom'
//components
import Students from './students'
class App extends Component {
render() {
return(
<div><h1>Home !!</h1>
<h2>Welcome to React Application !! </h2>
</div>
)
}
}
function getTime() {
var d = new Date();
return d.getHours()+":"+d.getMinutes()+":"+d.getSeconds()
}
const routes = <HashRouter>
<div>
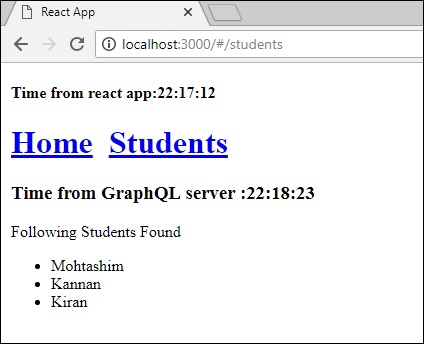
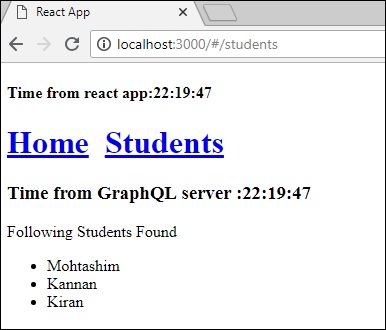
<h4>Time from react app:{getTime()}</h4>
<header>
<h1> <Link to="/">Home</Link>
<Link to = "/students">Students</Link> </h1>
</header>
<Route exact path = "/students" component = {Students}></Route>
<Route exact path = "/" component = {App}></Route>
</div>
</HashRouter>
ReactDOM.render(routes, document.querySelector("#root"))
async loadWithApolloclient() {
   const query = gql`{
      getTime
      students {
         id
         firstName
      }
   }`;
   const {data} = await  client.query({query})
   return data;
}
async  loadStudents_noCache() {
      const response = await fetch('http://localhost:9000/graphql', {
      method:'POST',
      headers:{'content-type':'application/json'},
      body:JSON.stringify({query:`{
         getTime
         students {
            id
            firstName
         }
      }`})
   })
   const rsponseBody = await response.json();
   return rsponseBody.data;
}
import React, {Component} from 'react';
import { Link} from 'react-router-dom'
//Apollo Client
import {ApolloClient, HttpLink, InMemoryCache} from 'apollo-boost'
import gql from 'graphql-tag'
const client = new ApolloClient({
   link: new HttpLink({uri:`http://localhost:9000/graphql`}),
   cache:new InMemoryCache()
})
class Students extends Component {
   constructor(props) {
      super(props);
      this.state = {
         students:[{id:1,firstName:'test'}],
         serverTime:''
      }
      this.loadWithApolloclient().then(data => {
         this.setState({
            students:data.students,
            serverTime:data.getTime
         })
      })
   }

   async  loadStudents_noCache() {
      const response = await fetch('http://localhost:9000/graphql', {
         method:'POST',
         headers:{'content-type':'application/json'},
         body:JSON.stringify({query:`{
            getTime
            students {
               id
               firstName
            }
         }`})
      })
      const rsponseBody =  await response.json();
      return rsponseBody.data;
   }

   async loadWithApolloclient() {
      console.log("inside apollo client function")
      const query = gql`{
         getTime
         students {
            id
            firstName
         }
      }`;
      const {data} = await  client.query({query})
      return data;
   }

   render() {
      return(
         <div>
            <h3>Time from GraphQL server :{this.state.serverTime}</h3>
            <p>Following Students Found </p>
            <div>
               <ul>
                  {
                     this.state.students.map(s => {
                        return(
                           <li key = {s.id}>
                              {s.firstName}
                           </li>
                        )
                     })
                  }
               </ul>
            </div>
         </div>
      )
   }
}
export default Students
this.loadStudents_noCache().then(data => {
   this.setState({
      students:data.students,
      serverTime:data.getTime
   })
})