GraphQL 查询
GraphQL 操作可以是读取或写入操作。 GraphQL 查询用于读取或获取值,而突变用于写入或发布值。在任何一种情况下,操作都是一个简单的字符串,GraphQL 服务器可以解析和响应特定格式的数据。通常用于移动和网络应用程序的流行响应格式是 JSON。
定义查询的语法如下-
//syntax 1
query query_name{ someField }
//syntax 2
{ someField }
以下是一个查询示例-
//query with name myQuery
query myQuery{
   greeting
}
// query without any name
{
   greeting
}
从上面的例子可以清楚地看出查询关键字是可选的。
GraphQL 查询有助于减少过度获取数据。与 Restful API 不同,GraphQL 允许用户限制应该从服务器获取的字段。这意味着更小的查询和更少的网络流量;这反过来又减少了响应时间。
插图 1-使用自定义字段查询学生模型
在这个例子中,我们将一组学生存储在一个 json 文件中。每个学生模型都有像 firstName、lastName 和 id 这样的字段,但没有 fullName。在这里,我们将讨论如何进行查询以检索所有学生的 fullName。为此,我们需要在两个架构解析器中创建 fullName 字段。
让我们看看如何使用以下步骤来做这个插图-
步骤 1-下载并安装项目所需的依赖项
创建一个名为
query-app 的文件夹。从终端将目录更改为
query-app。稍后,按照"环境设置"一章中介绍的步骤 3 到 5 进行操作。
第 2 步-创建架构
在项目文件夹 query-app 中添加
schema.graphql 文件并添加以下代码-
type Query {
   greeting:String
   students:[Student]
   studentById(id:ID!):Student
}
type Student {
   id:ID!
   firstName:String
   lastName:String
   fullName:String
}
请注意,
students.json 文件中没有
fullName 字段。但是,我们需要获取学生的
全名通过查询新台币。所述的
全名的,在这种情况下将是不可用的数据源的自定义字段。
步骤 3-创建解析器
在项目文件夹中创建一个文件
resolvers.js 并添加以下代码-
const db = require('./db')
const Query = {
   //resolver function for greeting
   greeting:() => {
      return "hello from  TutorialsPoint !!!"
   },

   //resolver function for students returns list
   students:() => db.students.list(),
   //resolver function for studentbyId
   studentById:(root,args,context,info) => {
      //args will contain parameter passed in query
      return db.students.get(args.id);
   }
}
//for each single student object returned,resolver is invoked
const Student = {
   fullName:(root,args,context,info) => {
      return root.firstName+":"+root.lastName
   }
}
module.exports = {Query,Student}
第 4 步-运行应用程序
创建的
server.js 的文件。请参阅环境设置章节中的步骤 8、在终端中执行命令
npm start。服务器将在 9000 端口上启动并运行。在这里,我们使用 GraphiQL 作为客户端来测试应用程序。
打开浏览器并输入 URL
http://localhost:9000/graphiql。在编辑器中输入以下查询-
{
   students{
      id
      fullName
   }
}
用于查询的响应在下面给出-
{
   "data": {
      "students": [
         {
            "id": "S1001",
            "fullName": "Mohtashim:Mohammad"
         },

         {
            "id": "S1002",
            "fullName": "Kannan:Sudhakaran"
         },

         {
            "id": "S1003",
            "fullName": "Kiran:Panigrahi"
         }
      ]
   }
}
创建的
server.js 和添加以下代码-
const bodyParser = require('body-parser');
const cors = require('cors');
const express = require('express');
const db = require('./db');
const port = 9000;
const app = express();
//loading type definitions from schema file
const fs = require('fs')
const typeDefs = fs.readFileSync('./schema.graphql',{encoding:'utf-8'})
//loading resolvers
const resolvers = require('./resolvers')
//binding schema and resolver
const {makeExecutableSchema} = require('graphql-tools')
const schema = makeExecutableSchema({typeDefs, resolvers})
//enabling cross domain calls and form post
app.use(cors(), bodyParser.json());
//enabling routes
const  {graphiqlExpress,graphqlExpress} = require('apollo-server-express')
app.use('/graphql',graphqlExpress({schema}))
app.use('/graphiql',graphiqlExpress({endpointURL:'/graphql'}))
//registering port
app.listen(port, () => console.info(`Server started on port ${port}`));
执行在该终端的命令NPM启动。服务器将在 9000 端口上启动并运行。在这里,我们使用 GraphiQL 作为客户端来测试应用程序。
打开浏览器并输入 URL
http://localhost:9000/graphiql。在编辑器中输入以下查询-
{
   students{
      id
      fullName
   }
}
查询的响应如下-
{
   "data": {
      "students": [
         {
            "id": "S1001",
            "fullName": "Mohtashim:Mohammad"
         },
         {
            "id": "S1002",
            "fullName": "Kannan:Sudhakaran"
         },
         {
            "id": "S1003",
            "fullName": "Kiran:Panigrahi"
         }
      ]
   }
}
插图2 -嵌套查询
让我们获取学生信息和自己的大学细节创建嵌套查询。我们将使用相同的项目文件夹的工作。
步骤1 -编辑架构
架构文件已经有
student 字段。让我们添加一个字段学院并定义其类型。
type College {
   id:ID!
   name:String
   location:String
   rating:float
}
type Student {
   id:ID!
   firstName:String
   lastName:String
   fullName:String
   college:College
}
步骤2 -修改resolver.js
我们需要添加一个大学解析器函数,如下所示。学院解析器功能会为返回的每个学生对象执行。旋转变压器的在这种情况下,根参数将包含的
学生的
const Student = {
   fullName:(root,args,context,info) => {
      return root.firstName+":"+root.lastName
   },
   college:(root) => {
      return db.colleges.get(root.collegeId);
   }
}
module.exports = {Query,Student}
致电学院收集的get方法并传递
collegeId 的每个学生的解析器返回学院。我们必须通过
collegeId 学生与大学之间的关联关系
步骤3 -测试应用程序
打开终端窗口并导航到项目文件夹。键入命令-npm开始。启动浏览器并输入URL的
的http://本地主机:9000/graphiql
在GraphiQL窗口中输入以下查询-
{
   students{
      id
      firstName
      college {
         id
         name
         location
         rating
      }
   }
}
时,如下面给出的对查询的响应-
{
   "data": {
      "students": [
         {
            "id": "S1001",
            "firstName": "Mohtashim",
            "college": {
               "id": "col-102",
               "name": "CUSAT",
               "location": "Kerala",
               "rating": 4.5
            }
         },

         {
            "id": "S1002",
            "firstName": "Kannan",
            "college": {
               "id": "col-101",
               "name": "AMU",
               "location": "Uttar Pradesh",
               "rating": 5
            }
         },

         {
            "id": "S1003",
            "firstName": "Kiran",
            "college": {
               "id": "col-101",
               "name": "AMU",
               "location": "Uttar Pradesh",
               "rating": 5
            }
         }
      ]
   }
}
什么是查询变量?
如果查询有一些动态值要传递,则使用变量表示这些动态值。因此,查询可以由客户端应用程序重用。
插图
让我们创建一个简单的应用程序,了解查询变量。
步骤1 -编辑模式文件
添加的
sayHello的的字段,它需要一个字符串参数,并返回字符串。名称值将是在客户端应用程序的动态。
type Query {
   sayHello(name:String!):String
}
步骤2 -编辑resolver.js文件
添加一个
sayHello 解析器,它的参数如下-
sayHello:(root,args,context,info) => `Hi ${args.name} GraphQL server says Hello to you!!`
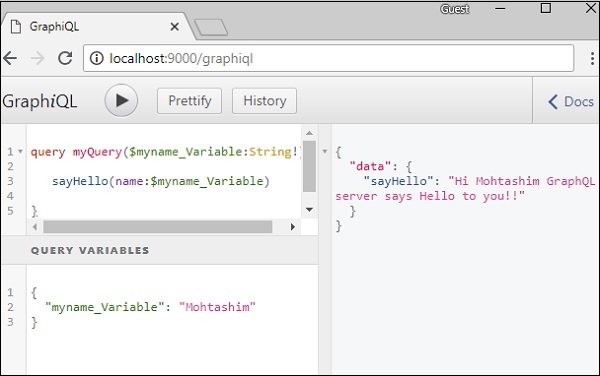
步骤3 -声明查询变量在GraphiQL
一个变量声明与$后面是变量的名称。例如:。$ myname_Variable
在$ myname_Variable声明,它必须带有命名查询语法中使用。该查询,更改为MyQuery取字符串值,并将其传递到sayHello的如下所示-
query myQuery($myname_Variable:String!) {
   sayHello(name:$myname_Variable)
}
设为在GraphiQL客户端的查询变量部JSON对象为$ myname_Variable值。
{
   "myname_Variable": "Mohtashim"
}
上面的代码的输出是如下-
{
   "data": {
      "sayHello": "Hi Mohtashim GraphQL server says Hello to you!!"
   }
}
如何在枚举中使用查询变量
让我们来看看如何使用查询变量时场参数为
枚举类型
步骤 1-编辑 schema.graphql 文件
enum ColorType {
   RED
   BLUE
   GREEN
}
type Query {
   setFavouriteColor(color:ColorType):String
}
在
setFavouriteColor 的函数以枚举作为输入,并返回字符串值。
步骤2 -编辑resolvers.js文件
分解器功能的
setFavouriteColor 的需要的
根和
ARGS 的。传递给函数在运行时的枚举值可通过args参数进行访问。
setFavouriteColor:(root,args) => {
   return  "Your Fav Color is :"+args.color;
}
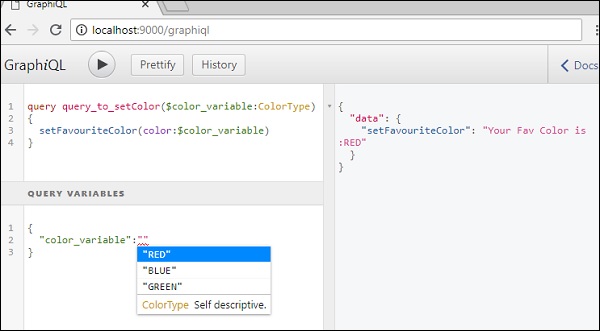
第 3 步-在 GraphiQL 中声明一个查询变量
该查询名为
query_to_setColor,它采用 ColorType 名称为 color_variable 的变量。这个变量被传递给方法setFavouriteColor。
query query_to_setColor($color_variable:ColorType) {
   setFavouriteColor(color:$color_variable)
}
在GraphiQL的查询可变部,键入如下代码-
{
   "color_variable":"RED"
}
的响应如下所示-
{
   "data": {
      "setFavouriteColor": "Your Fav Color is: RED"
   }
}