photoGap 相机拍照
从相机拍摄照片
在前面的部分中,我们了解了 UI、存储、地理定位、媒体和设备加速度计。在本节中,我们将了解相机以及如何使用 PhoneGap 拍照。每个人都喜欢拍照,几乎每个设备都有某种板载摄像头。在这个完整的部分中,我们将看看相机。首先,我们将了解如何设置图像选项,例如图像质量。我们将从相机获取图像,返回缩略图,然后从操作系统中现有的图像库中选择一张图片。
现在,我们将使用设备硬件,即板载相机。通过使用 PhoneGap,我们将访问该摄像头。这些是我们在代码实现过程中将查看的以下图片选项。
1) 质量
质量定义为照片是否将被压缩。因此,如果照片将被压缩意味着它将使用更少的存储空间,但它的质量会降低。本质上,我们将有一个 JSON 类似颜色的像素,这可能会导致照片看起来像素化或失焦。所以,50 将被添加到一些压缩,我们可以增加到 80,这是一种常见的数字,可以为我们提供更高质量的照片。
2) 目的地类型
目的地类型将告诉我们在拍摄照片时将如何处理它。我们将拍摄我们的照片或照片的 URI(通用资源指示器)路径。
3) 编码类型
PhoneGap 支持两种编码类型,即、JPEG 和 PNG。如果我们的设备支持拍摄 PNG 照片,我们可以使用相机编码类型 JPEG 或使用相机编码类型 PNG。我们可以拍摄两种格式的好照片。我们可能有某种特殊的原因将其从 JPEG 更改为 PNG。
4) 宽度和高度
高度和宽度定义了图片的大小,即照片拍摄后有多大。高度和宽度是PhoneGap中拍照最重要的选项之一。
5) Media type
该选项用于定义媒体类型.它可以是图片、视频等。我们将使用 a camera.MediaType.Picture 作为媒体类型。
我们将使用这些选项并使用以下步骤:
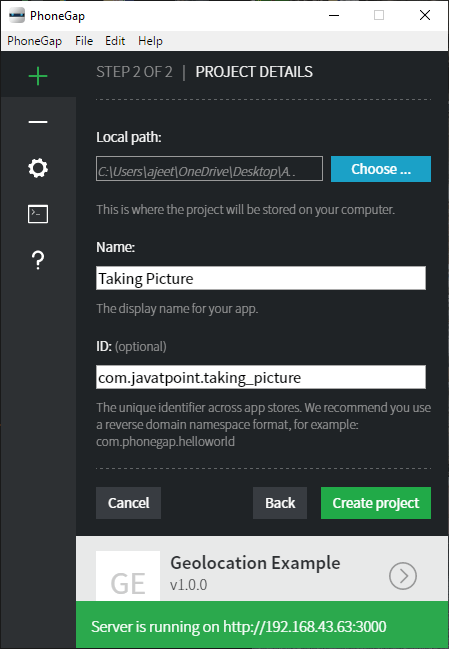
1) 创建一个新项目
首先,我们将使用一个空白模板创建一个新的PhoneGap 项目。如果您不知道如何使用空白模板创建应用程序,请查看 PhoneGap 项目 链接。
2) 创建用户界面
现在,我们将使用index.html 文件的正文部分,制作一个用于拍照并将其显示在显示器或屏幕上的用户界面。此 UI 包含用于显示图片的按钮和图像区域。正文部分将被编码为:
<body>
        <img id="imgArea" />
        <button id="btnTakePicture">Say Cheese!</button>
        <button id="btnClear">Clear Photo</button>
        <script type="text/javascript" src="cordova.js"></script>
</body>

3) 创建window.onload 函数
现在,我们将创建 window.onload 函数。在此函数中,我们将获取两个按钮并将侦听器附加到它们。第一个按钮将调用 takepic 函数,第二个按钮调用匿名函数。在这个匿名函数中,我们将通过以下方式使用Id获取图像区域并将其源设置为null:
window.onload=function()
        {
            document.getElementById('btnTakePicture').addEventListener('click', takePic);
            document.getElementById('btnClear').addEventListener('click',function(){
               document.getElementById('imgArea').src="";
});
4) 创建 takePic 回调函数
现在,我们将创建 takePic 回调函数。在这个函数中,我们将设置我们上面讨论过的所有选项。我们将质量设置为 80,编码类型为 JPEG,媒体类型为图片,宽度为 1200,高度为 800,目标类型为文件 URI。我们将通过以下方式调用具有成功、失败、选项参数的导航器的 getPicture 函数:
function takePic(e)
        {
            var options = {
                quality: 80,
                destinationType: Camera.DestinationType.FILE_URI,
                encodingType: Camera.EncodingType.JPEG,
                mediaType: Camera.MediaType.PICTURE,
                targetWidth: 1200,
                targetHeight: 800
            }
            navigator.camera.getPicture(success, fail, options);
}
5) 创建成功和失败回调函数
失败回调函数只包含一个定义错误的警报消息。成功回调函数将图像作为参数。在这个函数中,我们将获取图像区域并在其中设置图像。
function success(thePicture)
{
            var image = document.getElementById('imgArea');
            //alert(thePicture);
            image.src = thePicture;
}

function fail(e)
{
            alert("Image failed: " + e.message);
}
现在,我们已准备好运行我们的项目。
完整代码
<!DOCTYPE html>
<html>
    <head>
        <meta charset="utf-8">
        <meta name="viewport" content="initial-scale=1, maximum-scale=1, user-scalable=no, width=device-width">
        <link rel="stylesheet" href="http://code.jquery.com/mobile/1.4.5/jquery.mobile-1.4.5.min.css" />
        <script src="http://code.jquery.com/jquery-1.11.1.min.js"></script>
        <script src="http://code.jquery.com/mobile/1.4.5/jquery.mobile-1.4.5.min.js"></script>
        <style>
            #imgArea
            {
                width: 100%;
            }
        </style>
        <script>
        window.onload=function()
        {
            document.getElementById('btnTakePicture').addEventListener('click', takePic);
            document.getElementById('btnClear').addEventListener('click',function(){
               document.getElementById('imgArea').src="";
            });

        }

        function takePic(e)
        {
            var options = {
                quality: 80,
                destinationType: Camera.DestinationType.FILE_URI,
                encodingType: Camera.EncodingType.JPEG,
                mediaType: Camera.MediaType.PICTURE,
                targetWidth: 1200,
                targetHeight: 800
            }
            navigator.camera.getPicture(success,fail, options);
        }

        function success(thePicture)
        {
            var image = document.getElementById('imgArea');
            //alert(thePicture);
            image.src = thePicture;
        }

        function fail(e)
        {
            alert("Image failed: " + e.message);
        }
        </script>
        <title>Pic Options</title>
    </head>
    <body>
        <img id="imgArea" />
        <button id="btnTakePicture">Say Cheese!</button>
        <button id="btnClear">Clear Photo</button>
        <script type="text/javascript" src="cordova.js"></script>
    </body>
</html>
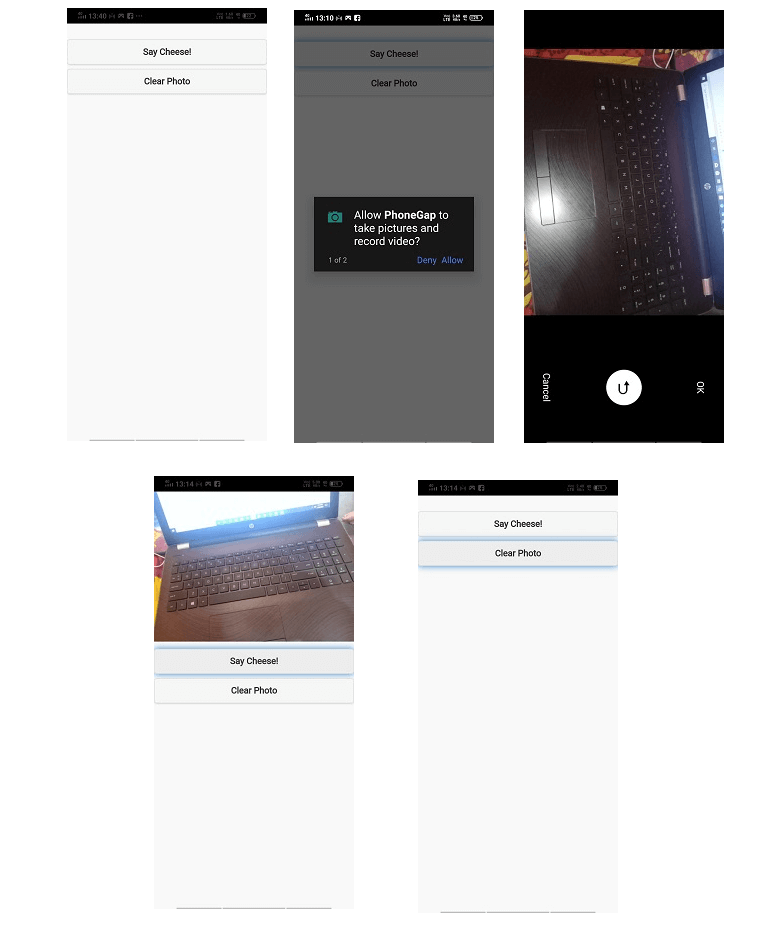
输出